


We’ve all been there. You wake up, walk into the kitchen, and instead of a clean prep surface, you’re greeted by a toaster, an air fryer, a coffee maker, and a blender, all fighting for the same 18 inches of counter space.
It’s not a storage failure. It’s an appliance strategy problem. And we’ve spent a lot of time figuring out what actually works in tight spaces.
According to a January 2025 survey of 1,000 U.S. homeowners by Eagle Woodworking, 62% listed clearing countertop clutter as a top priority, and 58% said it causes them daily stress. You’re not being fussy; that frustration is completely valid.
This guide covers 16 real methods. Some cost nothing. Some cost under $100. A few require a weekend afternoon. All of them work.Look, if you’re renting and can’t drill a single hole, about a third of this list still applies to you directly. We’ve flagged each idea by effort level.
1. We Install an Appliance Garage, Our Favorite Permanent Fix
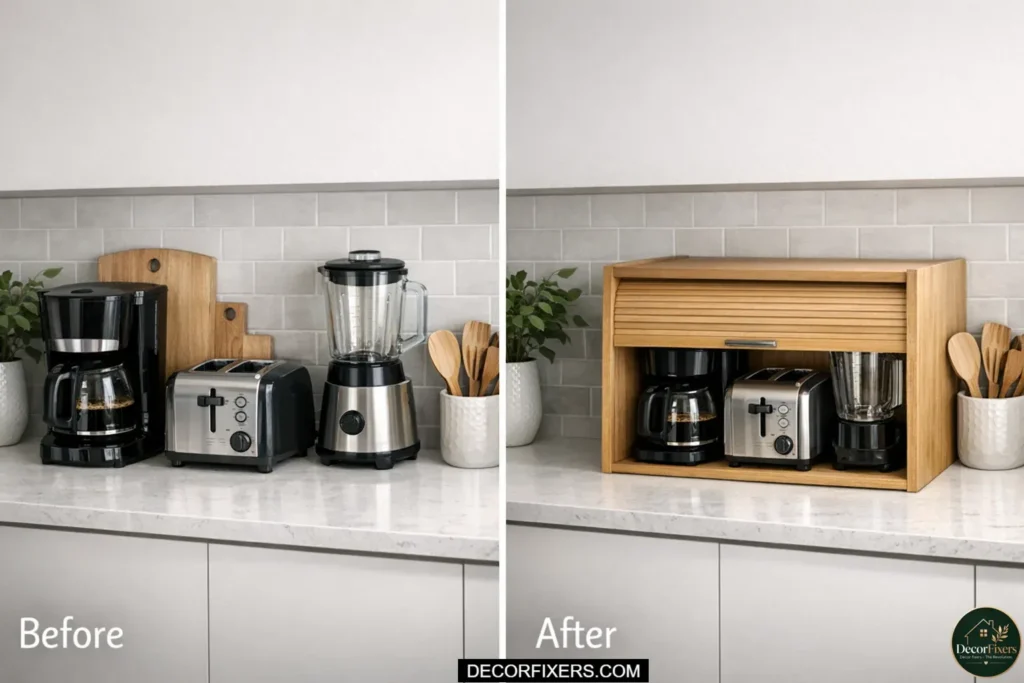
An appliance garage is a cabinet built into your counter backsplash area, typically fitted with a tambour (roll-up) or bi-fold door. We’ve retrofitted upper cabinets with these in dozens of small kitchens, and the result is always the same: the counter feels twice as big.
The Omega National Products Tambour Door Appliance Garage (available on Amazon) fits standard upper cabinets and installs without major construction. You slide the door up, pull out the coffee maker, done.
One safety note we always give: never use an appliance garage for active heat-generating appliances like toaster ovens or air fryers unless the unit has ventilation cutouts. Trapped heat is a real issue that most articles simply don’t mention.
2. We Use Pull-Out Shelf Organizers for Zero-Demo Storage
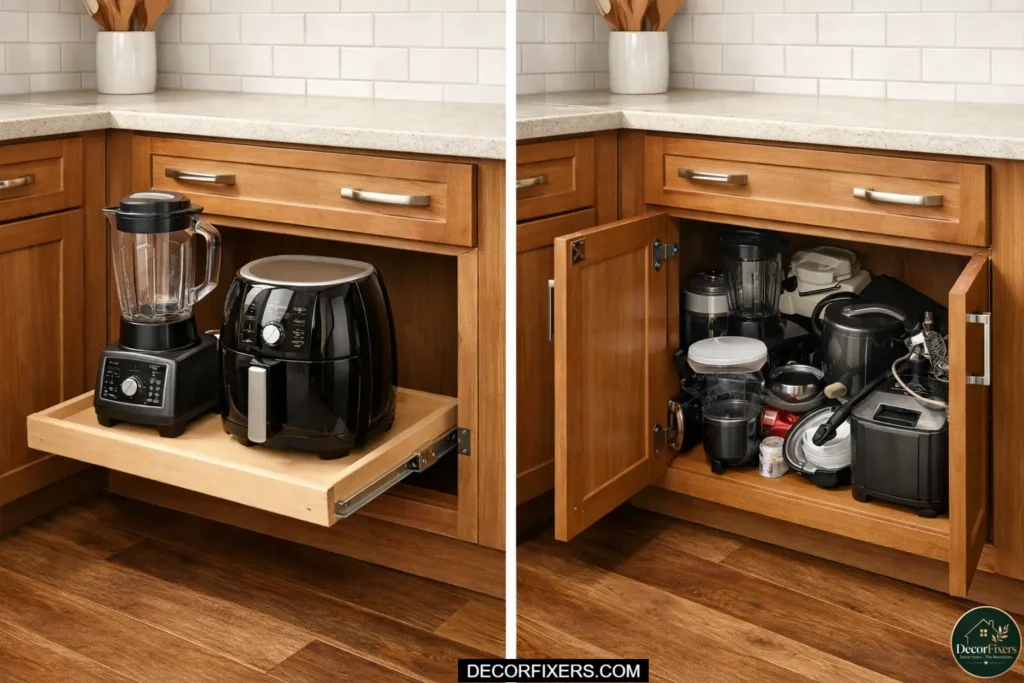
If you’re renting or just not ready to pull out a drill, the Hold N’ Storage pull-out cabinet organizer ($99.99 on Amazon) is the move we recommend most. It installs in an existing lower cabinet and converts it into a slide-out appliance station.
You pull the shelf out toward you, grab the blender, and use it at counter height. No kneeling. No digging. It’s a small thing, but it completely changes behavior.
One caveat: check the weight capacity before loading. Most standard units support 20–50 lbs. Heavy appliances like a Kitchen Aid stand mixer may exceed that.
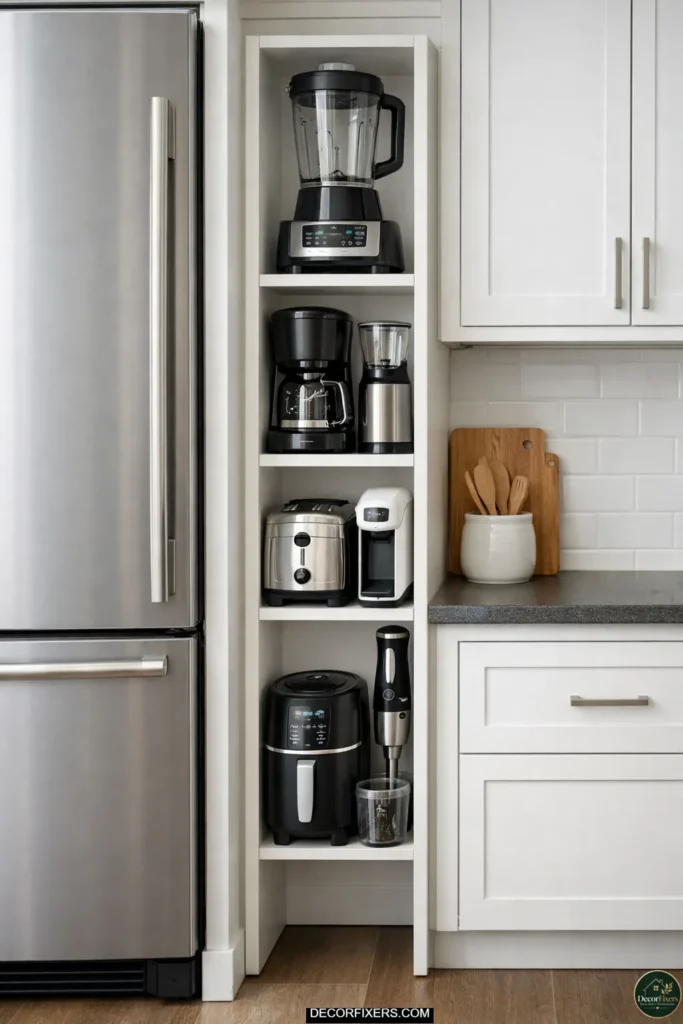
3. I Turn an IKEA SEKTION Cabinet Into an Appliance Pantry
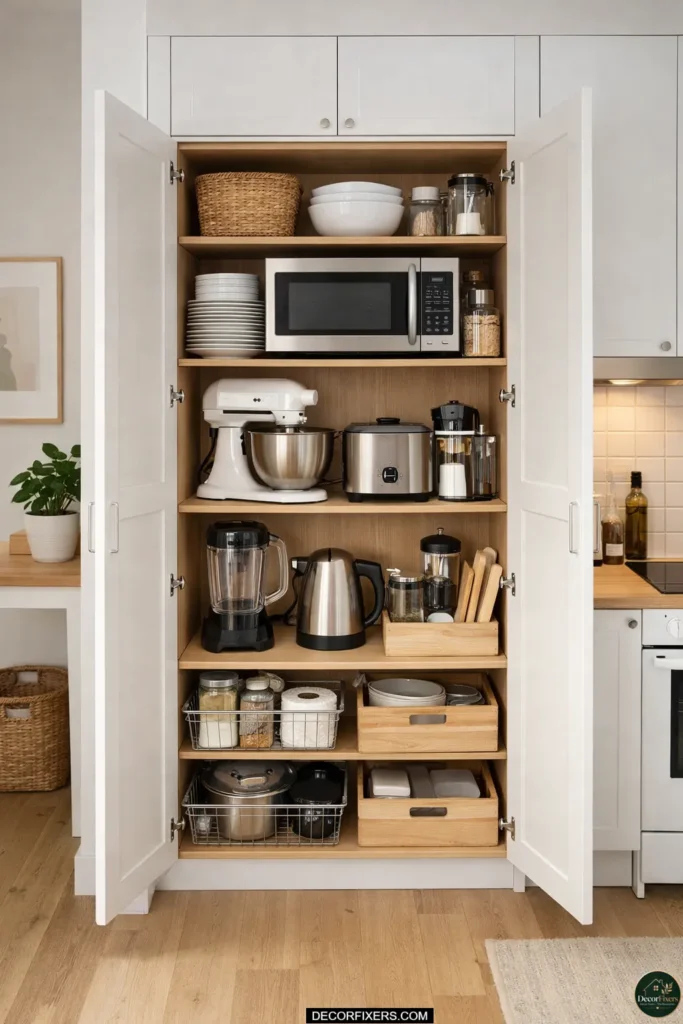
This is one of my personal favorites for budget full-overhauls. The IKEA SEKTION cabinet system lets you build a dedicated appliance pantry column, tall enough for a full-sized pantry, customizable with shelves, and cheap enough to fit in a realistic budget. (Related: Budget Open Plan Kitchen Ideas for Very Small Spaces)
I’ve used this in studio apartments where the kitchen has exactly zero dedicated storage. You pick a wall corner, anchor a SEKTION frame, add adjustable shelves, and suddenly you have a proper appliance station.
Design tip: Choose a door finish that matches your existing cabinetry. The visual continuity makes the whole kitchen feel intentional, not makeshift.
4. We Hide the Coffee Maker in a Cabinet With a Slide-Out Drawer
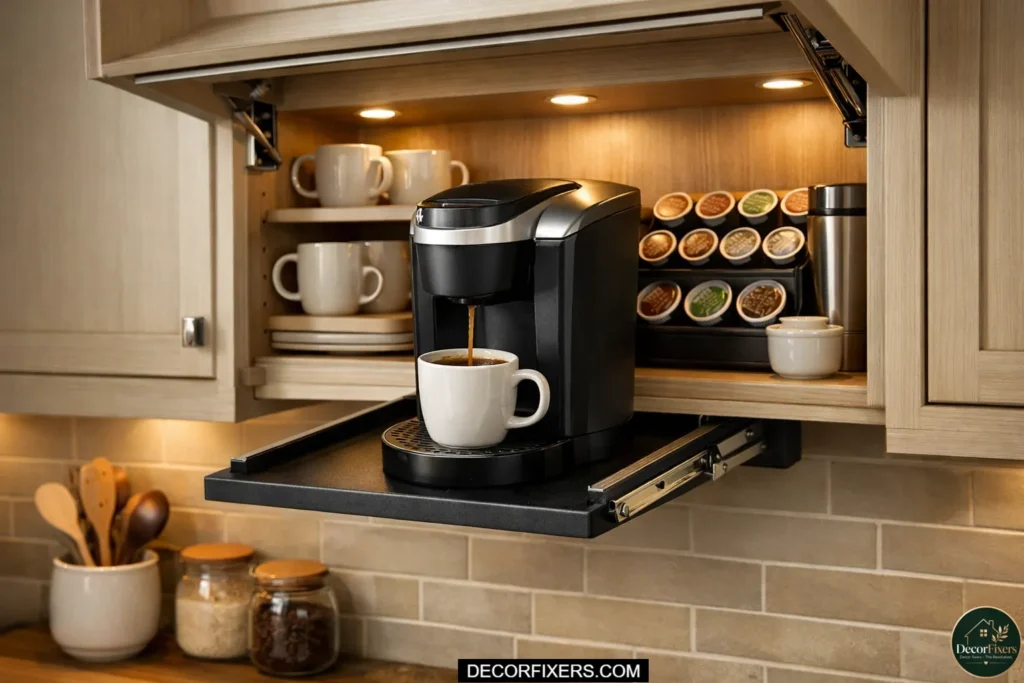
Here’s the thing: the coffee maker is probably the one appliance most people use every single day. Hiding it completely in a closed cabinet is frustrating if you have to move three things just to access it.
The solution we use is a cabinet with a slide-out drawer tray, a shelf that pulls out horizontally, so the coffee maker sits at the back of the cabinet but glides forward to the front when you need it. The drawer also creates ventilation, so heat doesn’t get trapped.
Some cabinet builders offer this as a custom upgrade. If you can’t install a custom version, look for pull-out tray bases from CliqStudios or similar kitchen cabinet companies that ship flat-pack.
5. I Use a Rolling Kitchen Cart as a Mobile Appliance Station
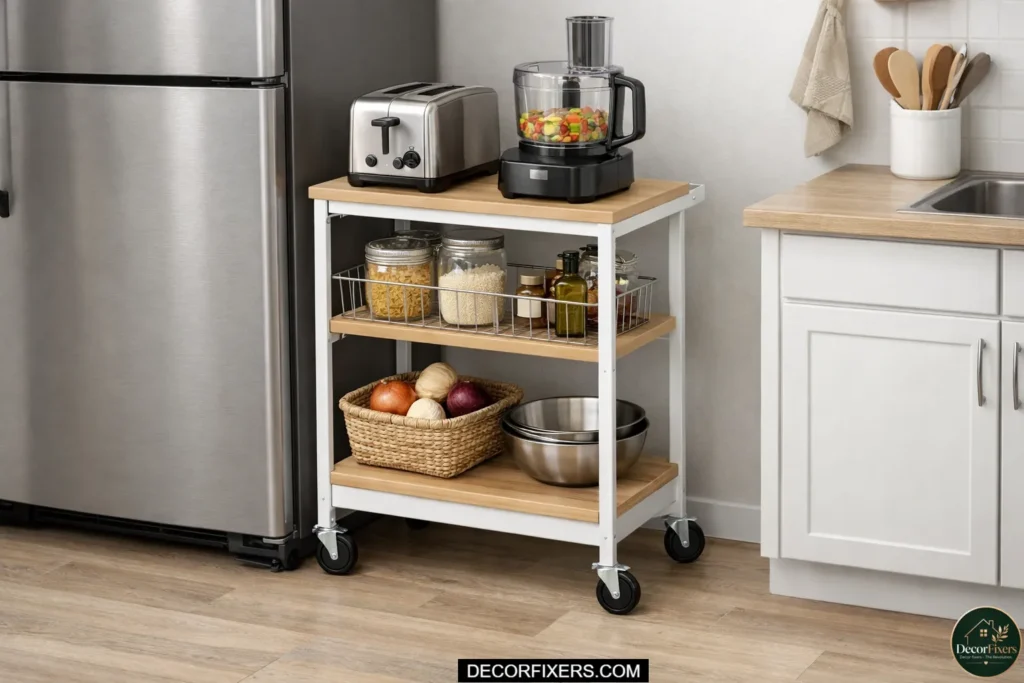
Not enough people think about this one. A slim rolling cart solves two problems at once: it hides your appliances and adds prep surface area.
I keep our toaster and a small food processor on a rolling cart that parks beside the refrigerator. When I need counter space, I roll the cart aside. When I need the toaster, I roll it to the counter and plug it in. It’s completely renter-friendly, requires no installation, and can move with us whenever we leave.
The Three Hio Rolling Kitchen Microwave Cart (available on Amazon) is a solid, affordable option; it has lockable wheels, a drawer, and shelving for under $80.
Quick Comparison:
| Option | Best For | Key Benefit | Limitation |
| Appliance Garage | Daily-use appliances | Keeps items plugged in & hidden | Takes counter space |
| Pull-Out Shelf Organizer | Renters, no renovation | No drilling, under $100 | Limited weight capacity |
| IKEA SEKTION Pantry | Budget full makeovers | Customizable, affordable | Requires assembly |
| Appliance Cover / Basket | Renters, zero budget | Instant clutter disguise | Doesn’t actually hide the item |
| Rolling Kitchen Cart | Flexible/movable storage | Doubles as a prep station | Needs floor clearance |
6. We Try the ‘Furniture Armoire’ Method for Eclectic Kitchens
This one gets overlooked. If your kitchen has a corner or a wall nook, a freestanding armoire or tall cabinet from another room can become an appliance storage unit. We’ve used repurposed wardrobes, vintage hutches, and even oversized pantry cabinets this way.
It works especially well in bohemian, farmhouse, or eclectic spaces where the extra furniture piece reads as intentional rather than random.
Quick note: Make sure the interior has power access nearby. Appliances that live in an armoire but have no outlet within reach will never get used, and then you’ve just created expensive clutter.
7. I Use Appliance Covers to Disguise What Can’t Be Hidden
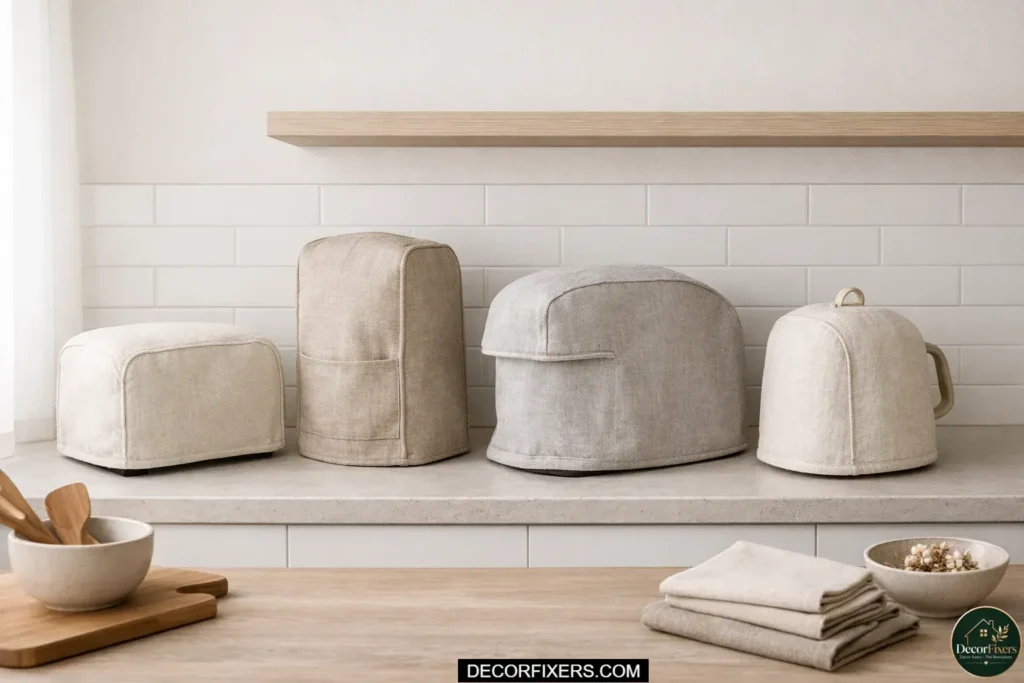
Or maybe I should say it this way: not every appliance can be stored away. Some kitchens, especially studio rentals, simply don’t have cabinet space to spare. For those situations, we use appliance covers to reduce visual noise.
Fabric covers for air fryers run about $15.99 on Amazon. Etsy carries custom linen and cotton covers in farmhouse, neutral, and maximalist prints. They won’t actually hide the appliance, but they dramatically reduce the visual clutter of a counter full of mismatched gadgets.
Think of it as styling, not storage. It works.
8. We Convert a Corner Cabinet With a Le Mans or Comfort Corner Accessory
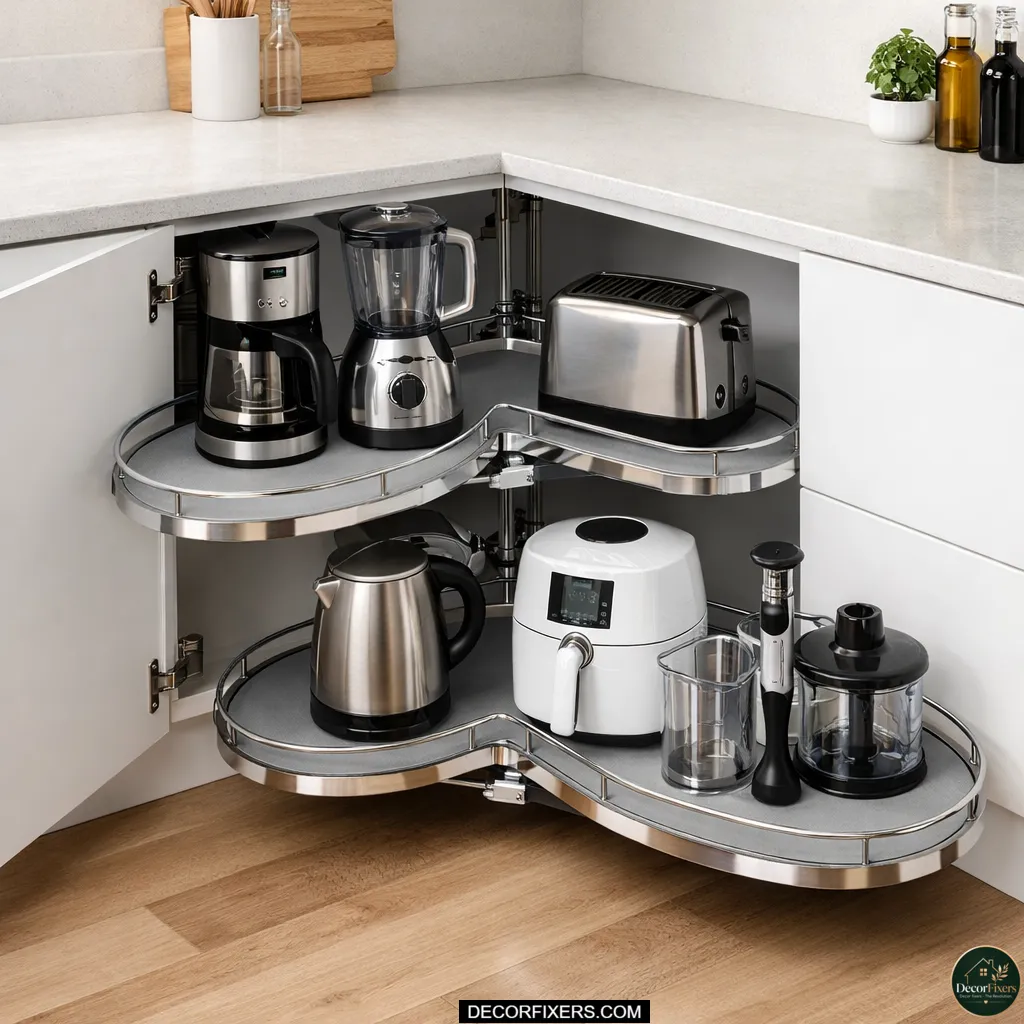
Blind corner cabinets are dead space in most small kitchens. We’ve converted them into legitimate appliance storage by installing Le Mans or Comfort Corner swivel accessories, mechanisms that let the interior shelves swing outward so you can actually reach what’s inside without dislocating a shoulder.
I’ve seen conflicting data on weight limits across brands; some manufacturers list 30 lbs per shelf, others go up to 65 lbs. My read: verify the spec before loading a stand mixer or cast iron appliance, and go by the manufacturer’s sheet, not the marketing copy.
It’s a bit more installation effort than most ideas on this list. But for a kitchen with nothing but blind corners, it changes everything.
9. I Build a Dedicated ‘Appliance Zone’ in a Deep Base Cabinet
This is the method most interior designers quietly recommend. Instead of scattering appliances across multiple cabinets, we pick one deep base cabinet, usually the one closest to the prep area, and dedicate it entirely to appliances.
We remove the middle shelf, giving vertical clearance for taller items like stand mixers and Instant Pots. The top shelf holds lighter items, mugs, and travel tumblers. The appliance zone becomes a single mental location: everything lives there, everything’s retrieved from there.
The reduction in mental load is real. When everything has one home, the kitchen feels calmer.
| Featured Snippet: How to Create an Appliance Zone in One Cabinet To hide appliances in one cabinet zone, follow these steps: 1. Choose the deepest base cabinet nearest your prep area. 2. Remove the middle shelf to create vertical clearance. 3. Group appliances by frequency, daily use at the front, occasional use at the back. 4. Install a pull-out shelf organizer for easy access. 5. Place a power strip inside if local codes allow. |
10. We Use Vertical Nooks Beside the Fridge

The gap beside your refrigerator, even one that’s only 8–12 inches wide, is prime real estate. We’ve turned these slim vertical spaces into built-in appliance bays for narrow items like blenders, stick vacuums for kitchen mess, and even small charging drawers.
If the space is open and unfinished, a slim tower shelf with a door can fill it cleanly. If it’s too narrow for a standard shelf unit, custom vertical cubby inserts are available from most kitchen cabinet suppliers.
This idea works best when you have 10+ inches of clearance. Under that, it’s usually only useful for flat items like cutting boards, not appliances.
11. I Hang Appliances Using Under-Cabinet Mounts
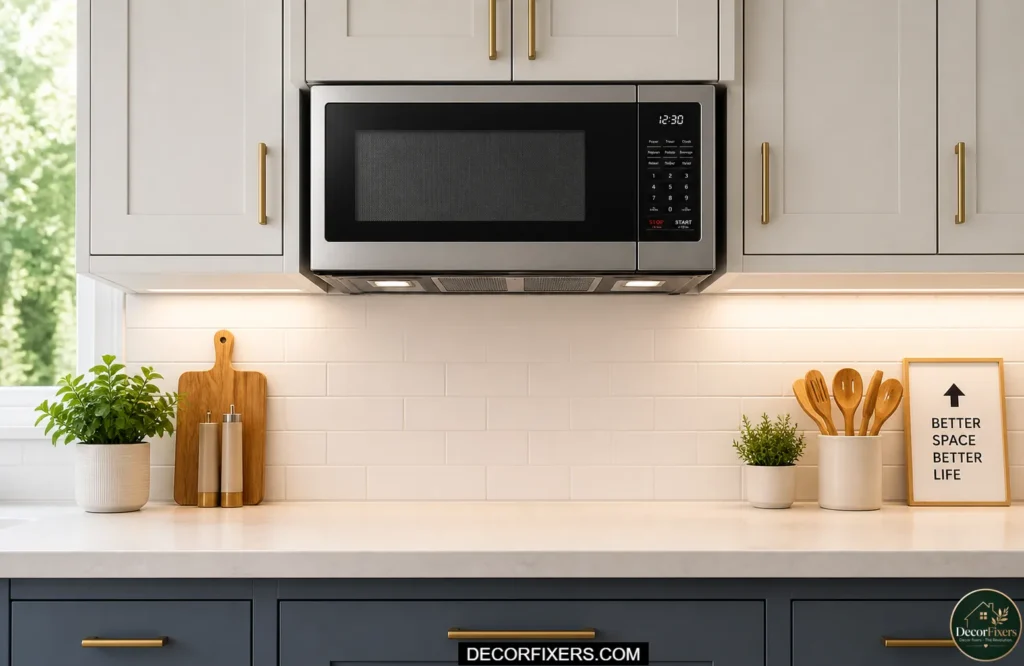
Some appliances are built to be mounted, specifically toasters and microwaves. We use under-cabinet mounting brackets to move these off the counter entirely and attach them to the underside of upper cabinets.
This is especially effective for microwaves, which are usually the largest counter occupants. An under-cabinet microwave mount can free up a full square foot of workspace.
Renter warning: mounting brackets usually require screws into the cabinet underside. Check your lease. Some landlords allow it, some don’t.
12. We Use Rattan Baskets and Lidded Bins for Open-Shelf Appliance Concealment
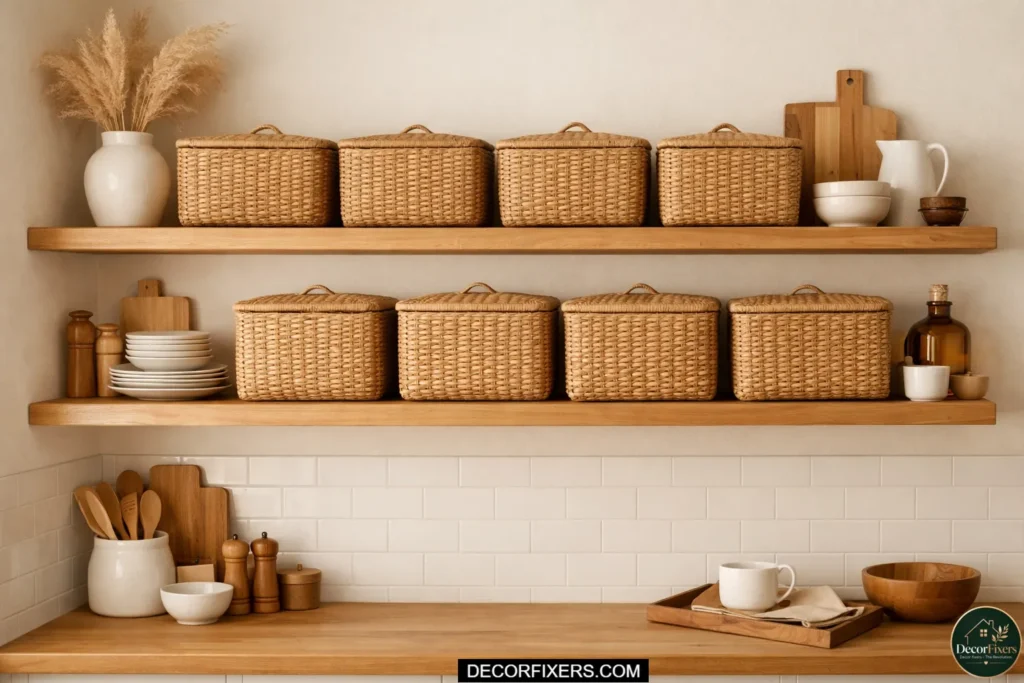
Open shelving is a popular small kitchen solution, but open shelves with visible appliances can feel just as chaotic as a cluttered counter.
We group appliances into matching lidded rattan baskets or bins. The basket hides the appliance, the lid controls the visual noise, and the matching material makes the shelf look intentional. It’s styled storage, not just practical storage.
This approach works particularly well for frequently swapped items, port filter accessories, hand mixer attachments, or bread machine paddles, that aren’t the appliance itself but still create visual clutter when left loose on a shelf.
13. I Build a Hidden Coffee and Toaster Station Behind Bi-Fold Doors
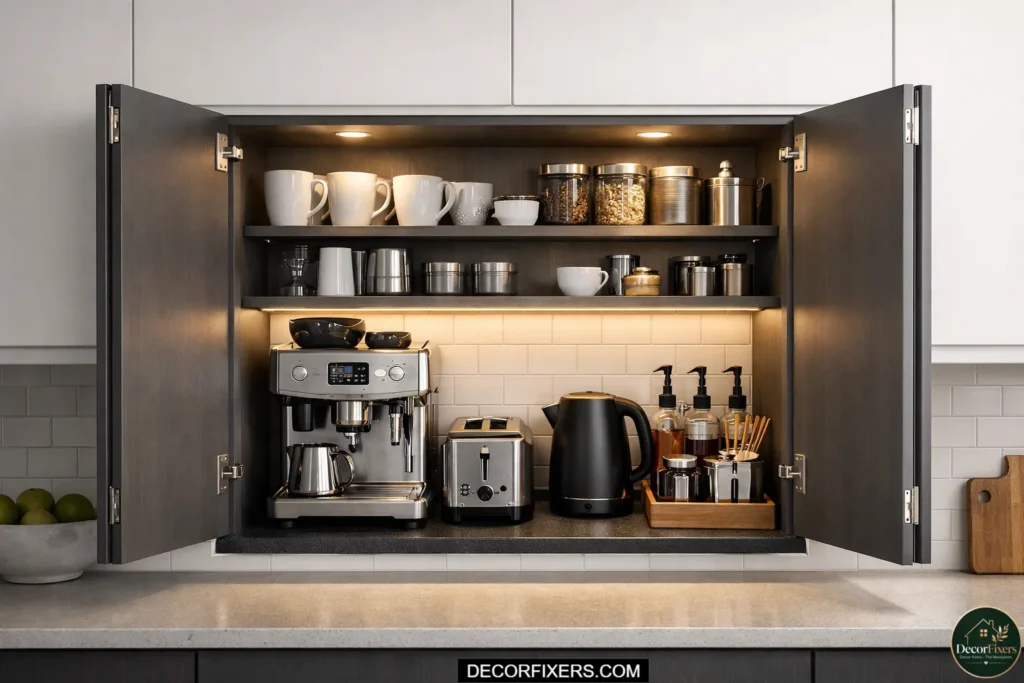
This is the version of the appliance garage that doesn’t require tambour door hardware. A standard upper cabinet fitted with bi-fold doors opens wide enough to access a full coffee station, maker, pods, and mugs, and closes completely flat when not in use.
We’ve done this with IKEA Section wall cabinets paired with custom bi-fold door conversions. The cost stays low, and the result looks like intentional cabinetry rather than a storage workaround.
One thing we always do: add a small LED strip light inside so the station is actually pleasant to use at 6 a.m. It sounds minor. It isn’t.
14. We Use a Pop-Up Shelf for the Stand Mixer
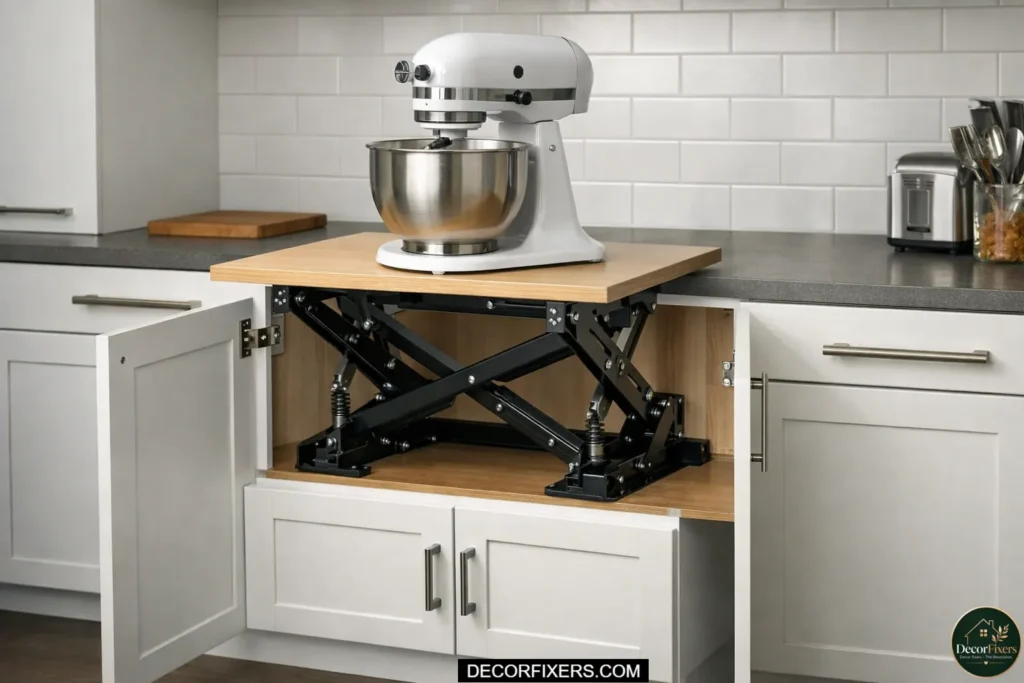
Stand mixers, KitchenAid especially, are heavy, awkward to lift, and used frequently enough that pulling one from a deep cabinet is genuinely painful. The solution is a pop-up mixer shelf: a spring-loaded platform inside a base cabinet that lets you lift the mixer to counter height, use it, then lower it back inside.
| Featured Snippet: Appliance Garage vs. Pull-Out Shelf Organizer Appliance garage vs. pull-out shelf: An appliance garage is better suited for daily-use items (coffee maker, toaster) because it keeps them plugged in and on the counter. A pull-out shelf organizer works better for renters or tight budgets, no drilling required, and it installs in under an hour. The key difference is whether you need items always-ready vs. occasionally accessible. |
We’ve seen some sources claim pop-up shelves only work for renovation projects. That’s valid for fully built-in versions. But if you’re dealing with an existing base cabinet, aftermarket pop-up shelf kits from kitchen hardware brands like Rev-A-Shelf do exist and install without full cabinet replacement.
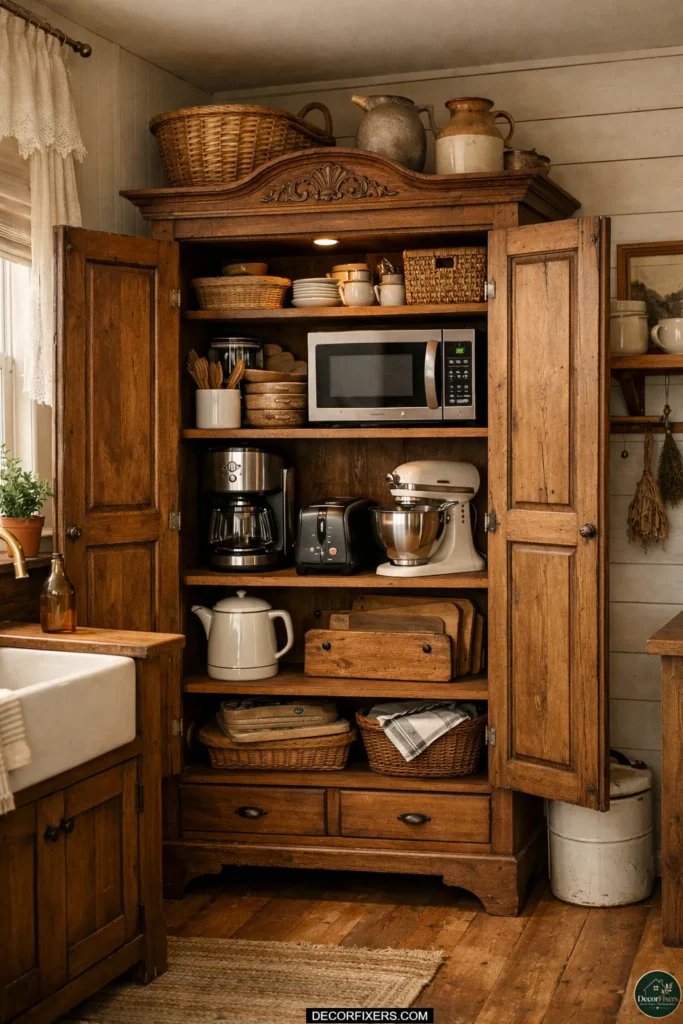
15. I Repurpose Furniture From Other Rooms
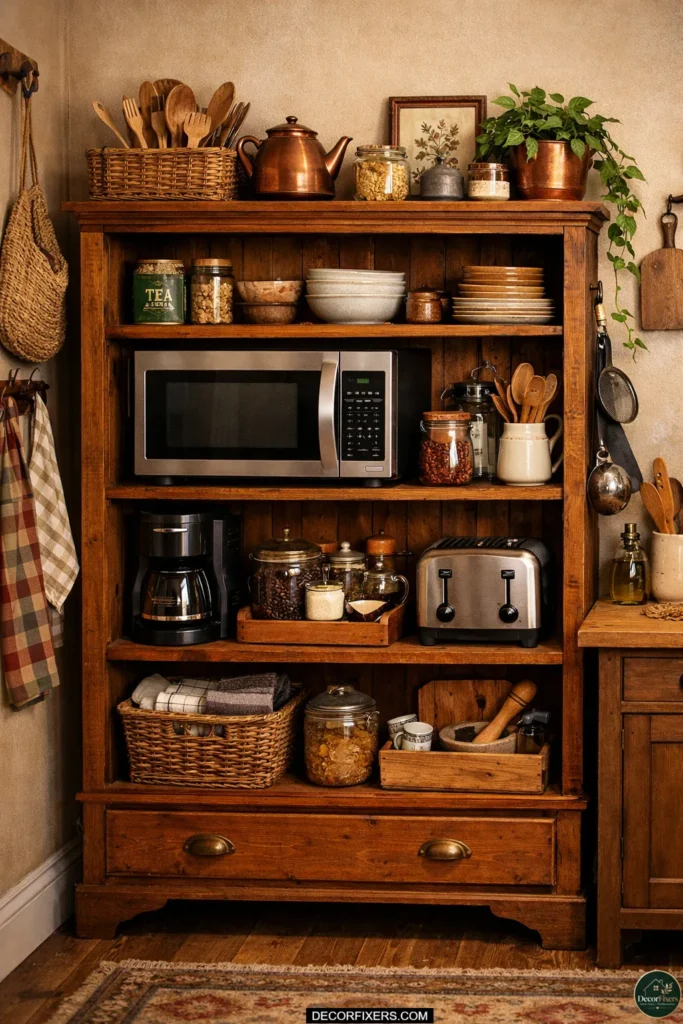
No, the body says kitchen appliances have to live in kitchen furniture. We’ve used vintage bookshelves, repurposed wine racks, and old console tables as appliance stations when the kitchen itself was completely out of storage options.
The trick is consistency; whatever piece you repurpose should either match the kitchen’s finish or stand far enough apart in style that it reads as an intentional design statement rather than an afterthought.
Some experts argue this approach makes a kitchen look cluttered in a different way. That’s valid for minimalist or Scandinavian-styled spaces. But for maximalist, farmhouse, or eclectic kitchens, mixed furniture adds warmth.
16. We Use Curtains or Fabric Panels to Close Off Open Shelving
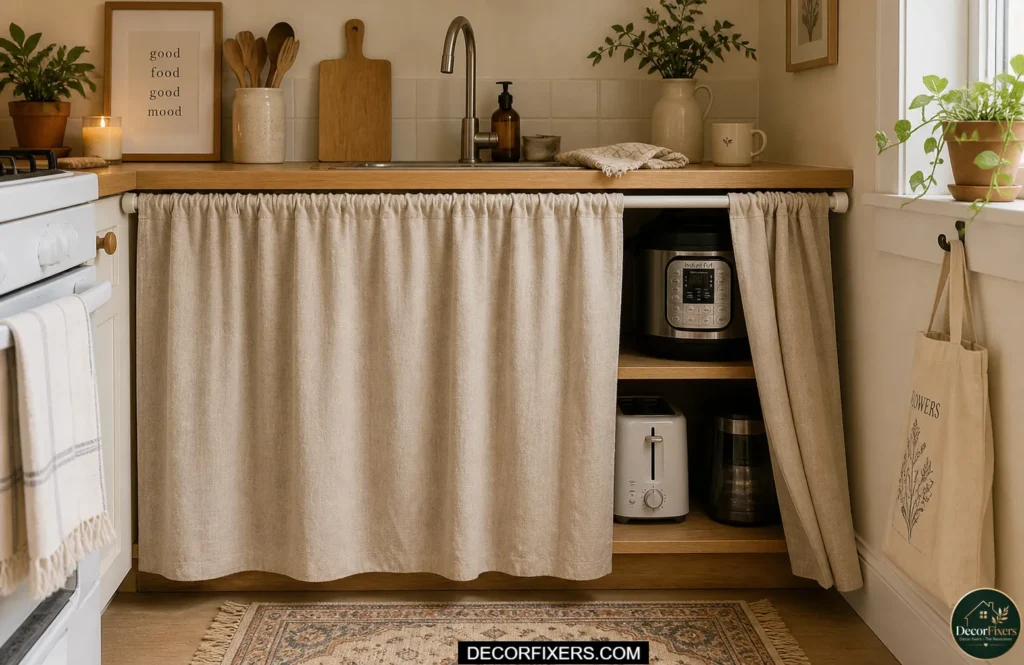
This is the lowest-effort method on this list, and completely renter-friendly. We hang a tension rod with a curtain or fabric panel across an open shelf section. It hides everything behind it, requires no drilling, and comes down when you move out.
This approach works best under a breakfast bar or along the lower third of an open shelving unit. Upper curtains can feel cramped, but a lower panel creates the impression of built-in storage.
Fabric recommendation: Use a medium-weight linen. Light fabrics billow every time a cabinet nearby opens. Heavy fabrics droop. Linen holds its shape without looking stiff.
That Most Storage Guides Skip: The Ventilation Problem
Here’s a real concern almost no guide addresses: heat and ventilation when storing active appliances in enclosed spaces. Air fryers, toaster ovens, and Instant Pots.
Storing them inside a fully enclosed appliance garage, without ventilation cutouts, and running them while the door is closed creates a genuine fire risk. We always advise: if you’re building or buying an appliance garage for heat-generating items, ensure it has ventilation slots or that the door stays open during operation.
Most people reading this are still looking for the “perfect setup.” That’s the mistake.
CONCLUSION:
I’ve worked on enough small kitchens to know this: the problem isn’t space, it’s friction. The moment it’s even slightly annoying to pull something out, you stop using that system. Then everything drifts back to the counter. I’ve seen it happen over and over.
What actually worked for me wasn’t doing everything at once. I picked one change that reduced effort immediately, usually a pull-out shelf or a dedicated appliance zone, and tested it in real daily use. If it made cooking easier, I kept it. If it didn’t, I removed it. No attachment, no overthinking.
The kitchens that stay clean aren’t the most beautiful ones. They’re the ones where access is effortless. Where the hidden option is faster than leaving something out.
If I were starting again, I wouldn’t chase aesthetics first. I’d fix accessibility first, because once that’s right, the clean look follows automatically.
So don’t try all 16 ideas. Try one that removes friction today. If it actually makes your life easier, build from there. That’s the only approach I’ve seen consistently work.
FAQs:
| Q: What’s the best way to hide appliances in a small kitchen without renovating? A: Use a pull-out cabinet shelf organizer or a rolling cart. Both require zero drilling, cost under $100, and work in rentals. Group appliances by frequency so that what you use daily stays most accessible. |
| Q: How do I store my air fryer in a small kitchen? A: Keep it on a rolling cart that parks beside the fridge, or in a ventilated lower cabinet on a pull-out tray. Never store it in a sealed appliance garage; it generates too much heat during use. |
| Q: Should I use an appliance garage or a pull-out organizer for my coffee maker? A: Appliance garage if you own your home and want the cleanest look. Pull-out organizer if you rent or want a quicker, cheaper fix. Both work; the garage just costs more and looks more built-in. |
| Q: Why does my small kitchen always feel cluttered even after I clean it? A: Countertop appliances create visual clutter even when they’re clean. Moving even two appliances into cabinet storage dramatically changes how spacious the kitchen feels, regardless of actual size. |
| Q: When should I use appliance covers instead of storing appliances away? A: When you have zero cabinet space left. Covers don’t solve the storage problem, but they reduce visual noise significantly. Use matching fabric or rattan covers for a styled, intentional look. |

Creator of DecorFixers, sharing practical home and interior ideas focused on real-life usability, simple design improvements, and budget-friendly solutions.
2 thoughts on “Hide Kitchen Appliances in Small Spaces: 16 Storage Fixes (That Actually Work)”