

I remember standing in my kitchen at 7 pm on a Tuesday, stirring pasta with one hand and mentally counting how many times that week the cooking chaos had just bled straight into the living room, dishes on the sofa arm, steam hitting the Telly, the whole space feeling like one cluttered, unfinished room that couldn’t decide what it wanted to be. Sound familiar?
If you’re living with a very small open-plan kitchen and a tight budget, the problem isn’t usually a lack of space. It’s that nobody has sat down and told you specifically what to do with the space you’ve already got, without spending £9,000 or gutting the whole place.
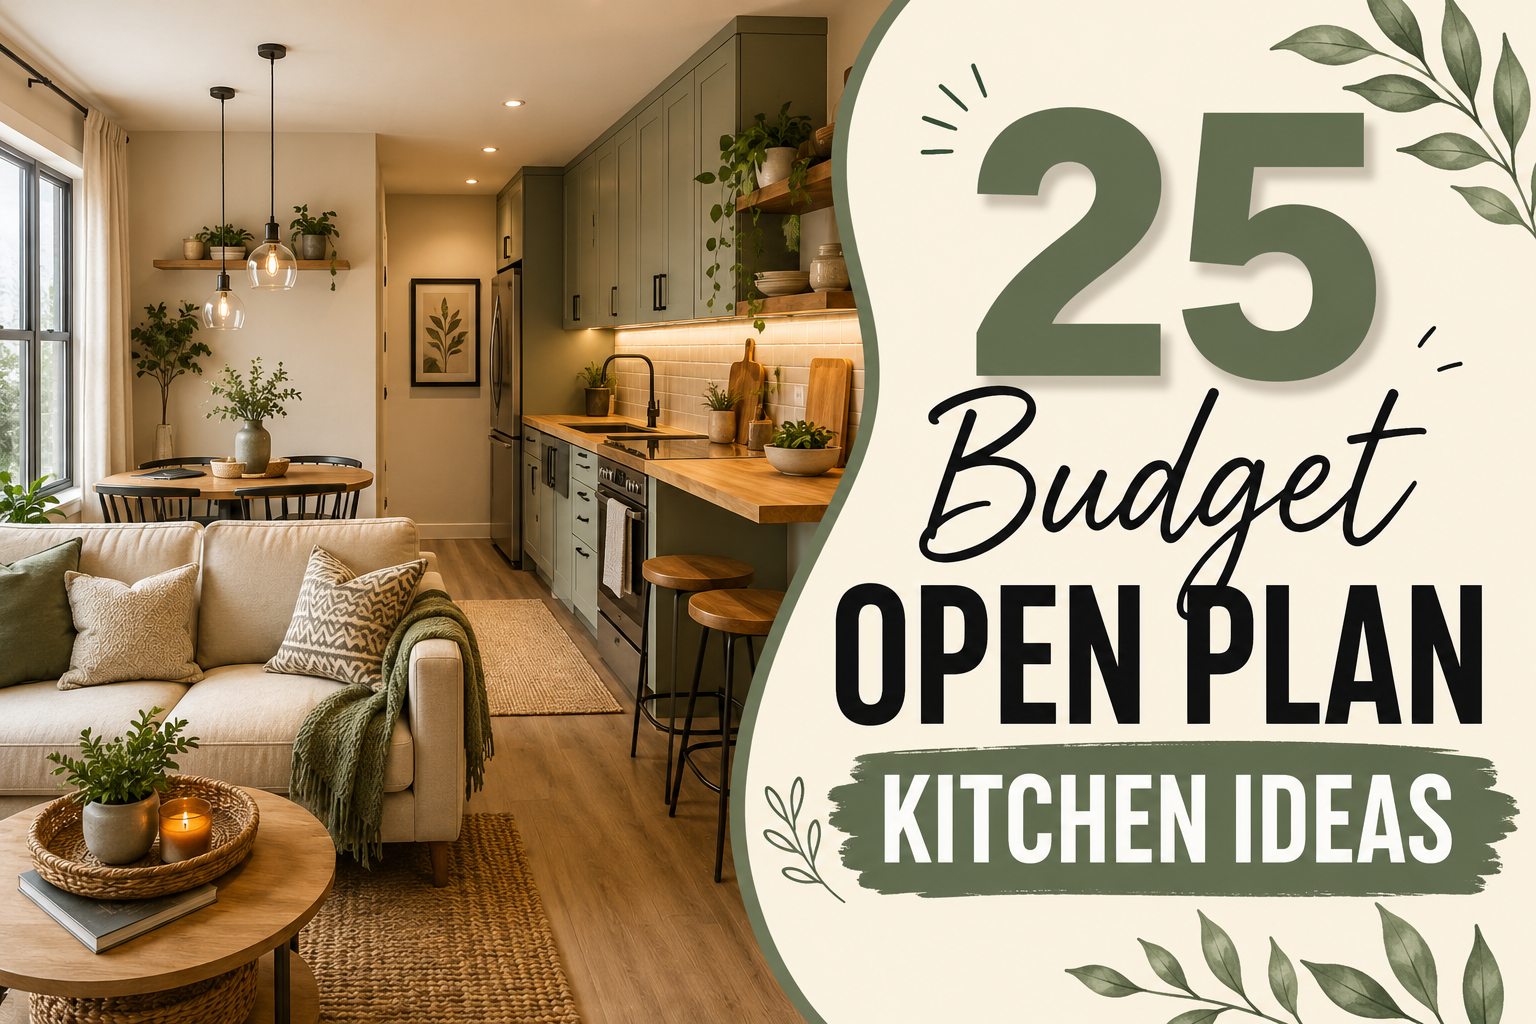
That’s exactly what this article does. No vague advice. No £10k renovation inspo. Twenty-five real, specific tricks, some under £20, none requiring a builder, that actually make a cramped open plan kitchen feel bigger, more functional, and less chaotic.
Quick Definition: Very small open-plan kitchen ideas on a budget refers to low-cost design strategies, typically under £500 in total, that zone, organize, and visually expand a combined kitchen and living space without structural work. The goal is to make the cooking area feel intentional and separate from the lounge, without building any walls or replacing any units.
1. Use a Rug to Zone Your Kitchen From the Living Area (Without Spending a Fortune)
A single rug is the most reversible, fastest, and cheapest spatial trick in open plan design. And yet it’s the one thing most budget guides forget to mention.
Here’s the thing: in a small open-plan space, the floor is one continuous surface, which is exactly why the cooking zone and the lounge feel like one chaotic room. A rug placed beneath the sofa or the coffee table creates an immediate visual boundary. Your eye reads it as a separate ‘room’ even though nothing structural has changed.
Homeowners who’ve tried this often report that it was the single most impactful change they made, costing under £80 from retailers like Dunelm or even less from IKEA. The key detail most guides skip: size matters more than pattern. Too small, and the rug looks like an afterthought. As a rule, all four sofa legs should sit on the rug, or at least the front two. Go bigger than feels comfortable on paper; it’ll look right in the room.
For the kitchen side, a washable cotton runner along the length of the worktop does double duty: it defines the cooking zone and protects the floor around £15–£25 from Dunelm.
2. Hang Pendant Lights Over the Cooking or Dining Zone to Create Instant Definition
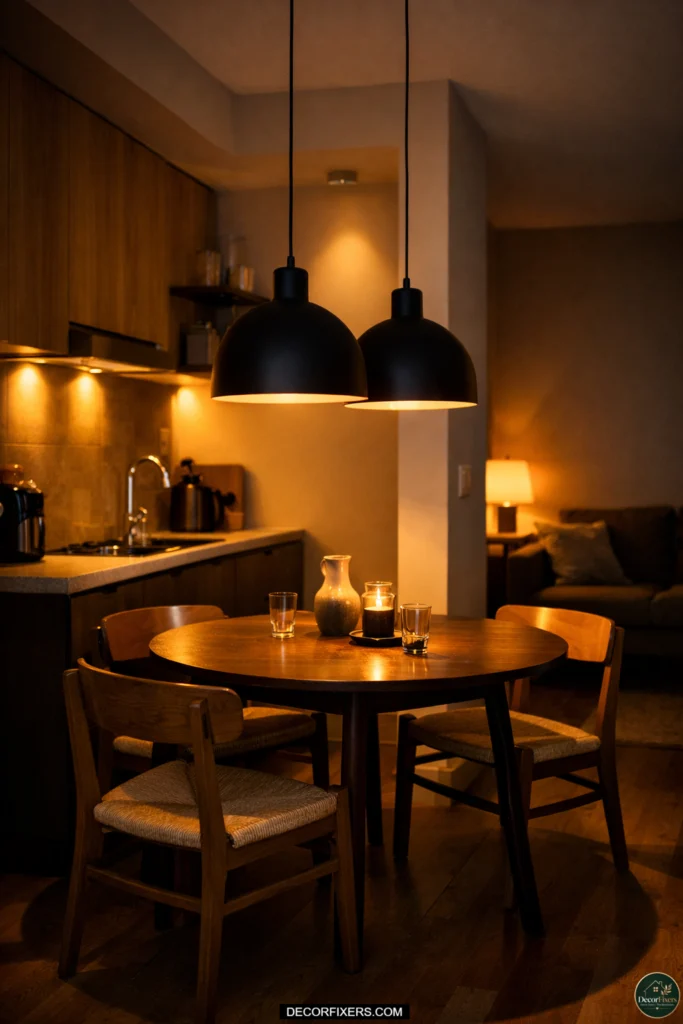
Lighting is architecture on a budget. Two pendant lights hung over a small dining table or kitchen counter tell the eye ‘This is a different zone’ more powerfully than most physical dividers.
Most open-plan kitchens in flats and terraced houses are working with a single overhead bulb, which is exactly why the space reads as one flat, undefined room. Swap that out (or add pendant lights on a plug-in cord if rewiring isn’t an option), and the spatial logic of the room shifts immediately.
Plug-in pendant lights are a renter’s best friend. No electrician required. Models from IKEA’s SUNNEBY or JÄLLVIK range start from around £12–£25 and look far more expensive than they are. Hang them at around 75cm above the table surface. That drop creates visual warmth and anchors the dining zone without eating into floor space.
3. Build a DIY Peninsula From Flat-Pack Units to Divide the Space Without Losing Light
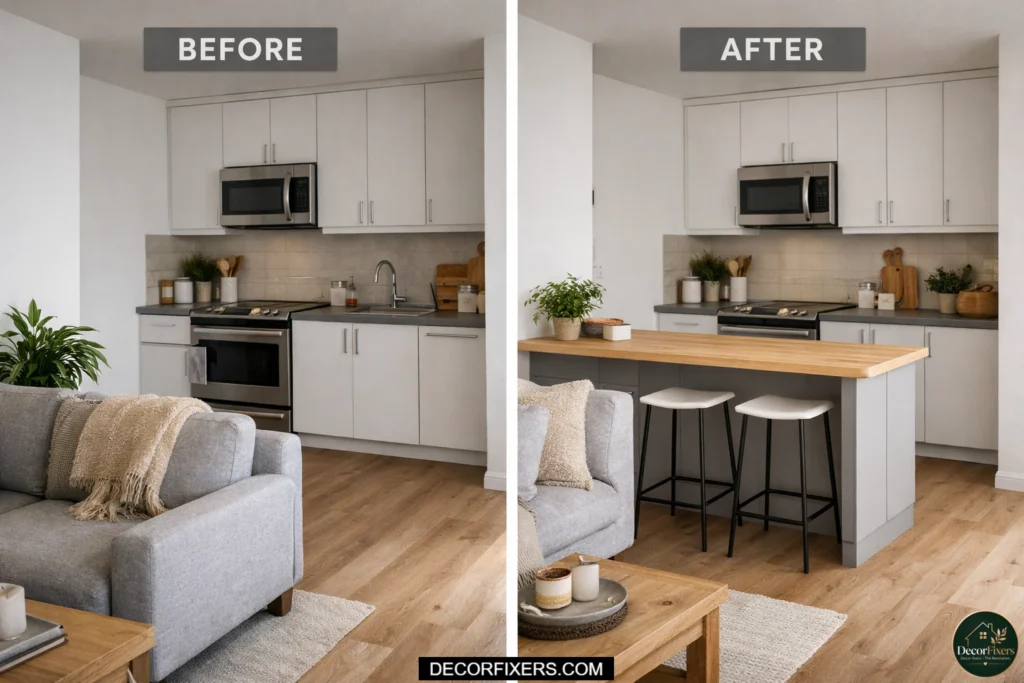
A peninsula, a counter unit fixed to one wall at one end, with the other end extending into the room, is the single most effective spatial divider for a small open-plan kitchen. Unlike a full island, it doesn’t require extra floor clearance on all four sides.
The budget version? Two IKEA METOD base cabinets side by side, placed perpendicular to your existing kitchen run. The METOD system allows base units from £35 per carcass, and you can finish the open-facing side with a panel, a worktop overhang for bar stools, or simply paint it to match the kitchen. A two-unit peninsula with a worktop overhang can be assembled from IKEA components for around £200–£350, depending on finish, a fraction of a bespoke carpenter’s quote.
The IKEA METOD system comes with a 25-year guarantee on all cabinet carcasses, which matters when you’re investing in a semi-permanent piece.
How to build a budget peninsula:
1. Measure the depth of your kitchen run and ensure the peninsula extends no further than 90cm into the room. 2. Buy two IKEA METOD 60cm base units and secure them back-to-back with brackets to the wall. 3. Lay a 3cm-thick worktop (laminate from £60) across both units with a 25cm overhang on the lounge-facing side. 4. Add two barstools at the overhang. Done.
4. Paint Your Existing Cabinet Doors Without Replacing Them, a £30 Transformation
Most budget kitchen guides suggest replacing cabinet doors. That’s unnecessary 80% of the time.
Rust-Oleum Kitchen Cupboard Paint, available from Dunelm for around £16 per 750ml tin, bonds to wood, melamine, and laminate without primer, and resists water and stains in a real kitchen environment. One tin covers roughly 6m² of surface, which is typically enough for a small kitchen’s upper and base unit doors combined. The finish isn’t a compromise either: the matt version genuinely looks like a professional spray job when applied correctly with a short-pile roller.
Homeowners who’ve used Rust-Oleum on flat MDF doors consistently report a finish indistinguishable from new in photos. Where it struggles is on heavily textured wood grain doors; those need light sanding first.
I’ve seen conflicting data; some sources say chalk-finish paints outperform kitchen-specific formulas on durability, while others say kitchen paints are specifically formulated to resist grease and humidity better. My read: for a kitchen, use a kitchen-rated paint. The formulation difference is real.
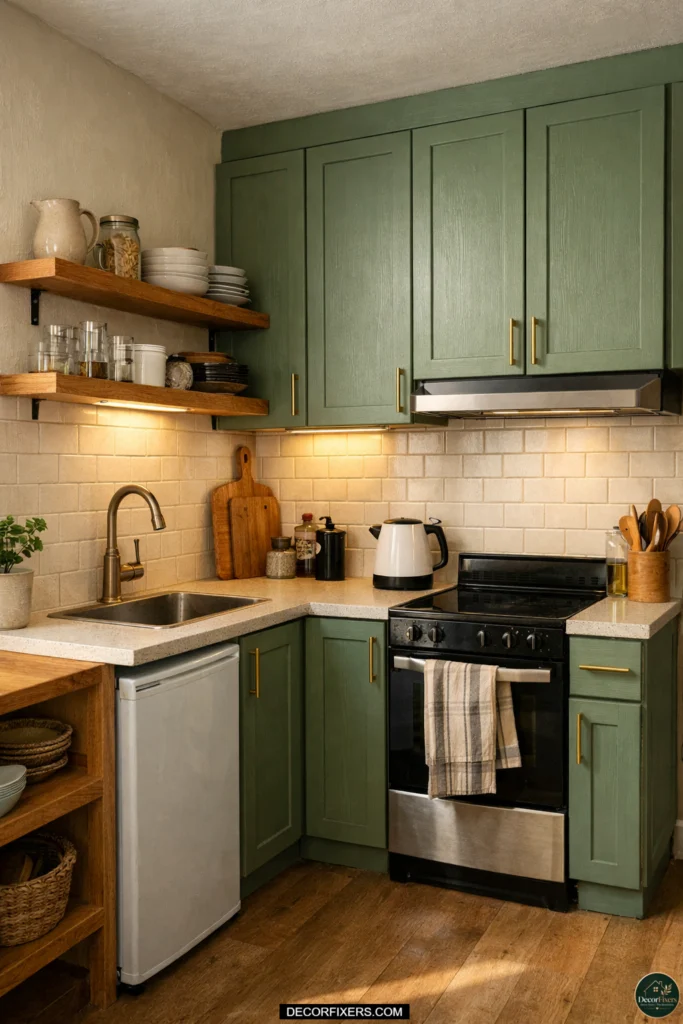
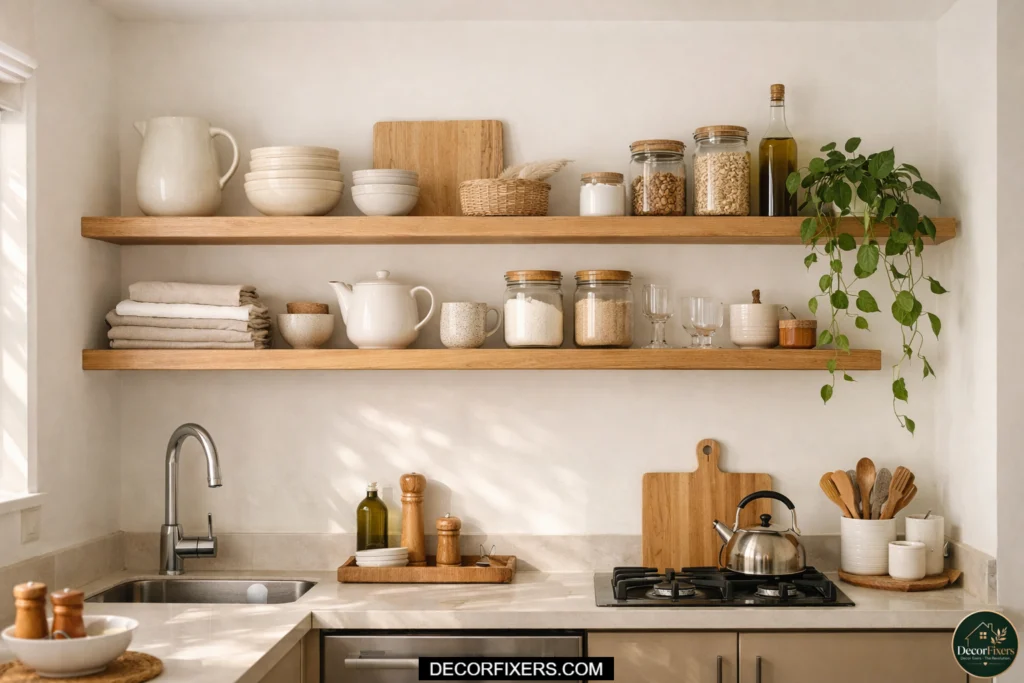
5. Use Open Shelving Strategically to Make the Space Feel Airy, Not More Cluttered
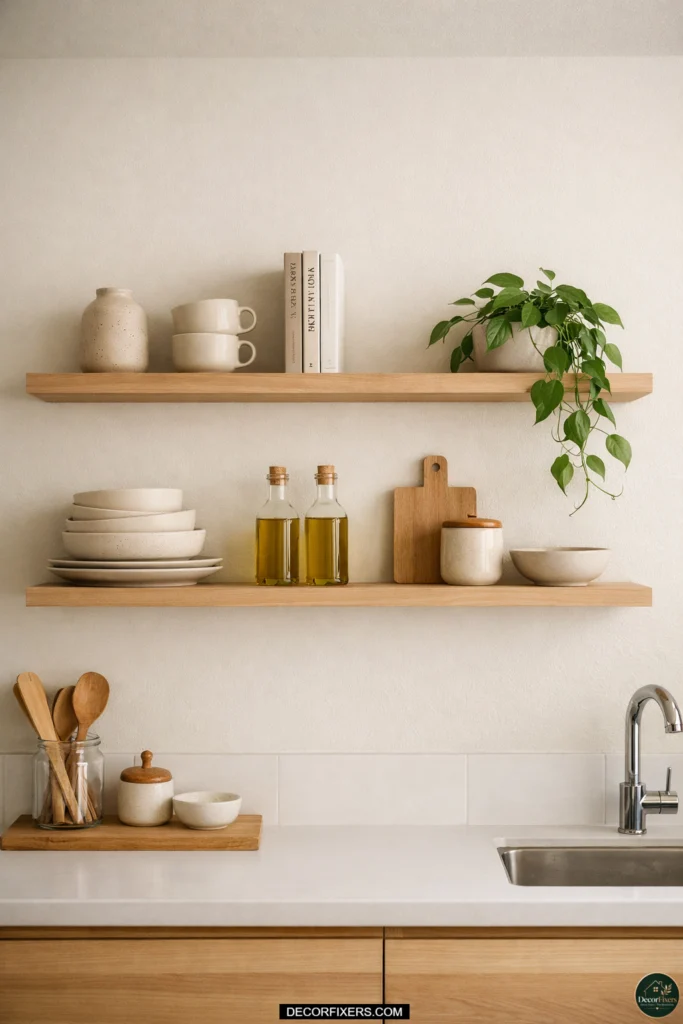
Open shelving gets recommended constantly. It also gets installed incorrectly constantly, which is why people end up with surfaces that look more chaotic than before.
The rule is simple: open shelves only work if 40–50% of the shelf space is intentionally ‘styled’ rather than fully loaded. Packing a shelf to capacity defeats the airy effect. One or two cookbook spines, a small plant, a few neutral ceramic pieces, and then the actually useful items (oils, spices) displayed tidily in matching containers.
Dunelm’s open shelving units start from around £15–£25 for floating wall shelves in white or oak effect. Fix them at 180cm height and above your current base units to keep worktop space free while adding vertical storage, the eye reads as organized. For the open plan kitchen specifically, shelves on the kitchen-side wall (rather than above the hob) keep heat and steam away from displayed items.
Or maybe I should say it this way: open shelving isn’t a storage strategy. It’s a display strategy. If your shelves are packed, keep the doors.
6. Use the Same Color on Walls and Cabinets to Make the Kitchen Feel Bigger
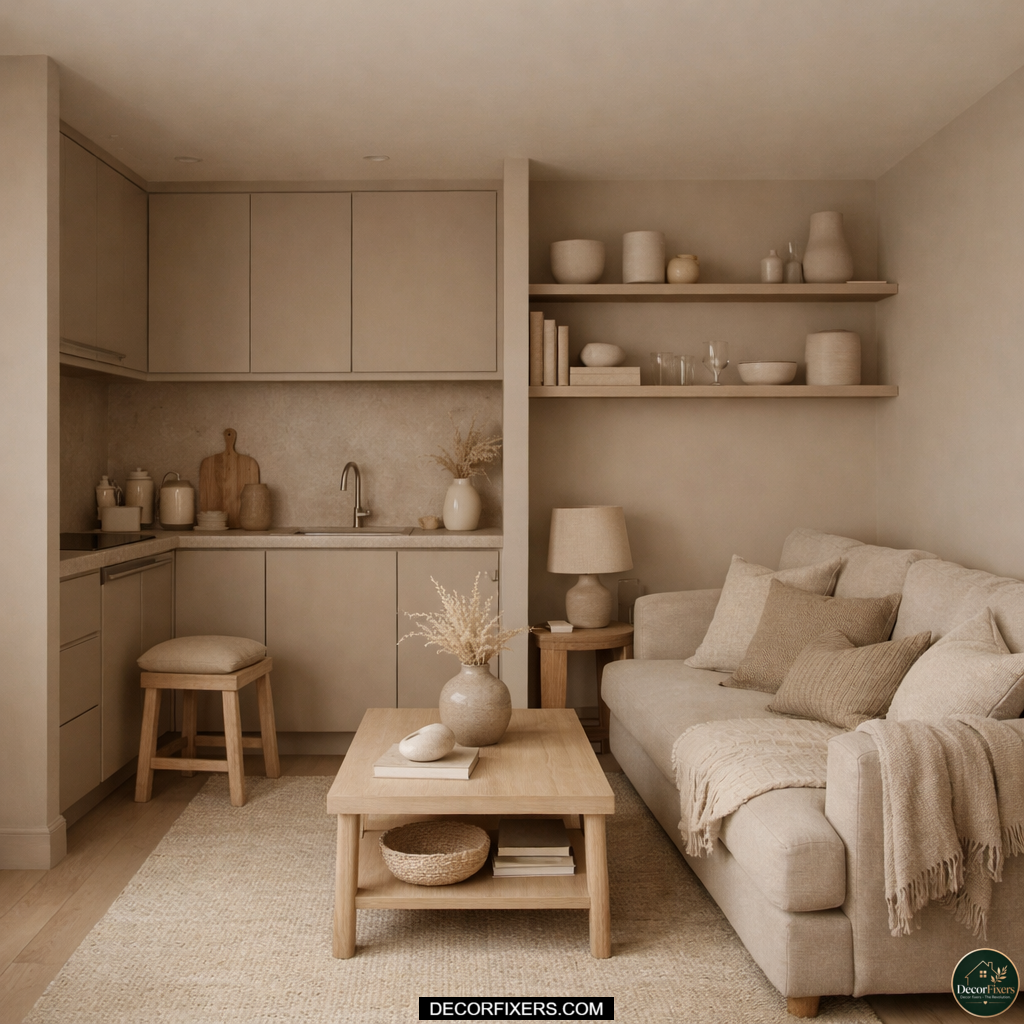
This is the counter-intuitive one. Most people assume that a small kitchen needs white walls and light cabinets to feel spacious. The data and interior designers suggest otherwise.
Carina, kitchen design lead at Ideal Home, puts it clearly: paint cabinets and walls in the same tone to create a seamless, cocooning effect. When there’s no contrast between the wall and the unit, the eye can’t find the boundary between them. The room reads as larger because the visual information is simplified.
For a small open plan kitchen-diner specifically, choose one mid-tone, sage green, warm mushroom, dusty blue, and apply it to both the walls of the kitchen zone and the cabinet doors. Use a slightly lighter shade of the same color on the lounge walls. This creates tonal zoning without hard borders.
Farrow & Ball’s estate emulsion is often cited, but genuinely not necessary on a budget. Dulux Trade Vinyl Matt achieves the same flat, high-quality finish for a fraction of the price, and most Dulux color codes can be color-matched inexpensively at B&Q.
7. Position Your Sofa as a Room Divider, and Stop the Lounge from Bleeding Into the Kitchen
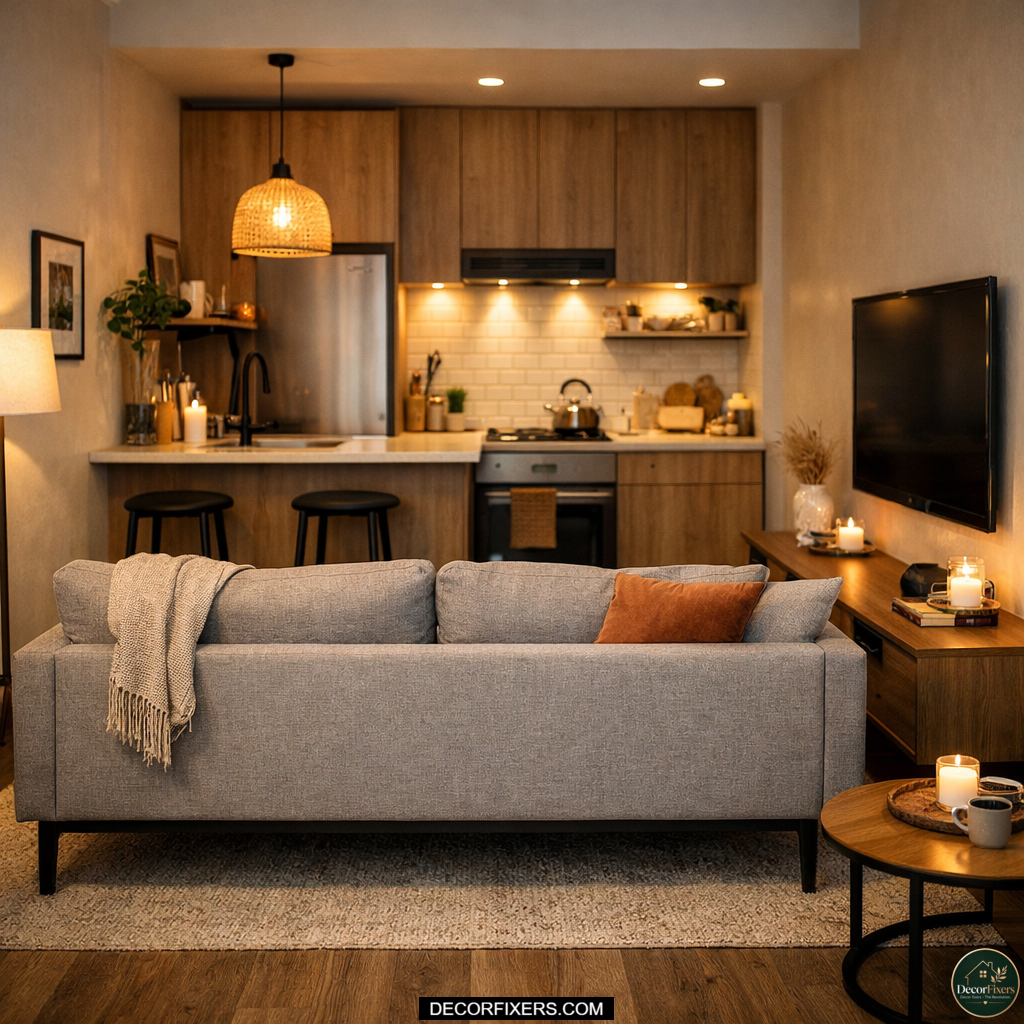
This is the free version of every spatial divider, and barely anyone does it deliberately.
The back of a sofa placed with purpose, parallel to the kitchen run and facing away from the cooking zone, creates a psychological boundary without taking up any additional space. That low sofa back becomes the ‘wall’ between cooking and living, as long as it’s placed at the right distance (typically 90–120cm from the peninsula or the kitchen unit edge).
A corner sofa works even better. The ‘L’ of the corner gives you two orientations: one side faces the TV or the living space, the other faces the dining area. The corner point itself acts as the informal ‘corner of the room’ even in a room with no corners at all. Checkatrade interior guides reference this specifically as one of the most underused spatial tools in open-plan homes.
8. Add Vertical Storage to Claim Every Centimeter of Wall Space Above Head Height
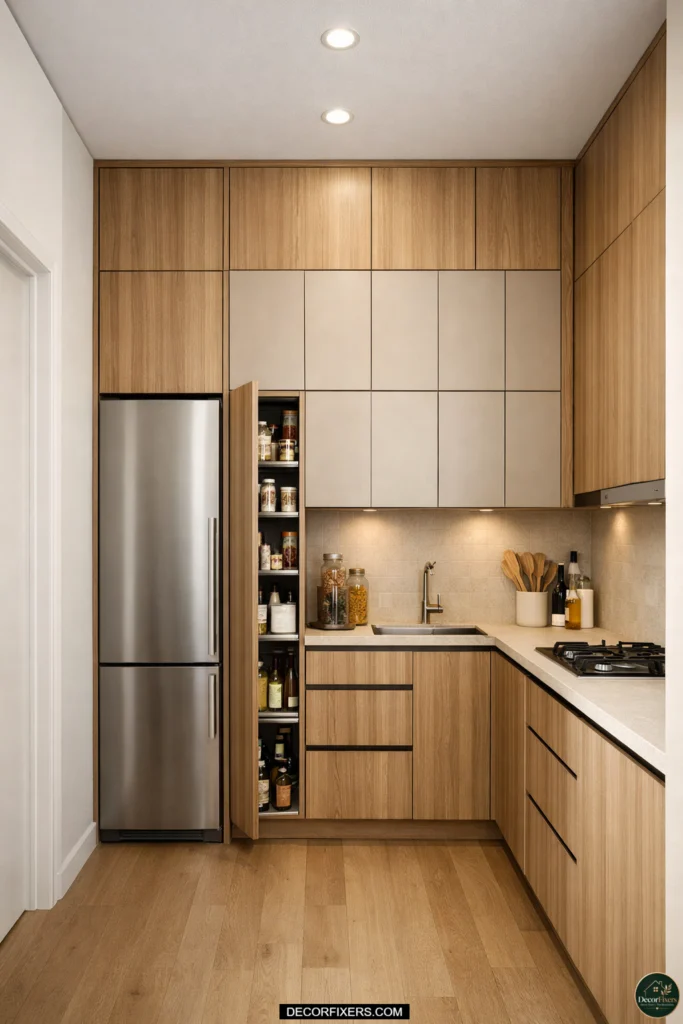
Floor space is premium. Wall space above 180cm is almost always wasted.
Tall larder-style units, or simply adding a second run of wall cabinets above your existing ones, can double accessible storage without eating a single centimeter of floor. IKEA METOD high cabinets in the 200cm height come in from £64 for the carcass alone, and can be fitted beside a fridge or at the end of a run to create a floor-to-ceiling storage wall that makes the room feel taller, not more cramped.
The visual trick is real: floor-to-ceiling vertical lines make a ceiling feel higher. In a low-ceilinged open-plan kitchen-diner, running units all the way to the ceiling shifts the room’s proportions dramatically.
Quick note: if ceiling access isn’t possible due to an extractor or a beam, end the units at 195cm and add a decorative fascia panel to close the gap. Same visual effect, no structural compromise.
9. Swap Solid Cabinet Doors for Glass-Fronted Panels on the Upper Units

You don’t need to replace your cabinets. You need to replace two or three of the upper unit doors.
Glass-fronted doors on upper wall cabinets perform two functions simultaneously: they push the visual boundary of the cabinet back, making the wall feel deeper, and they force you to keep the displayed contents tidy, which keeps the kitchen looking cleaner in the open plan sightline from the lounge. IKEA sells replacement glass-front doors for METOD cabinets in the JUTIS and GLASSVIK range, from around £20 to £50 per door.
Some experts argue that glass-fronted uppers increase visible clutter. That’s valid for a household with mismatched crockery and zero inclination to style the contents. But if you’re dealing with a small open plan kitchen that’s permanently on show from the sofa, a neatly arranged shelf of white plates and glasses reads as a positive design feature, not clutter. The difference is curation, not budget.
10. Use Under-Cabinet LED Strips to Define the Kitchen Zone With Light
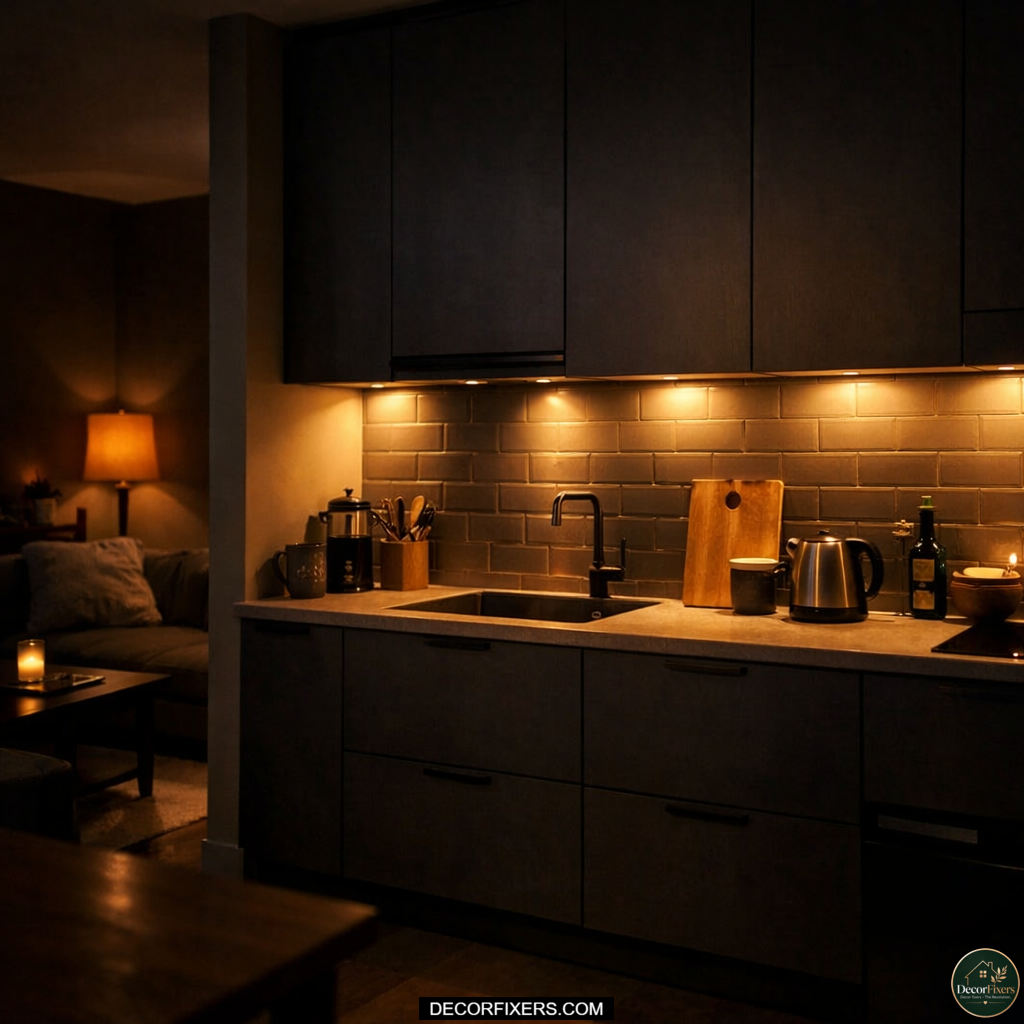
Under-cabinet LED strips are the most underrated kitchen upgrade for under £30.
Mounted beneath wall units, they create a band of warm task light that illuminates the worktop, but also visually separates the kitchen zone from the rest of the room at night. When the overhead light is dimmed and the LED strips are on, the kitchen glows as a distinct space. The lounge recedes. The zones are suddenly obvious.
Plug-in LED strips (no electrician required) are available on Amazon or from B&Q for £12–£25 for a 1m run. Choose warm white (2700K) rather than cool white. Cool light makes a kitchen feel clinical, not cozy, and in an open-plan space that adjoins a lounge, warmth matters more than brightness.
Pair with dimmable overhead lights for maximum flexibility. Bright for cooking. Dim for evenings. Two distinct moods, one room.
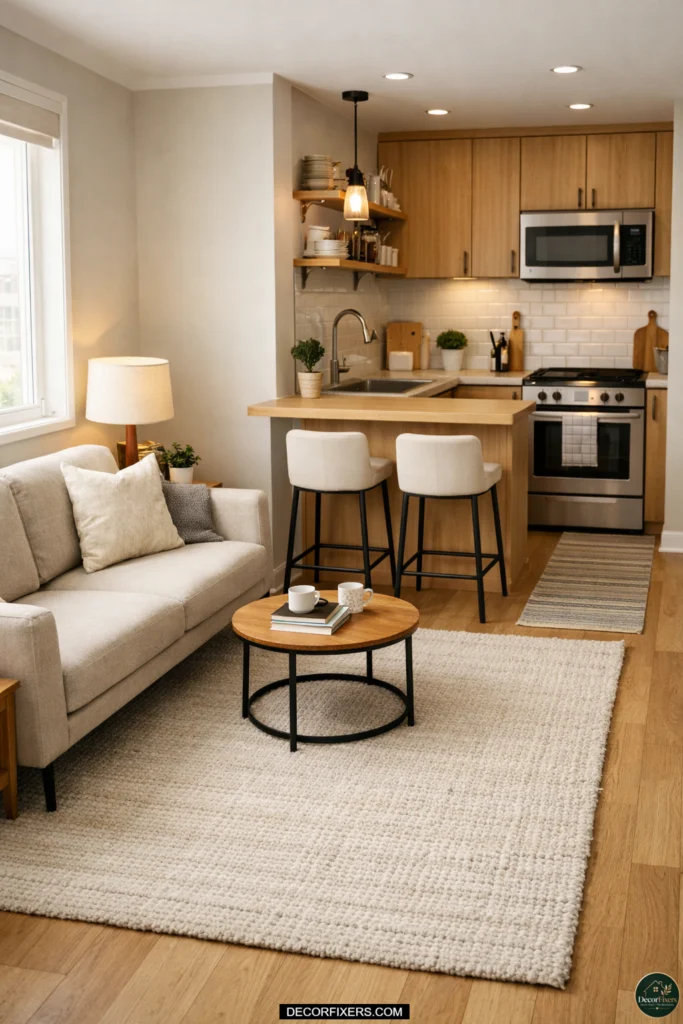
11. Install a Slim Breakfast Bar at the End of Your Kitchen Run Instead of a Dining Table
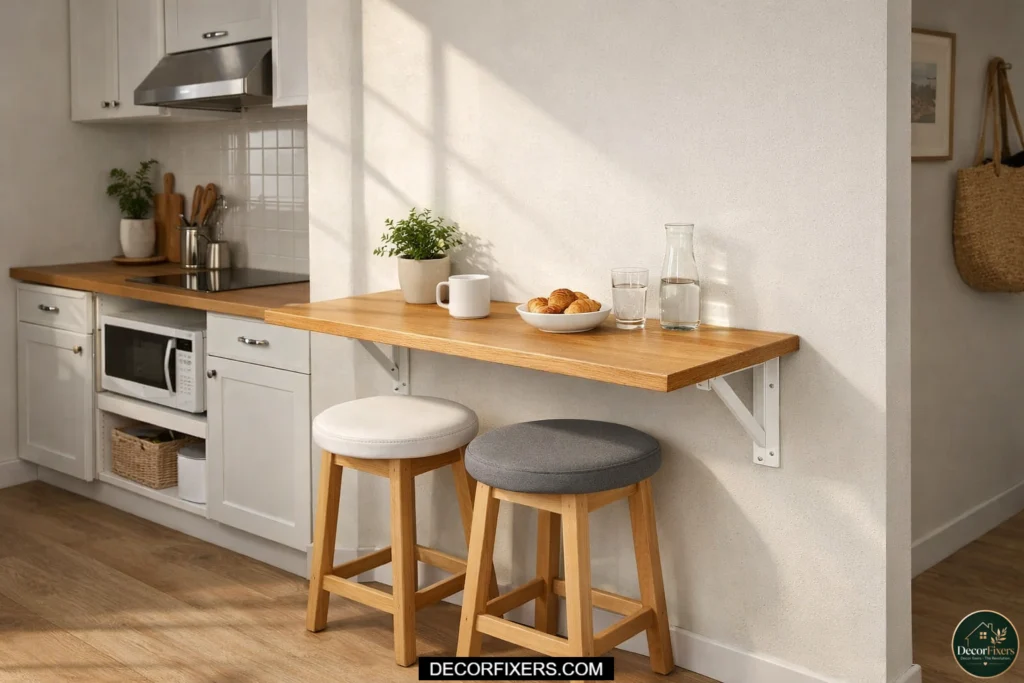
A full dining table in a small open plan kitchen-diner is often the single piece of furniture eating the most space for the least return.
A wall-mounted fold-down breakfast bar, fixed at counter height (90cm) with two bar stools tucked beneath, replaces the dining table entirely in spaces under 25m². When not in use, it folds flat against the wall. When open, it seats two adults comfortably and creates a physical transition zone between the kitchen and the lounge.
IKEA’s NORBERG fold-down wall bar starts from £35. A pair of compatible bar stools from £25 each. Total cost for a breakfast bar setup: around £85–£120. That’s a solution for a problem that most homeowners spend £400+ trying to fix with a compact dining set that still takes up too much floor space.
12. Use a Half-Height Bookcase or Sideboard to Create a Soft Boundary Between Zones
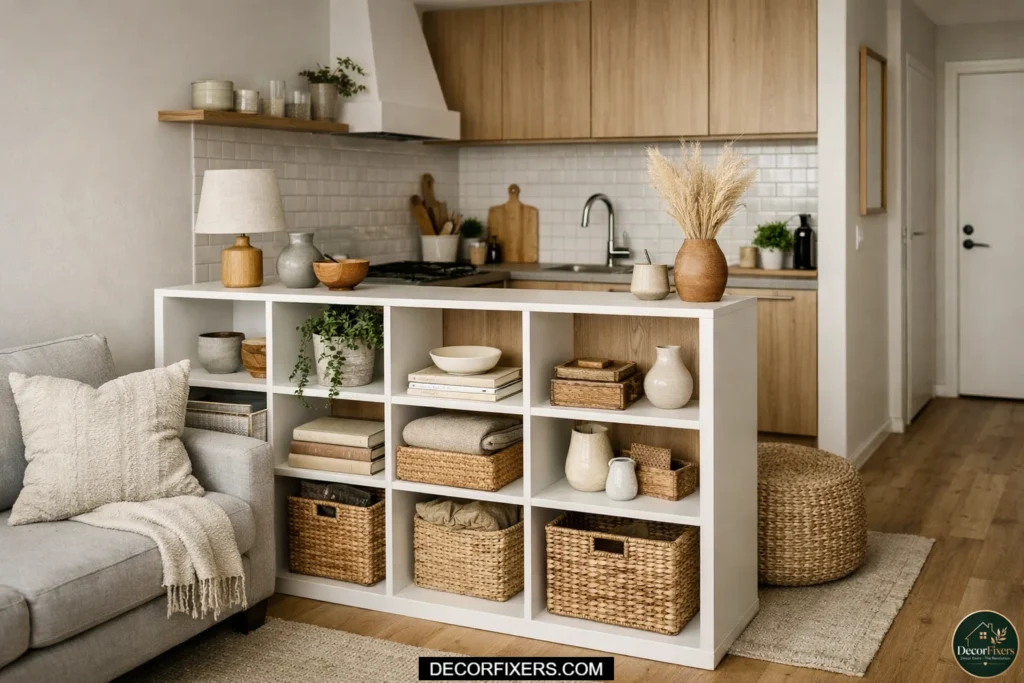
Half-height units, typically 80–100cm tall, are the ideal soft divider for a small open plan space. They’re tall enough to register as a boundary, short enough not to block light or sightlines.
A slim Kallas unit from IKEA (£69 for a 2×2 configuration) placed perpendicular to the kitchen run, filled on the lounge side with books or baskets, creates a mid-room boundary that doubles as storage. The kitchen side can face toward the cooking zone as a small serving shelf. Two functions, one object, zero construction.
Homeowners living in rented properties particularly value this approach; it’s entirely reversible, leaves no marks, and can be reassembled in a different configuration when the lease ends.
13. Add a Splashback That Reads as a Design Feature to Anchor the Kitchen Zone Visually
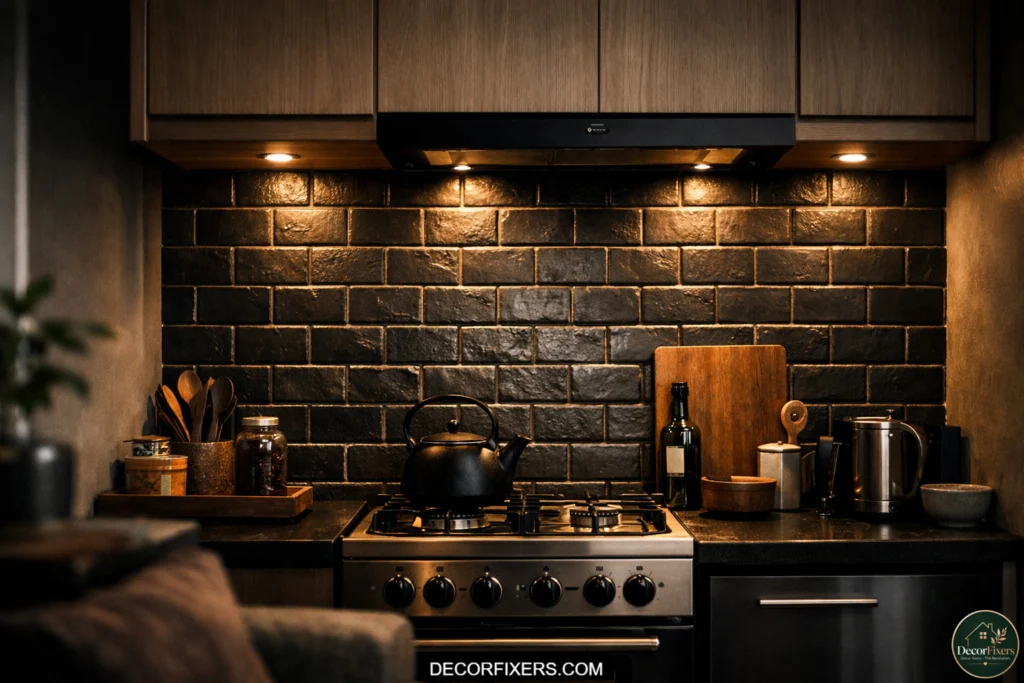
A splashback does more than protect the wall. In an open plan space, it’s the most effective visual signal that ‘this is where the kitchen is.’
Budget splashback options in 2025 include peel-and-stick tile sheets from Amazon (from around £25 per pack, enough for a standard 90cm x 60cm area) or self-adhesive vinyl in marble or metro tile patterns. Neither requires grouting or tiling skills. Both are renter-friendly.
The design choice matters more than the material. A metro tile pattern in a contrasting color to the kitchen walls anchors the cooking zone visually, even from the sofa. The lounge end of the room has soft textiles. The kitchen end has a tile pattern. That visual contrast does the zoning work more cheaply than any physical divider.
Quick Comparison:
| Option | Best For | Key Benefit | Limitation |
| Area Rug | Renters / immediate change | Instant, reversible zone | Needs to be large enough to work |
| Peninsula unit | Owners with basic DIY skills | Physical + storage divider | Requires flat-pack build |
| Back-of-sofa placement | Zero-budget households | Completely free | Only works with the right sofa size |
| Pendant lighting | Renters (plug-in versions) | Creates mood + zone at night | Less effective in the daytime |
| Half-height bookcase | Renters / temporary solutions | Dual storage and boundary | Limited height effect |
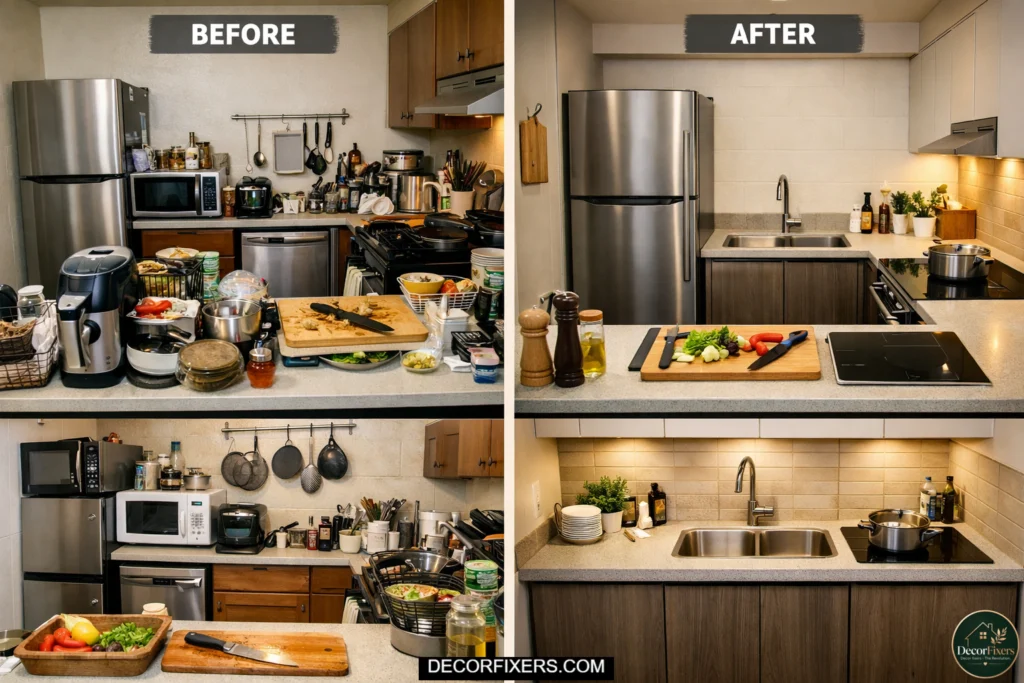
14. Declutter the Worktop Down to Three Essential Items; the Rest Goes Inside Cupboards
This is the least glamorous trick in the list and probably the most impactful.
A cluttered worktop in a small open-plan kitchen bleeds visually into the lounge. The toaster, the kettle, the fruit bowl, the oil bottles, the coffee machine, and the random stack of post, from the sofa, all read as chaos. And no amount of lighting, rugs, or shelving fixes a permanently overcrowded worktop.
The three-item rule: choose three items that live permanently on the worktop. Everything else gets a home inside a cupboard. Yes, the toaster can go inside a cupboard. Yes, the kettle can go on a pull-out shelf. IKEA’s UTRUSTA pull-out shelf mechanism fits inside standard METOD base units and brings appliances forward at worktop height, then tucks them away. Around £15 per fitting.
Users who’ve tried worktop decluttering as the first step before any design changes consistently report that it made a bigger visual difference than anything they spent money on afterward.
15. Lay a Herringbone Vinyl Floor Tile in the Kitchen Zone Only to Define the Space
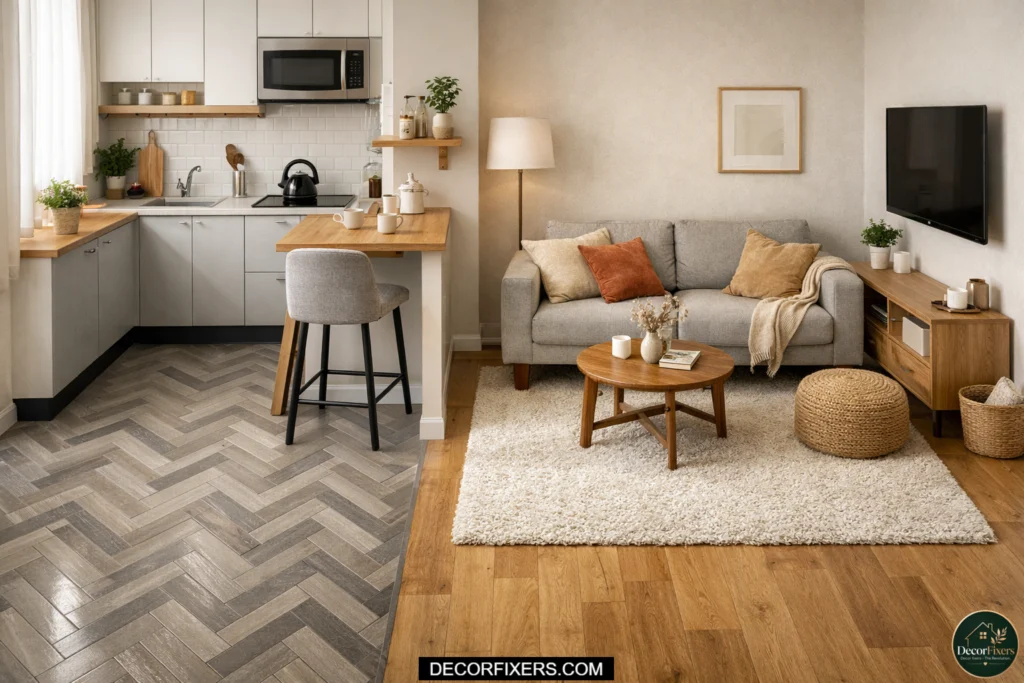
Changing the flooring in just the kitchen zone, not the whole room, is one of the most spatially effective tricks in open plan design. When the floor changes, the room changes. Simple as that.
Peel-and-stick luxury vinyl tiles in a herringbone or large-format pattern are available from B&Q (Karndean-style LVT) from around £2–£5 per tile. A typical small kitchen zone of 5m² can be retiled for under £80 in materials. No adhesive, no specialist tools. The tiles sit flat on a smooth floor and lift cleanly if you’re renting.
The flooring contrast creates a clear visual signal: kitchen here, living room there. Combined with a rug in the lounge zone, the two surfaces do the zoning work that most people try to achieve with furniture.
16. Mount a Magnetic Knife Strip and Pegboard to Get Tools Off the Worktop and Onto the Wall
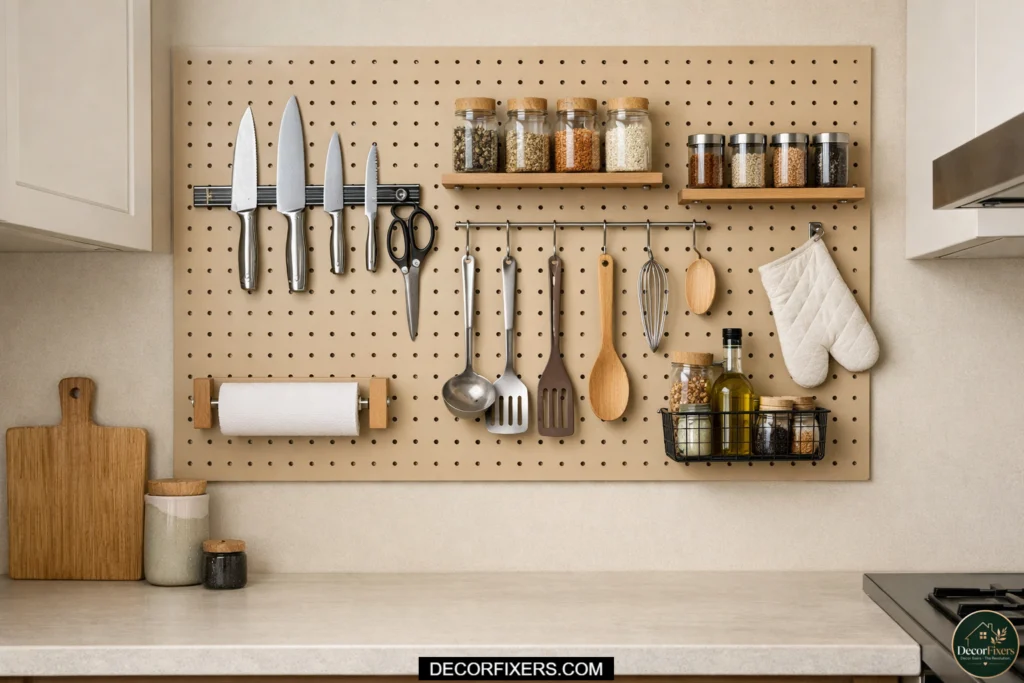
Wall-mounted storage in the kitchen zone is one of the most efficient uses of otherwise dead space.
A magnetic knife strip (from around £8 on Amazon) mounts horizontally at backsplash height and immediately clears a full knife block from the worktop. A pegboard system, IKEA’s SKÅDIS, is the benchmark, from £11 for a 36x56cm board, takes utensils, scissors, spice containers, and anything else currently occupying worktop or drawer space, and moves it to the wall in a visually organized way.
For the open plan specifically, a well-arranged pegboard in a matching color to the kitchen walls becomes a design feature visible from the lounge. A messy one undermines the whole room. Keep it minimal: a maximum of six to eight items per board, color-coordinated where possible.
17. Hang Curtains Floor-to-Ceiling to Make the Lounge Zone Feel Taller and Separate
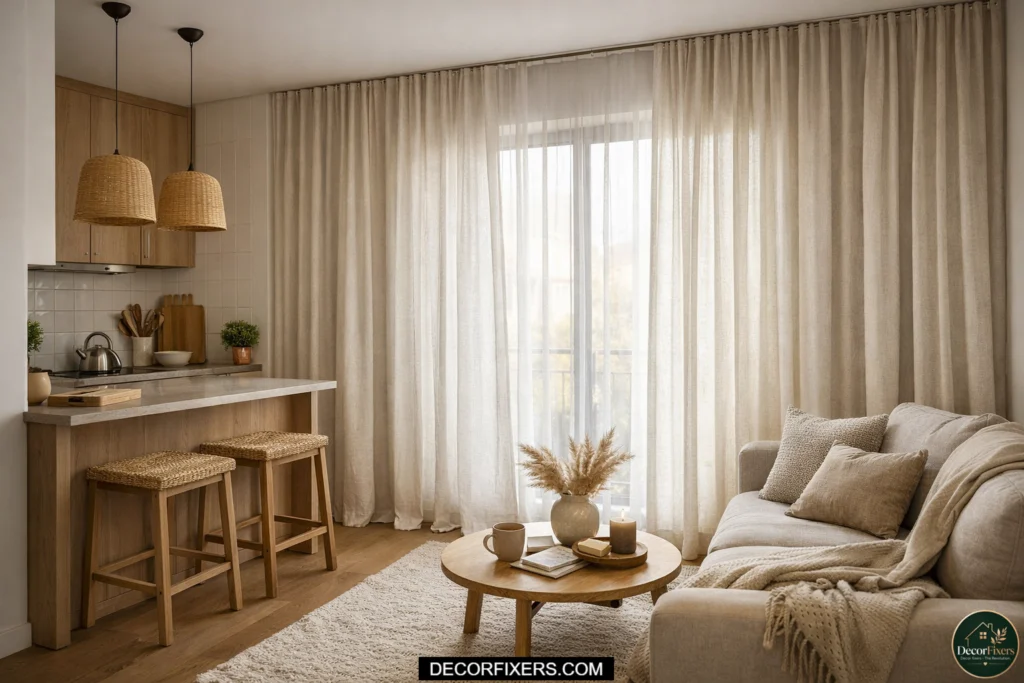
Curtains hung at ceiling height rather than window frame height are a free or near-free way to dramatically alter the proportions of a room.
In a small open-plan kitchen-diner, the lounge side often has a window or patio door. Hanging curtains from a ceiling-mounted track, rather than from above the window, makes the ceiling feel higher, the window feels larger, and the lounge feels more distinct from the kitchen zone. The visual separation is subtle but cumulative: tall curtains say ‘lounge’ and the absence of them on the kitchen side says ‘kitchen.’
Dunelm’s eyelet curtains in neutral linen or grey start from around £18–£35 per pair for standard drop lengths. A ceiling-mount track rod from IKEA’s KVARTAL range costs around £30 and can be cut to length at home.
18. Use Mirrors Strategically in the Kitchen Zone to Double Perceived Depth
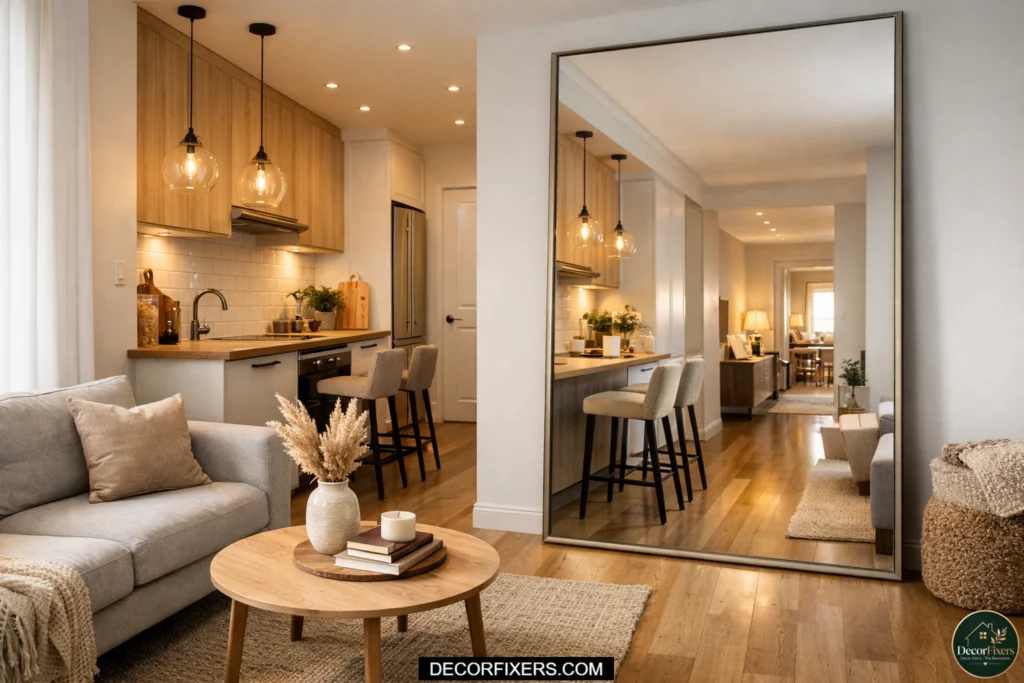
A single large mirror on the wall opposite the kitchen units does something unexpected: it doubles the perceived depth of the room.
In a narrow open-plan kitchen-diner, common in mid-century flats where the kitchen is essentially one end of a longer room, the walls at the lounge end can feel close and oppressive. A leaning floor mirror or a wall-mounted rectangular mirror (from IKEA’s NISSEDAL range, from £49) placed at the far end of the lounge bounces light back through the space and adds a visual second room that doesn’t exist.
Avoid placing mirrors directly opposite the hob; you don’t want to reflect steam and cooking mess. The ideal placement is the side wall of the lounge zone, or propped at an angle in a corner.
19. Add a Canopy Hood or Angled Extractor Above the Hob to Contain Cooking Smells in the Kitchen Zone
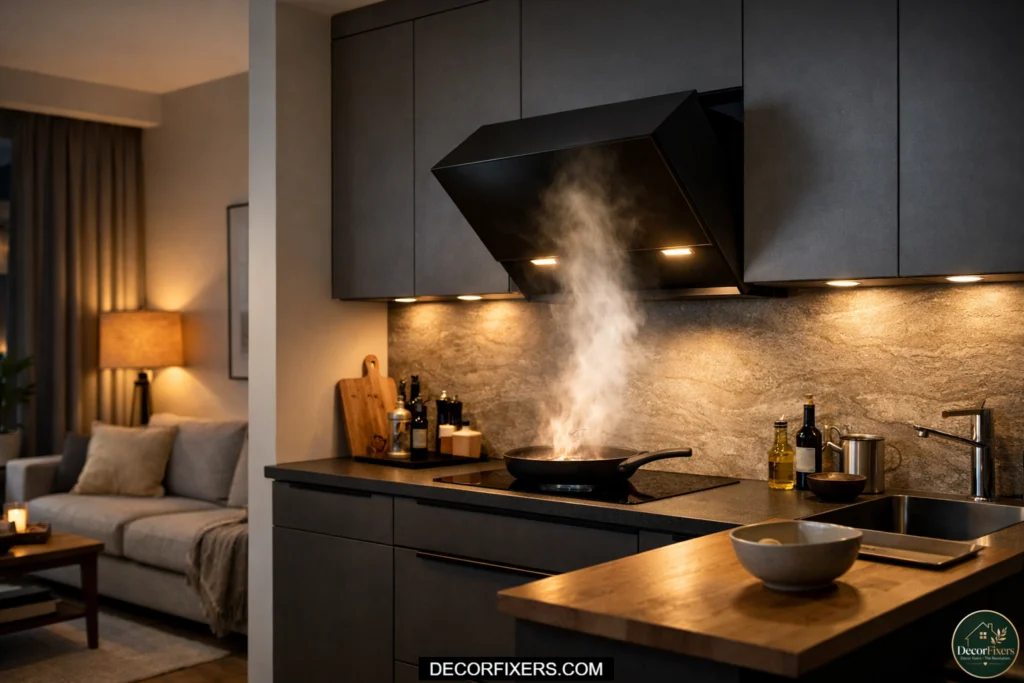
Cooking smells are one of the biggest practical complaints about small open-plan kitchens, and it’s one that £20 of styling products will never fix.
What most budget guides skip is that smell bleed in a small open plan space is an extraction problem, not a ventilation problem. A recirculating cooker hood, which filters air through activated charcoal and returns it to the room, is not adequate for a space where the lounge is 3 meters from the hob. You need a ducted extractor, or at minimum an angled recirculating hood with a genuine 600m³/h extraction rate.
Budget ducted hoods from brands like Bosch or Hotpoint start from around £90–£130 on Amazon. If ducting through an external wall isn’t an option, combine a recirculating hood with an activated charcoal filter replacement (typically every 6 months, around £8–£15) and keep a Maaco or similar compact air purifier in the lounge zone during cooking.
How to separate a very small open-plan kitchen from the living area on a tight budget.
The most effective low-cost separation tools are rugs, pendant lighting, and sofa positioning, used together. Zoning with lighting and soft furnishings is cited by homeowners as more effective than physical dividers in spaces under 30m². The combination of a lounge rug, a pendant over the dining zone, and the sofa back facing the kitchen costs under £150 total and achieves a spatial logic that feels structural.
20. Replace Bulky Upper Cabinets with Open Shelving on One Wall to Add Visual Breathing Room
Upper cabinets are for storage. They’re also visual weight, and in a small open plan kitchen, too many closed cabinet doors can make the kitchen zone feel like a wall has been thrown across the room.
Replacing one run of upper wall cabinets with open shelving, Dunelm’s floating shelves from around £15–£20 each, removes that visual heaviness without reducing storage if you’re disciplined about what goes on the shelves. Styled correctly (see trick #5), open shelves read as light and airy from the lounge sightline.
The trade-off is real, though: open shelves collect grease and dust in a kitchen environment faster than closed cabinets. Factor in regular cleaning as part of the arrangement. This works best in kitchens where the shelves are not directly above or beside the hob.
21. Use a Freestanding Kitchen Island on Wheels for Maximum Flexibility in Tiny Spaces
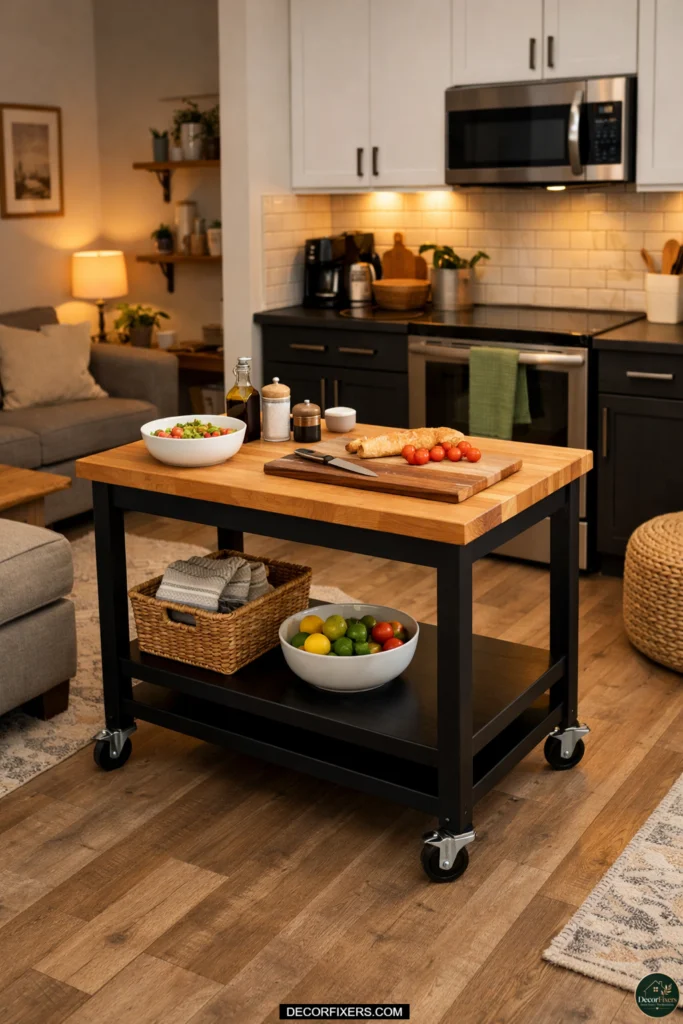
A fixed island is rarely feasible in a very small open-plan kitchen. A freestanding butcher’s block island on locking castor wheels is a completely different proposition.
Rolled into position during food prep, it provides an extra 0.5–1m² of worktop. Rolled to the edge of the room afterward, it becomes a serving station or a visual marker between the kitchen and lounge. When guests arrive, move it entirely. No fixed footprint, no commitment.
Options from IKEA (the RÅSKOG trolley at £35 or the FÖRHÖJA butcher’s block trolley at £70) or from supermarket home ranges (Aldi and Lidl periodically stock similar items for £49–£79) give you this flexibility without the cost of a fitted island that would cost £400+ from a kitchen supplier.
22. Hang an indoor plant or Trailing Vine to Create a Natural Visual Divider
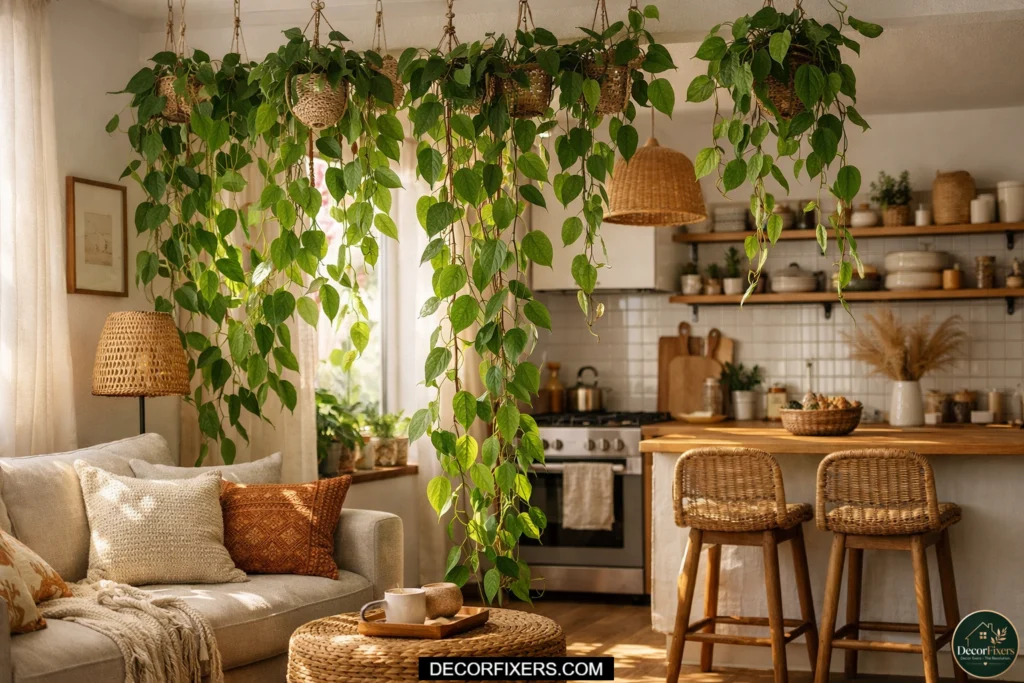
Plants are the most organic (literally) method of zoning an open plan space, and they get discussed almost nowhere in budget kitchen guides.
A macramé plant hanger suspended from a ceiling hook with a trailing photo or string-of-pearls creates a soft, living divider at head height between the kitchen and lounge zones. Unlike a physical shelf or unit, it takes up virtually zero floor space and adds texture, color, and freshness to what is often a rather hard-surfaced kitchen environment.
Ceiling hooks cost under £2. A macramé hanger from a market or Etsy costs £8–£20. A photos plant is practically indestructible, handles low light, and costs around £5 from a supermarket. Total outlay: approximately £15–£27 for a divider that no interior design magazine would be embarrassed to photograph.
23. Maximize Corner Space With a Lazy Susan or Pull-Out Corner Unit to Unlock Hidden Storage
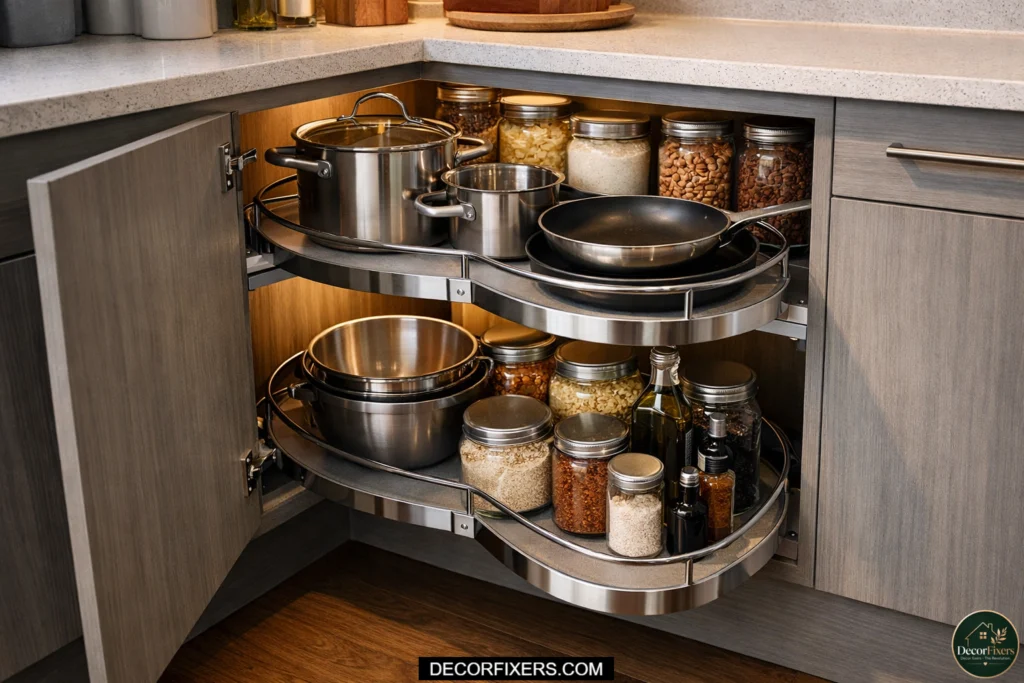
Corner base cabinets are famously useless as standard, a dark void that swallows pots and never gives them back.
A pull-out carousel (lazy Susan) fitted inside an existing corner unit unlocks access to the entire depth of the cabinet and can triple usable storage in a corner that was previously functioning at about 20% capacity. IKEA’s UTRUSTA carousel fitting costs around £30 and installs inside a standard 80cm corner METOD unit.
For kitchens without corner units, a freestanding rotating spice tower (from around £15) placed inside any accessible corner gives similar rotational access without any fitting at all. Lazy Susans for inside standard cupboards cost from £8 to £12 and are one of the highest-return storage upgrades per pound spent in any small kitchen.
24. Apply Peel-and-Stick Wallpaper to the Kitchen Side of a Bookcase or Unit to Define the Zone
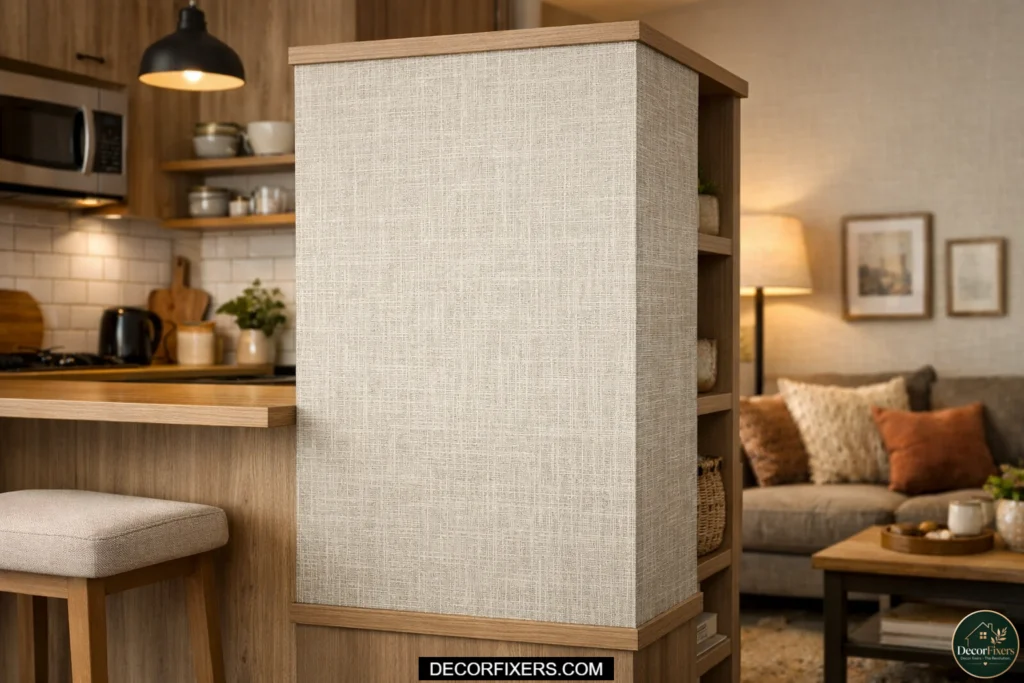
Here’s a trick that almost nobody mentions in standard small kitchen articles.
The lounge-facing side of any room divider, a Kallax unit, a peninsula end panel, or a half-height sideboard is almost always an afterthought: plain white or chipboard. Applying a strip of peel-and-stick wallpaper (from around £12–£20 per roll on Amazon or in B&M) to that facing panel transforms it into a deliberate design feature that clearly signals the boundary between zones.
A geometric pattern or a textured linen-look paper in a color that bridges both the kitchen and lounge palettes makes the divider look intentional rather than improvised. It’s a £15 fix that a designer would charge £150 in consultation fees to recommend.
25. Rethink Your Kitchen Layout with the Work Triangle Rule, No Renovation Required
The kitchen work triangle, the relationship between your fridge, sink, and hob, determines how efficiently you move through the space when cooking. Most small open-plan kitchens have never been consciously designed around this principle. The result is wasted movement, unnecessary clutter on worktops, and a cooking process that feels chaotic.
To rearrange your work triangle, follow these steps:
- Identify where your fridge, sink, and hob currently sit. Ideally, each should be no more than 90–180cm apart.
- Move the most frequently used tools and ingredients to the zone between sink and hob, that’s your primary prep zone.
- Clear the zone between the fridge and sink of any non-food items; this is your landing zone for groceries.
- Move everything else (appliances, paperwork, kids’ items) out of the triangle entirely.
You don’t need a new kitchen to apply this. You need twenty minutes, an empty worktop, and a willingness to put the toaster inside a cupboard.
Look, if you’re in a small open plan kitchen that feels chaotic during cooking, here’s what actually works: fixing the work triangle costs nothing and has a bigger impact on how the space feels in daily use than almost any physical change. Start here before spending anything.
What’s the cheapest way to make a small open-plan kitchen look more expensive?
The most cost-effective upgrades for perceived quality are cabinet door paint (Rust-Oleum Kitchen Cupboard Paint, around £16), new hardware handles (from £1 each at IKEA), and under-cabinet LED lighting (under £25). According to interior design guides cited by Ideal Home and Checkatrade, these three changes together can make a budget kitchen look like a mid-range renovation for under £80 total, making them the highest-return fixes in any small open-plan kitchen.
CONCLUSION:
If I’m being straight with you, the thing that made the biggest difference in my own small open plan kitchen wasn’t a product. It was three decisions made in one afternoon: moved the sofa so the back faced the kitchen, put a rug under it, and cleared everything off the worktop except the kettle, a chopping board, and a small plant.
The room immediately felt like two spaces. For free. That’s the principle that everything in this list builds on.
From there, the order I’d prioritize spending is: LED strips (under £25), then a zoning rug (under £80), then cabinet paint if the doors are ugly (under £30), then pendant lights for the dining zone (under £30 plug-in). That’s a full transformation for under £165, which is a long way from the £9,000 median that most homeowners spend on small kitchen renovations.
These tricks won’t fix a kitchen that’s structurally broken. But if the bones are fine and the space just needs intention applied to it, this list gives you everything you need.
This works best for open-plan kitchen-diners in existing homes where the layout is fixed. It won’t help if your kitchen genuinely needs a plumbing move or a structural opening to function.
FAQs:
Q: What’s the best way to zone a small open plan kitchen without building a wall?
A: Use three tools together: a rug under the lounge furniture, pendant lighting over the dining or cooking zone, and the sofa back facing the kitchen. That combination costs under £150 and creates a spatial logic that reads as structural.
Q: How do I make a very small open plan kitchen feel bigger without a renovation?
A: Tone-on-tone paint (walls and cabinets in matching shades), floor-to-ceiling vertical storage, and decluttered worktops are the three highest-impact tricks. None requires construction. Budget: under £100 for paint and hardware.
Q: Should I use an island or a peninsula in a very small open-plan kitchen?
A: A peninsula is better suited to very small open plan kitchens because it is fixed to a wall at one end, requiring clearance on only three sides rather than four. An island works better when you have at least 90cm of clearance on all four sides, typically in rooms over 15m². The key difference: a peninsula gives you the same division and worktop benefit of an island while using roughly 30% less floor space.
Q: Why does my open plan kitchen always feel cluttered even after I tidy it?
A: Because the cooking zone and lounge zone are visually merged, any clutter in the kitchen reads as clutter in the living room. The fix is zoning (rug, lighting, sofa position) so the eye registers them as separate spaces, even though they’re one room.
Q: When should I think about replacing cabinets rather than painting them?
A: Replace only when the carcass (the cabinet box itself) is damaged, warped, or structurally unsound. In all other cases, painting the doors, adding new handles, and replacing hinges will achieve a transformation indistinguishable from new for under £50.

Creator of DecorFixers, sharing practical home and interior ideas focused on real-life usability, simple design improvements, and budget-friendly solutions.
3 thoughts on “25 Budget Open Plan Kitchen Ideas for Very Small Spaces (That Actually Work)”