

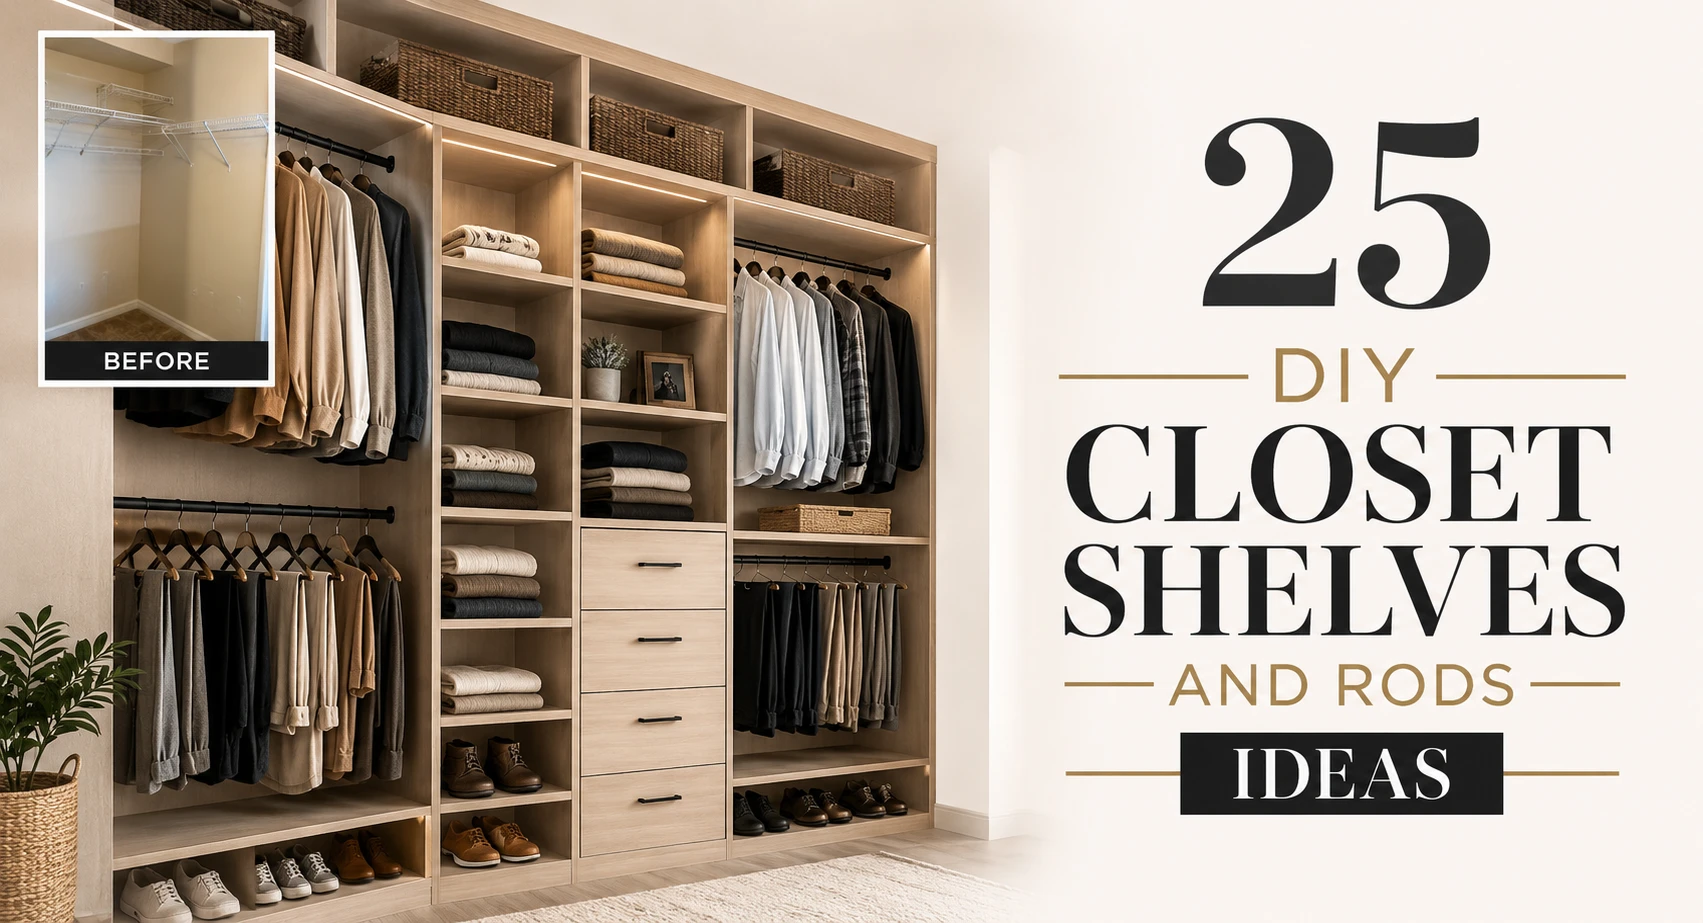
I’ll be honest with you: the first time I tore out a wire shelf and stared at four blank walls, I panicked. I had a drill, half a weekend, and zero idea where the studs were. Sound familiar? That moment, standing inside a closet that smells like old carpet while clothes pile up on the bed behind you, is exactly what pushed me to actually figure this out.
So, what I’m sharing here are 25 real DIY closet shelves and rods ideas, some dead simple, some more involved, all built around the actual problems people face: sagging wire shelves, rods at the wrong height, dead vertical space, and budgets that can’t touch a California Closets quote.
Whether you’re a renter working around landlord rules or a homeowner ready to drill into studs, you’ll find your build in this list. Let’s get into it.
25 DIY Closet Shelves and Rods Ideas (From Easiest to Most Custom)
1. The Single Shelf-and-Rod Starter Build
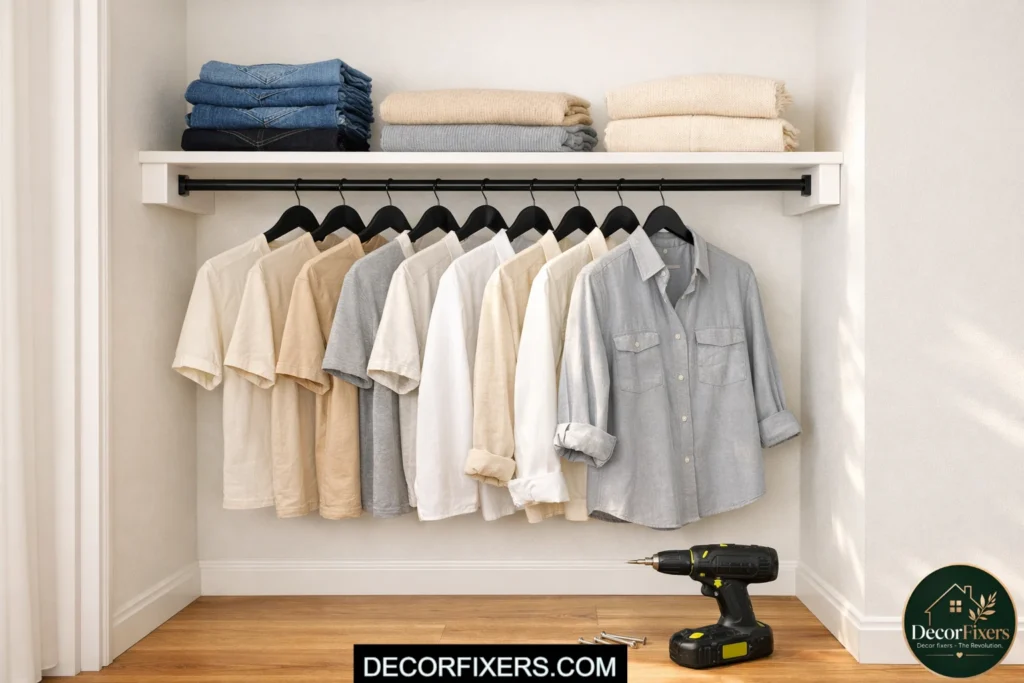
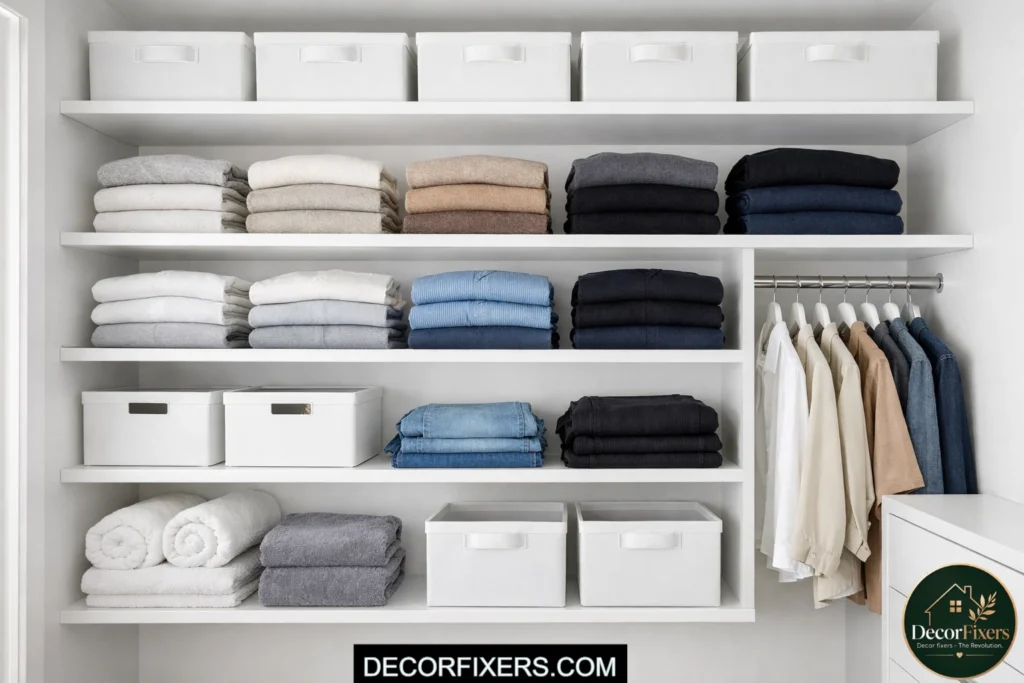
This is the foundation of every closet system and the first step most people should tackle. You cut one shelf board to span the full width of your closet, attach it to wall cleats screwed into studs, and hang a single rod 1–2 inches below it.
Mount the rod brackets 10–12 inches from the back wall so hangers clear easily. Standard single-rod height is 60 inches from the floor, which gives you clearance for dress shirts and jackets. Total cost using 3/4″ plywood and basic rod brackets from Home Depot: under $40.
2. Double-Hang Rod Configuration for Short Garments
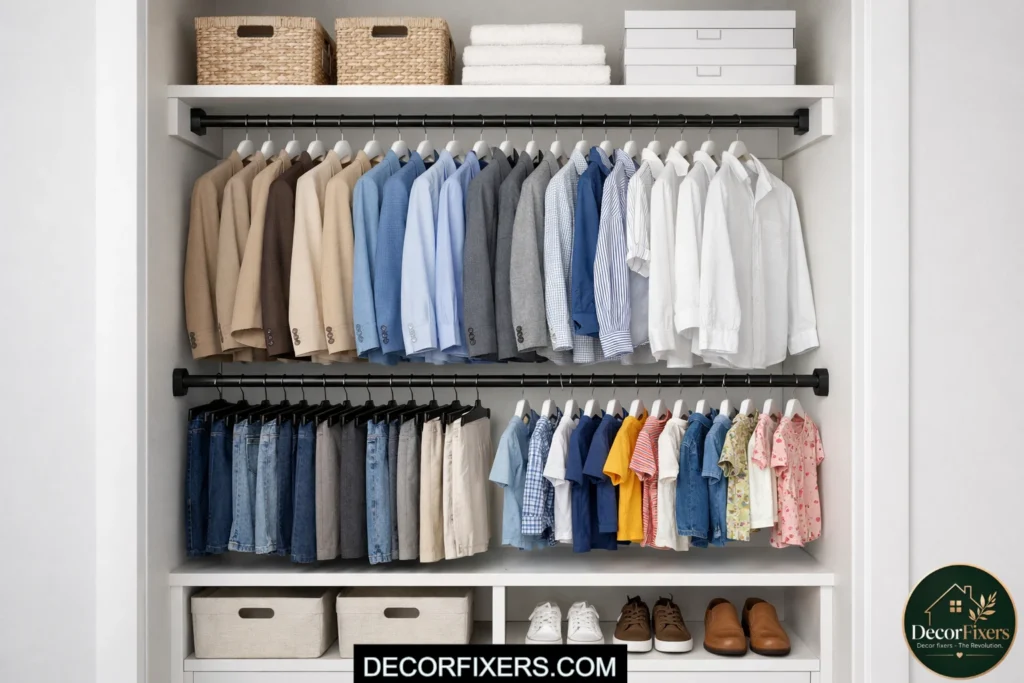
Double-hanging is one of the most underused storage moves out there. Instead of one rod running full height, you install two rods stacked, one at 80–82 inches, one at 40–42 inches from the floor, creating two complete hanging zones in the same width.
This setup is perfect for dress shirts, blazers, folded pants on hangers, and kids’ clothing. It literally doubles your hanging capacity without adding a single inch of floor space. Position the upper rod first, then measure down 40–42 inches for the lower bracket placement; consistency here matters for clearance.
3. Chain-Drop Second Rod (No Drilling Required)
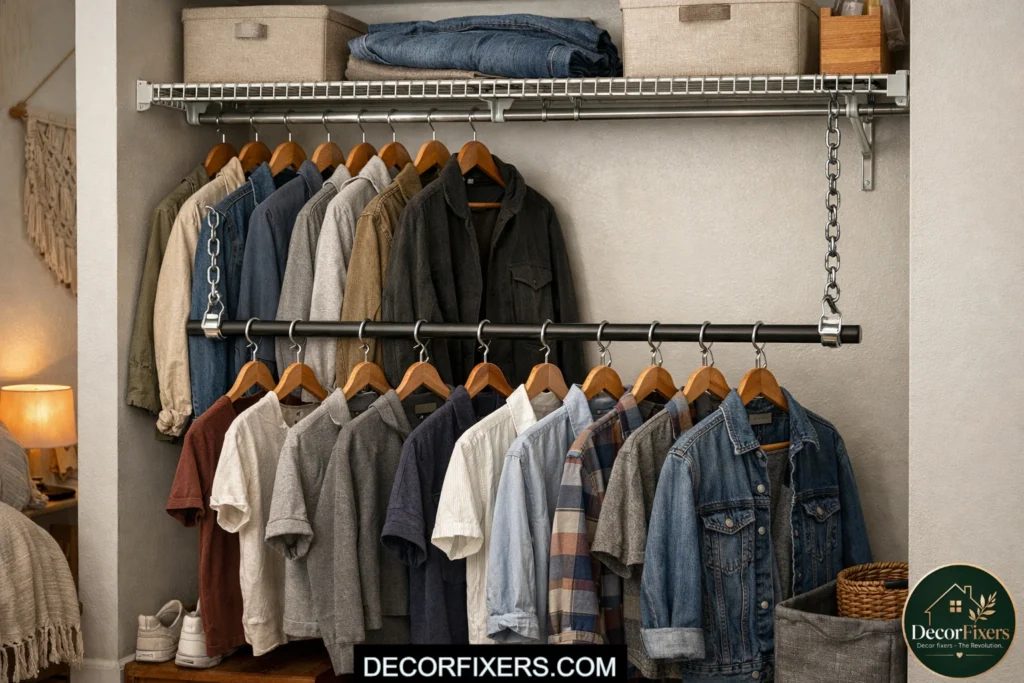
Renters and anyone nervous about drilling: this one’s for you. Hang a second rod directly from your existing top rod using heavy-duty chain and S-hooks. The chain clips over your current rod; the second rod hangs below at your chosen height.
Use steel carabiners instead of basic S-hooks; they’re adjustable and lock, so the lower rod won’t swing. This trick works especially well for a kids’ closet or half of a reach-in where you mostly store folded or short-hang items. Cost? Around $15 at any hardware store.
4. Plywood Cleat System for Clean, Solid Shelves
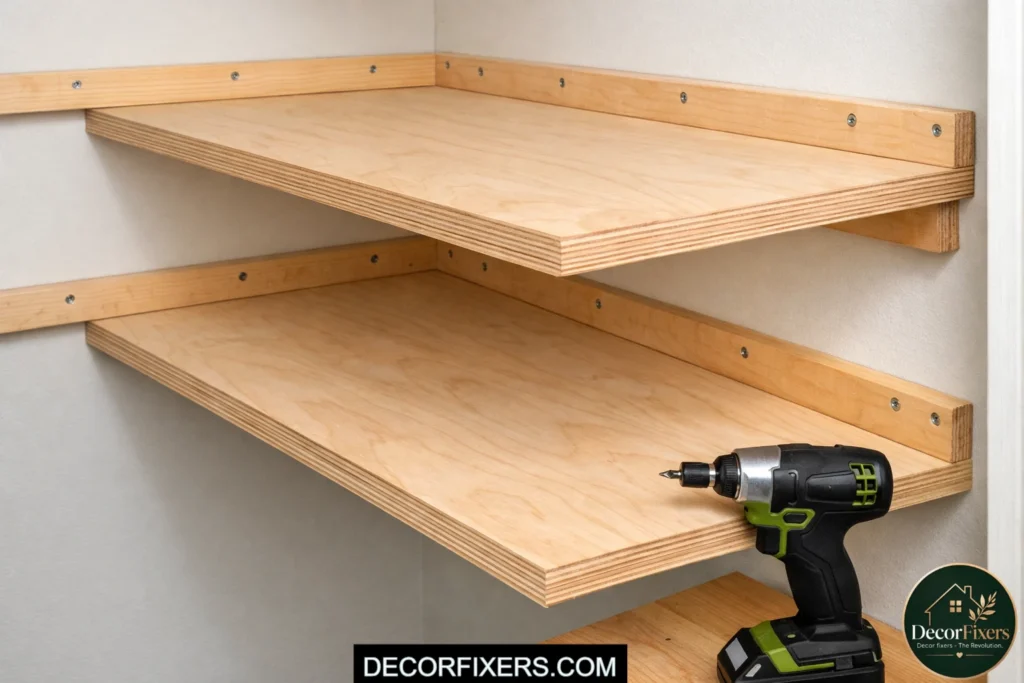
Wall cleats are strips of wood, usually 1×2 or 1×3 pine, screwed horizontally into wall studs. Your shelf board then rests directly on top of them. No visible brackets. No wobble. No gap between the shelf and the wall.
Use a level when installing each cleat; a crooked cleat means a crooked shelf, and you’ll notice it every single day. Drill pilot holes through the cleat before driving screws into studs to avoid splitting. This method is used by most professional closet builders because it’s clean, strong, and holds weight evenly across the full shelf length.
5. MDF Shelving with Painted Finish for a Custom Look
I’ve seen conflicting recommendations on MDF here; some sources say avoid it entirely, others use it for everything. My read is this: MDF is perfectly fine for shelves under 24 inches that won’t carry heavy loads, and it genuinely does take paint better than plywood, giving you that smooth, built-in look.
If you want your DIY closet to look like a California Closets install on a Home Depot budget, MDF shelves with two coats of semi-gloss white paint will get you there. Just keep spans short and add a center support bracket on anything longer. Sand edges lightly before painting for a seamless result.
How to Install DIY Closet Shelves and a Rod (Basic Method)
To build closet shelves from scratch and add a hanging rod, follow these steps:
1. Measure your closet walls, noting height, width, and depth.
2. Locate and mark all wall studs using a stud finder.
3. Cut shelving boards (3/4″ plywood or melamine) to your measured lengths.
4. Attach wall cleats or shelf brackets to studs at your desired height.
5. Set shelf boards on cleats and secure with screws or brad nails.
6. Install closet rod brackets 10–12 inches from the back wall, 1–2 inches below the shelf.
7. Cut your rod to length and drop it into the brackets.
6. ClosetMaid Wire Shelf Kit, the Budget Starting Point
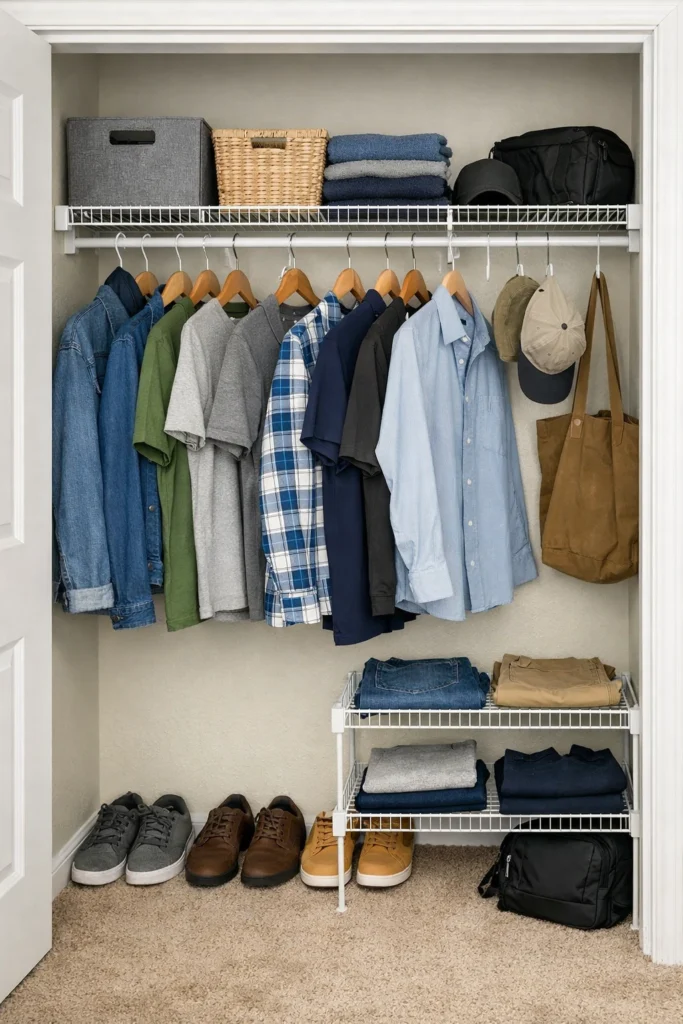
ClosetMaid wire shelving kits are available at Home Depot and Lowe’s and remain the fastest route to a functioning closet system. They’re not the most beautiful option, and wire can dent softer fabrics if clothes pile up, but they’re renter-friendly, affordable, and hold solid weight when mounted correctly.
Choose your width (they come in 12-, 16-, and 20-inch depths), have the store cut them to length, and install with end brackets plus a wall clip every 12 inches for maximum support. The complete kit, shelf, rod, and all hardware, runs $40–$80 depending on size. For a budget build you might eventually upgrade, this is a perfectly reasonable starting point.
Materials: ~$120–$180. Time: one weekend. Result: a closet system that genuinely looks custom and holds up for years. If you want to go even further with organization, check out these Small Closet Shelving Organization Ideas. They’re designed to maximize the system you just built.
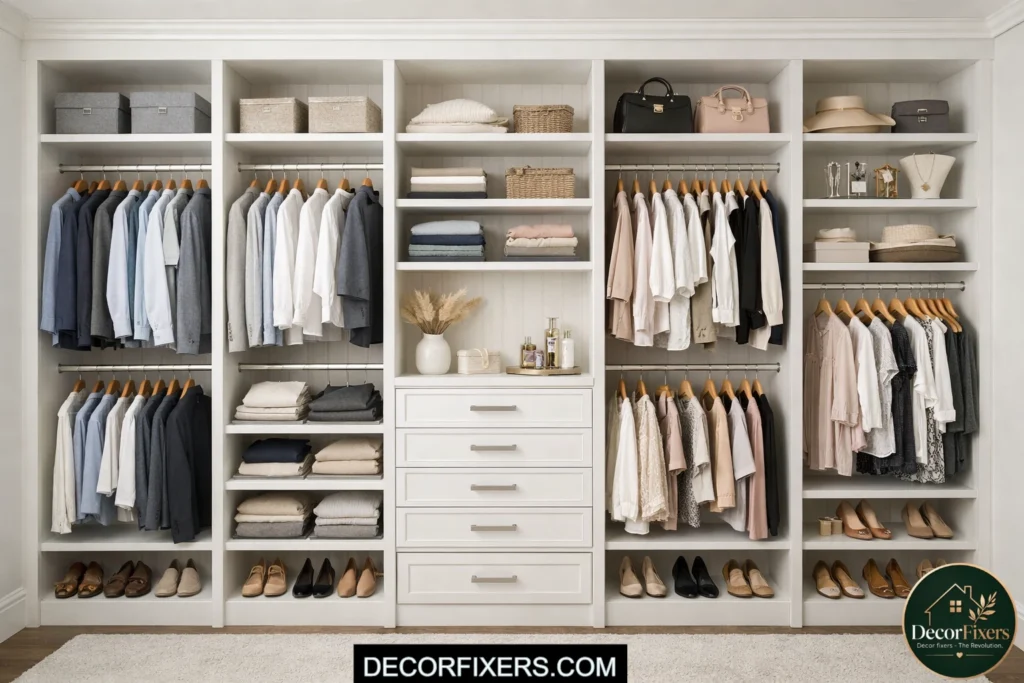
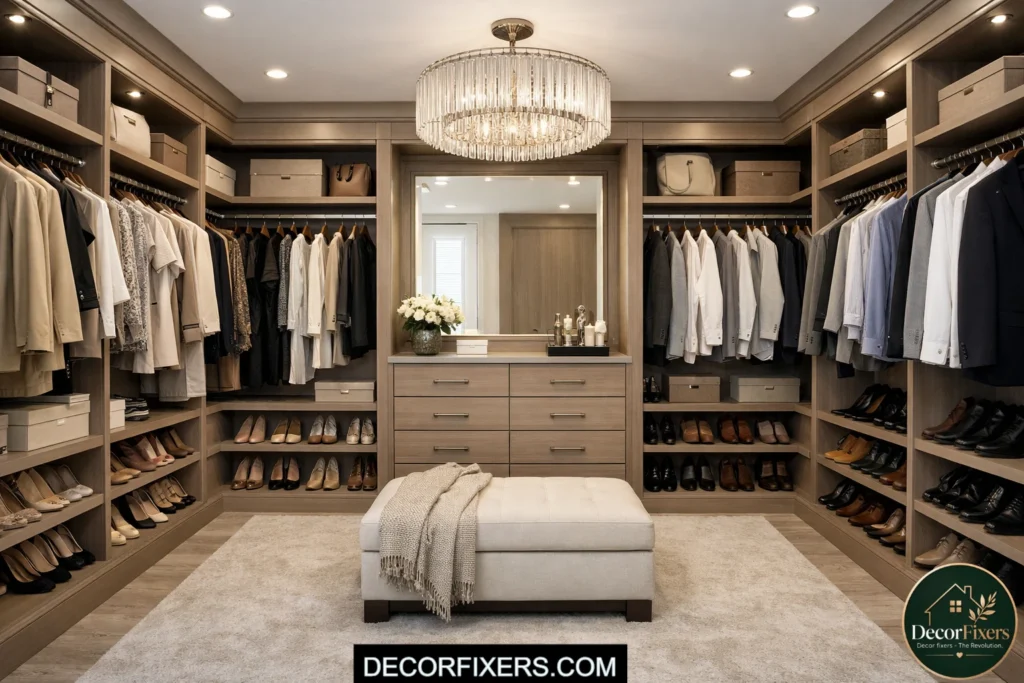
7. Floor-to-Ceiling Tower Shelves for Maximum Vertical Storage
Most closets waste half their vertical space. A floor-to-ceiling shelf tower, a freestanding or wall-mounted column of shelves, captures every inch from baseboard to ceiling. Build it from 3/4″ plywood with dados (routed grooves) to hold each shelf firmly, or assemble with pocket-hole joinery using a Kreg Jig for cleaner connections.
Standard depth for closet towers is 14–16 inches, which fits most bins, shoe boxes, and folded sweaters. Secure the tower to the wall with a furniture strap or L-bracket at the top; this isn’t optional. An unanchored tower is a safety hazard, especially if children are nearby.
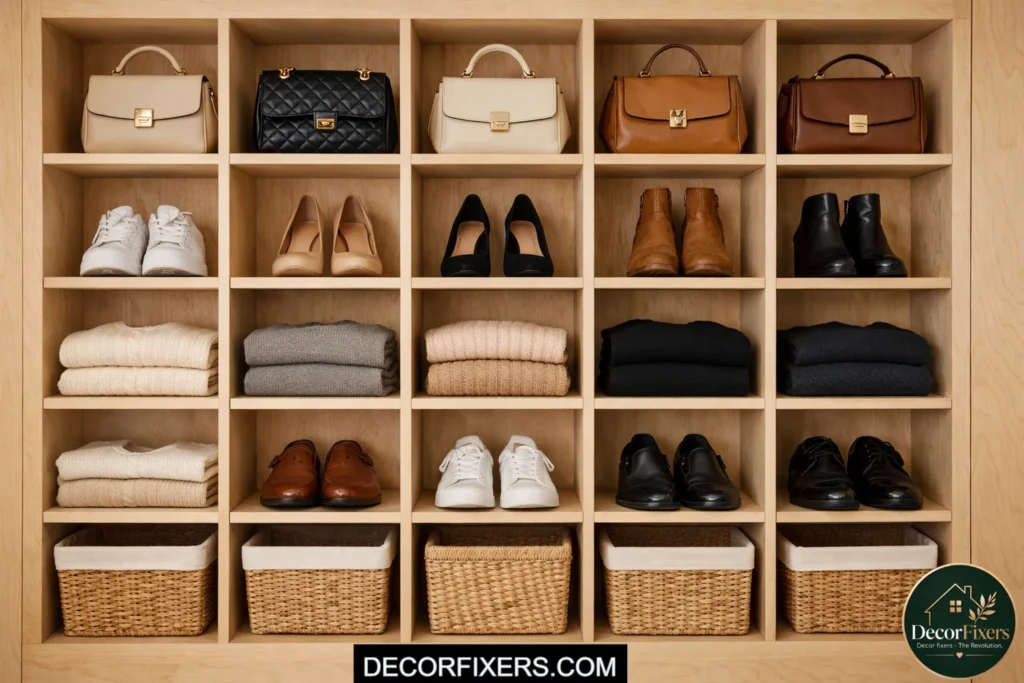
8. Built-in Look Using Vertical Plywood Dividers
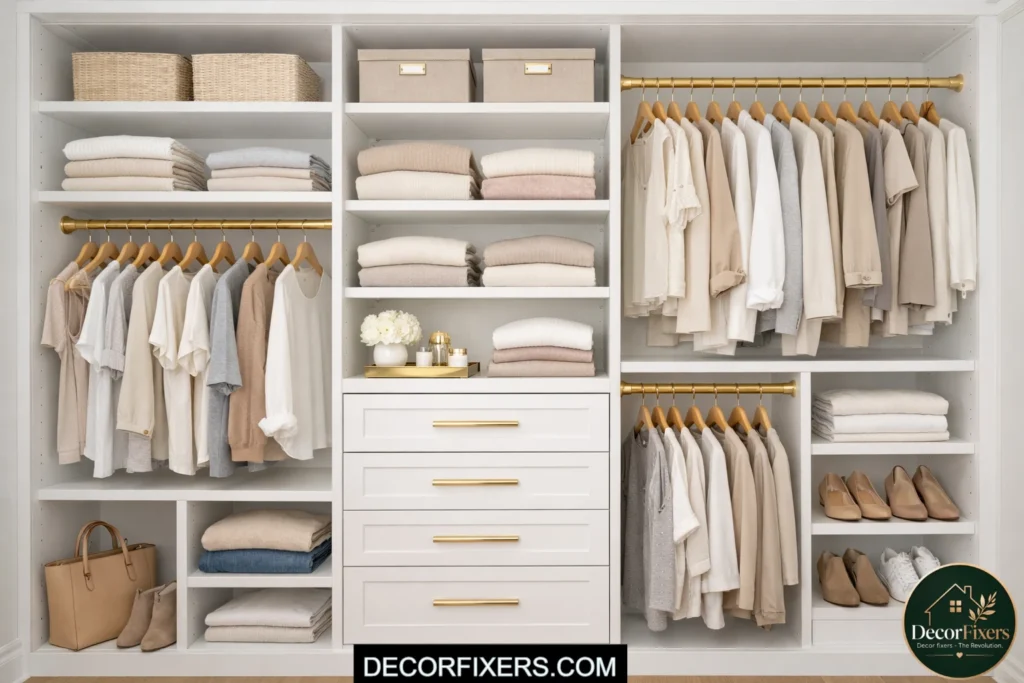
Vertical dividers turn a basic shelf run into a custom-built-in. Cut two panels of 3/4″ plywood to floor-to-ceiling height, install them as side walls inside your closet, then run horizontal shelf boards between them. This creates defined zones: a short-hang zone on the left, a double-hang zone in the center, and a shoe shelf tower on the right.
The trick is getting those vertical panels perfectly plumb. Use a level and shim the base if needed before fastening. Once the verticals are straight and secured, everything else falls into place quickly. This approach is how most professional custom closet companies do it, just without the $2,000 price tag.
If you’re tackling storage beyond just the closet, Home Storage and Organization Stunning Ideas for Small Spaces covers every room from the entryway to the garage with the same practical, budget-aware approach.
9. L-Shaped Corner Closet Configuration
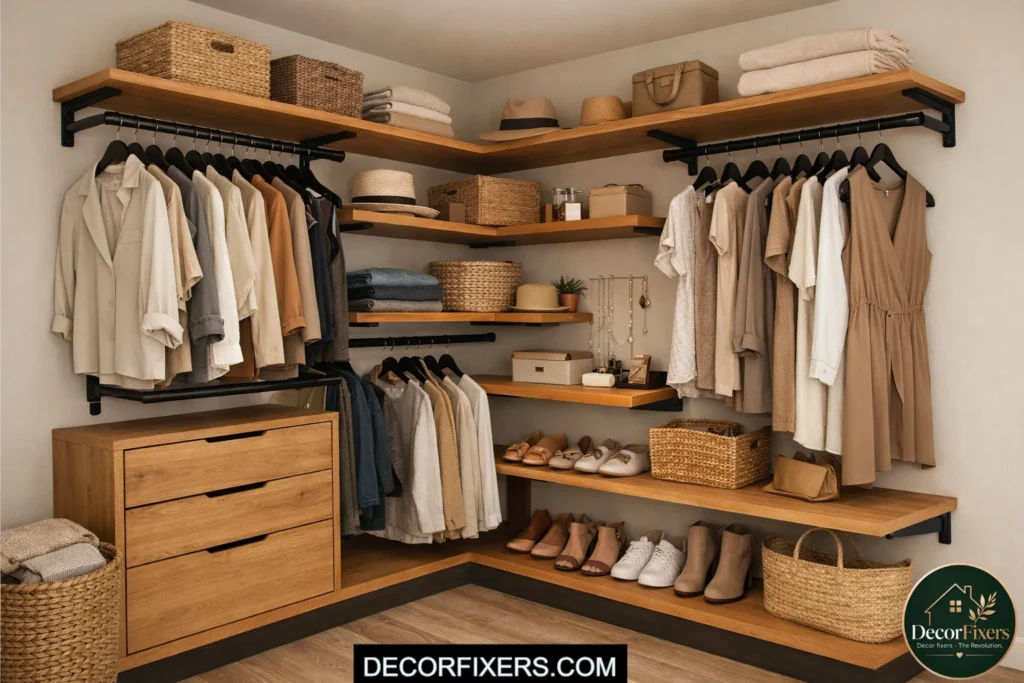
Corner closets create awkward dead space that most people just ignore. The fix: an L-shaped shelf layout that wraps shelves along two walls with a small notched corner shelf bridging the joint. Keep 2.5 inches of clearance between where the rod sits and the shelf above it so hangers slide freely.
Before cutting anything, use painter’s tape to mark your planned shelf heights and positions on the actual walls. What looks right on paper often needs adjustment once you’re standing inside the space. This five-minute step saves wasted boards and frustration.
10. Floating Shelves Above the Closet Rod
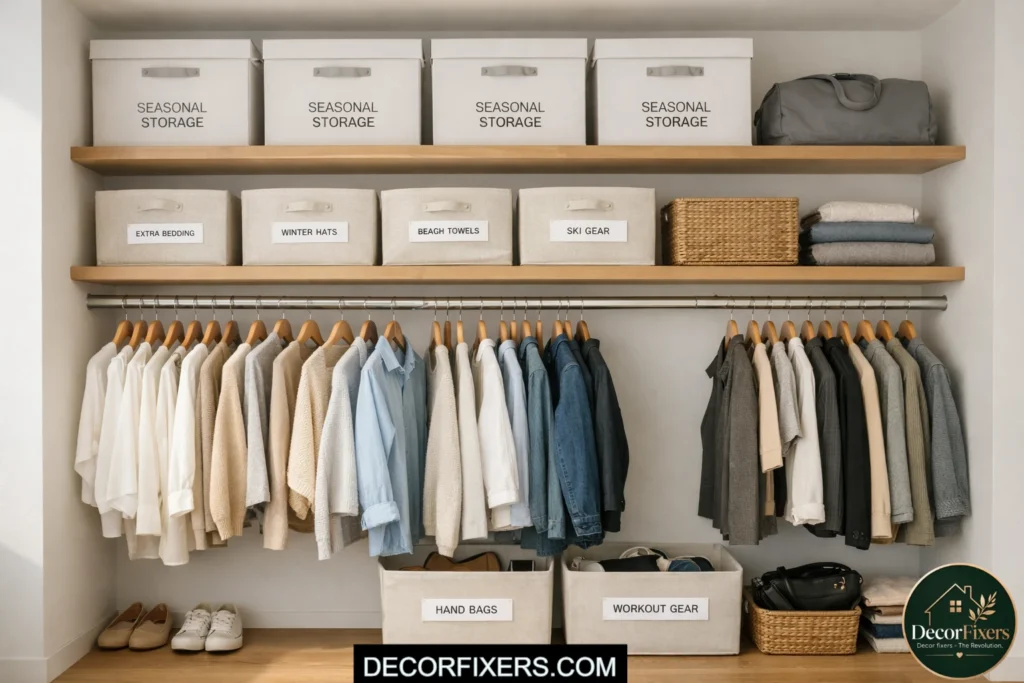
Dead space above the hanging rod is one of the most common wasted areas in a reach-in closet. There can be 24–30 inches of open wall above where your clothes hang. Add one or two floating shelves up there for bins, shoe boxes, or seasonal items you don’t reach every day.
Use heavy-duty floating shelf brackets rated for at least 50 lbs per shelf, not decorative ones, and anchor into studs. A 12-inch-deep shelf above the rod gives you meaningful storage without making the closet feel closed in. Label your bins so you’re not pulling everything down to find the winter scarves.
Quick Comparison:
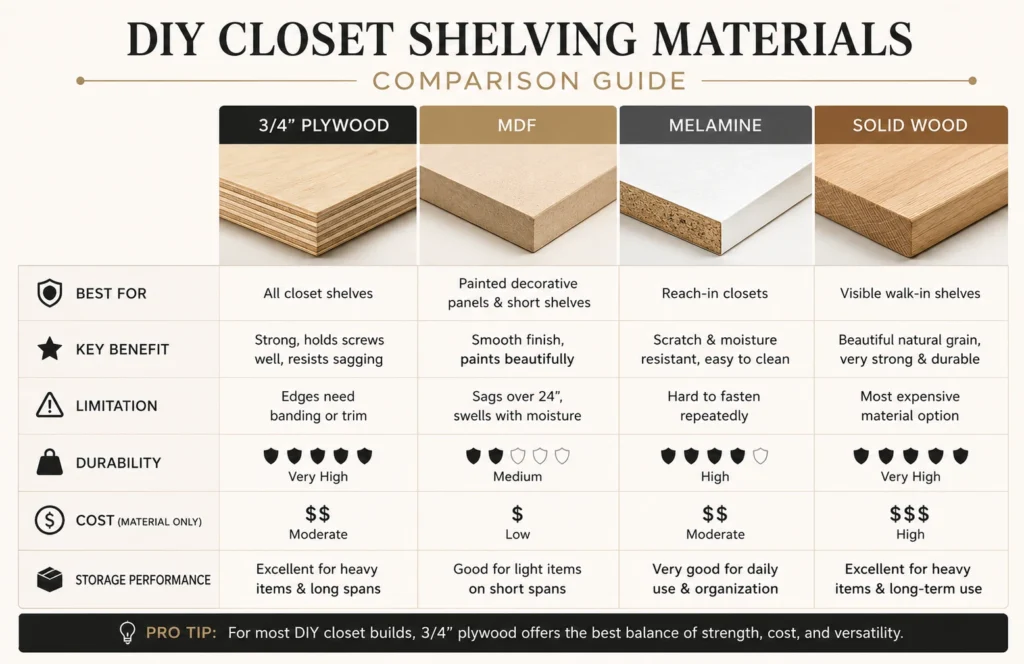
| Material | Best For | Key Benefit | Limitation |
| 3/4″ Plywood | All closet shelves | Strong, holds screws well | Edges need banding |
| MDF | Painted decorative panels | Smooth painted finish | Sags over 24″, swells with moisture |
| Melamine | Reach-in closets | Scratch/moisture resistant | Hard to fasten repeatedly |
| Solid Wood (Oak/Pine) | Visible walk-in shelves | Beautiful grain, very strong | Most expensive option |
Or maybe I should say it this way: use MDF if you’re painting decorative doors or panels, but never use it as the actual shelf board you’ll load with clothes, shoes, or bins. That mistake is incredibly common, and it’s what causes those sagging, crumbling shelves you’ve probably seen.
11. Melamine Shelving for a Sleek, Low-Maintenance Finish
Melamine boards, MDF, or plywood with a factory-applied resin coating are the go-to materials for a clean white finish without painting. The surface resists scratches, wipes down easily, and doesn’t need edge banding on the top face since the coating already protects it.
Cut exposed edges with a fine-tooth blade to minimize chipping, and apply iron-on edge banding to any visible cut edges for a professional finish. Melamine is heavier than raw plywood, so get a helper for installation. For most reach-in closets, a full melamine build runs $80–$150 in materials from a home center.
12. Double-Tier Shoe Shelf at the Closet Base
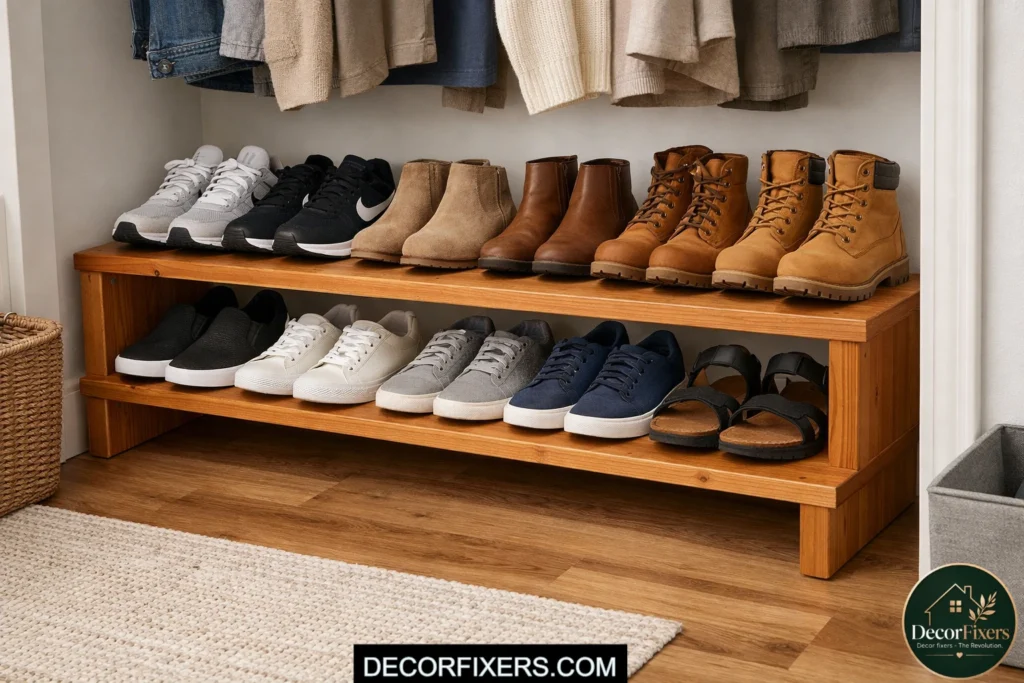
The floor of your closet is prime real estate. Build a simple two-tier angled shoe rack from 1×8 pine boards and dowels, or go flat with two horizontal shelves at 6 inches and 14 inches from the floor. Angled shelves display shoes better and make grabbing a pair faster.
Flat shelves hold more pairs per row and work better for boots, sneakers, and boxy shoes. Either approach is a straightforward beginner build: cut, sand, and nail. No wall attachment required for a freestanding floor unit. Paint or stain to match the rest of your closet system.
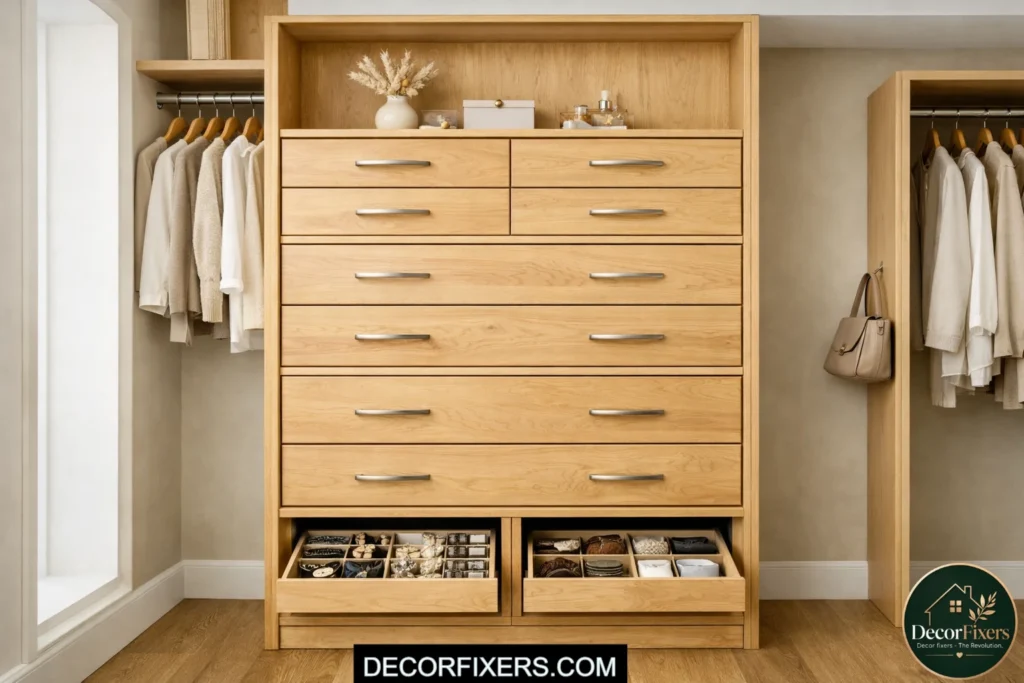
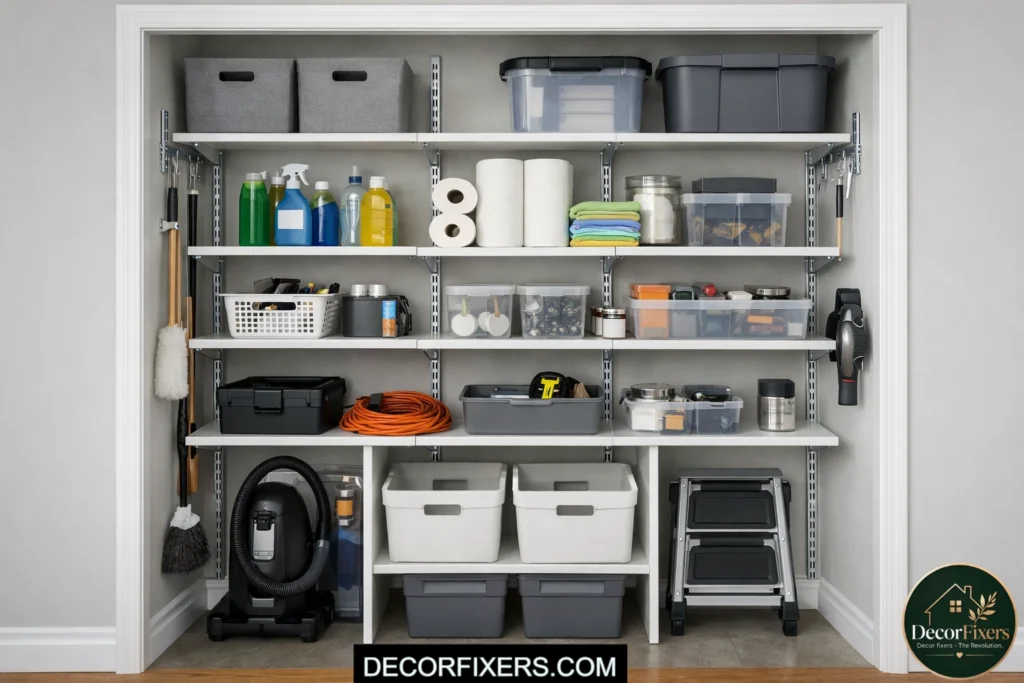
13. Upper Shelf with Two Rows of Storage Bins
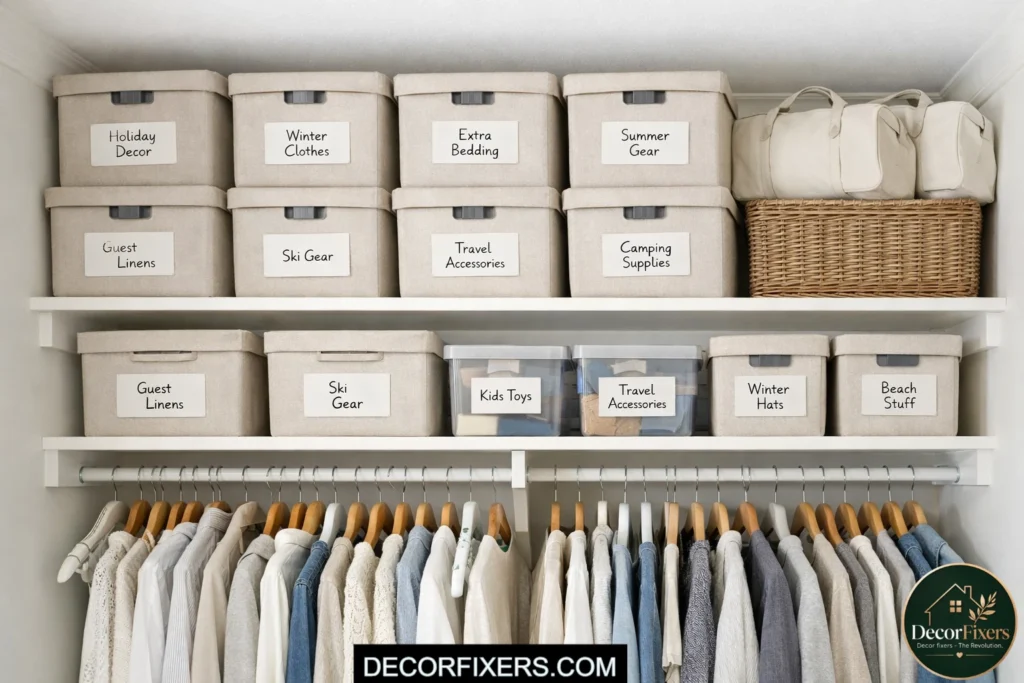
If you’ve got high ceilings, add a second shelf 18–24 inches above your primary top shelf. This spot is ideal for storing seasonal items, holiday decorations, out-of-season clothing, and extra bedding in labeled bins that you access a few times per year.
Build it the same way as your main shelf: cut a board, attach wall cleats to studs, and drop the board on top. The only real consideration here is reaching it safely. A small step stool stowed on the closet floor, or a pull-down attic ladder style rod, handles the access issue cleanly.
Is plywood or MDF better for closet shelves?
Plywood is the better structural choice for closet shelves, especially for spans over 24 inches. MDF sags under sustained weight, swells when exposed to humidity, and doesn’t hold screws well after repeated tightening. For a painted decorative finish on short, lightly loaded shelves, MDF is acceptable, but for anything load-bearing, 3/4-inch plywood is the standard professional choice.
14. Cedar-Lined Shelving for Clothing Protection
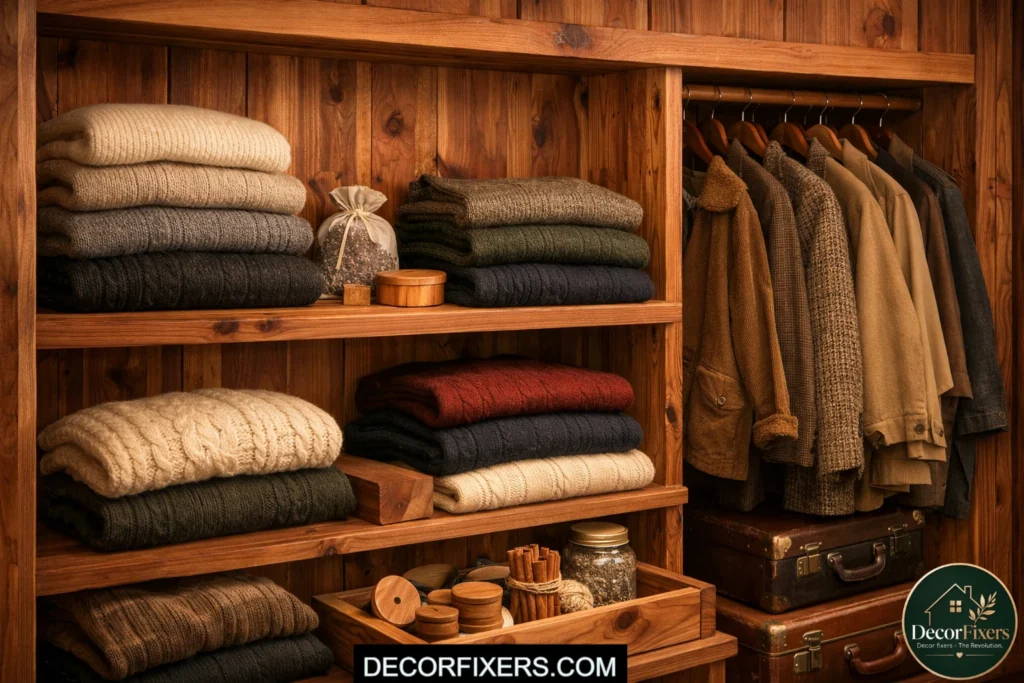
Aromatic red cedar contains natural oils that repel moths, silverfish, and carpet beetles, which is exactly why it’s been used in closets for centuries. The key detail most guides skip: cedar works best as a wall or shelf lining, not as the structural shelf board itself.
Line your closet walls and the underside of shelves with cedar planks, tongue-and-groove cedar panels, or cedar blocks, and build the actual shelves from plywood or solid wood. The scent fades over two to three years but comes back easily with light sanding. This is especially smart for wool sweaters and vintage or delicate fabrics.
15. Tension Rod Dividers for Shelf Organization
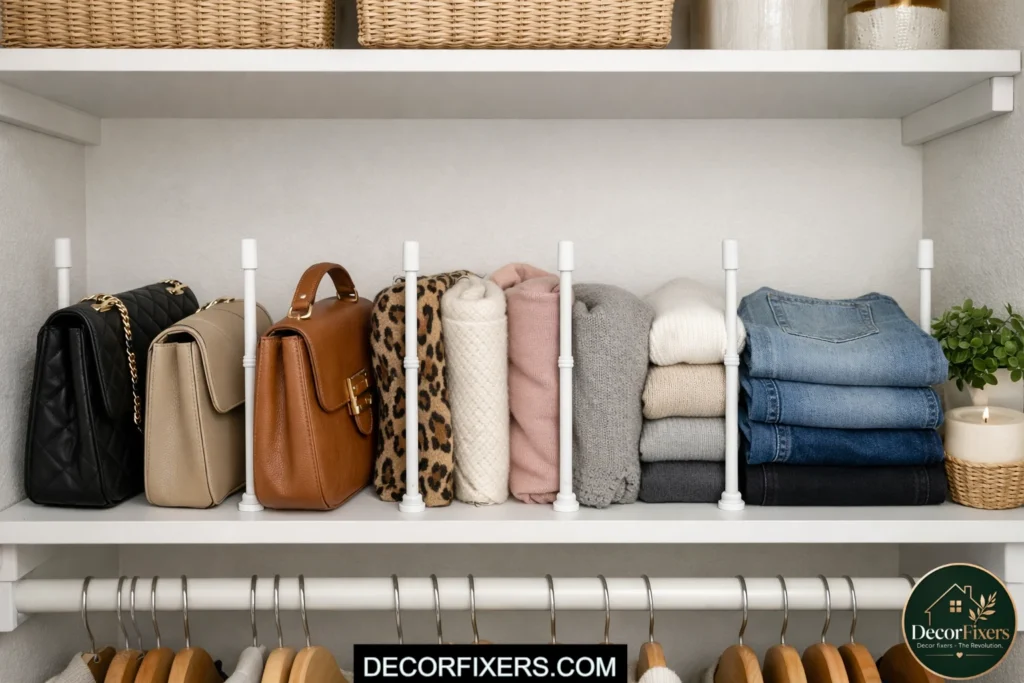
Here’s a genuinely underrated trick: small tension rods mounted vertically between closet shelves act as dividers that keep clutch bags, cluttered purses, and cluttered folded clothing from toppling over. No drilling, no damage, no tools beyond your hands.
Adjust the tension rod to the exact height between your shelves and push it into place. It stays put. For renters especially, this kind of non-invasive solution is worth knowing about. They’re also great inside drawer-height shelves to separate scarves, belts, and accessories.
16. Pocket-Hole Joinery for Stronger Shelf Connections (Kreg Jig Method)
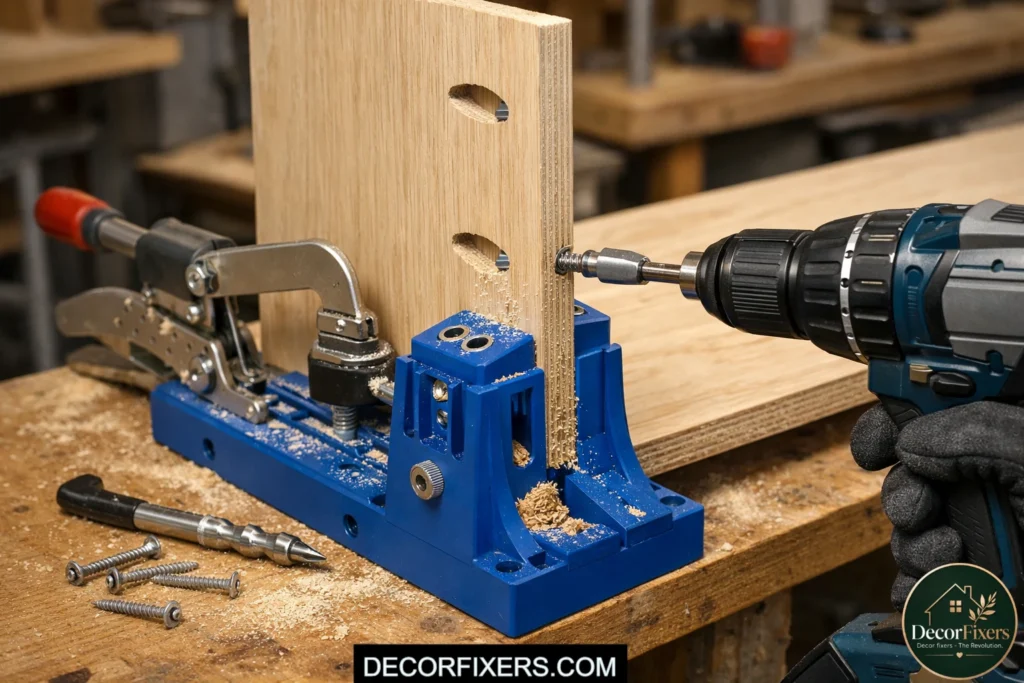
If you want clean wood joints without visible fasteners, the Kreg Jig pocket-hole system is the method. It drills angled holes into your shelf edge that accept special screws, pulling the boards together tightly and invisibly from the outside face.
This matters most when joining vertical shelf towers to horizontal boards, or when building a central support unit between two shelf runs. The Kreg R3 or 320 Jig runs about $35–$50, a one-time cost that improves every wood project you’ll ever build. It’s the single best upgrade for anyone who builds multiple closet systems.
17. Wall Anchors for Studs-Free Closet Installations
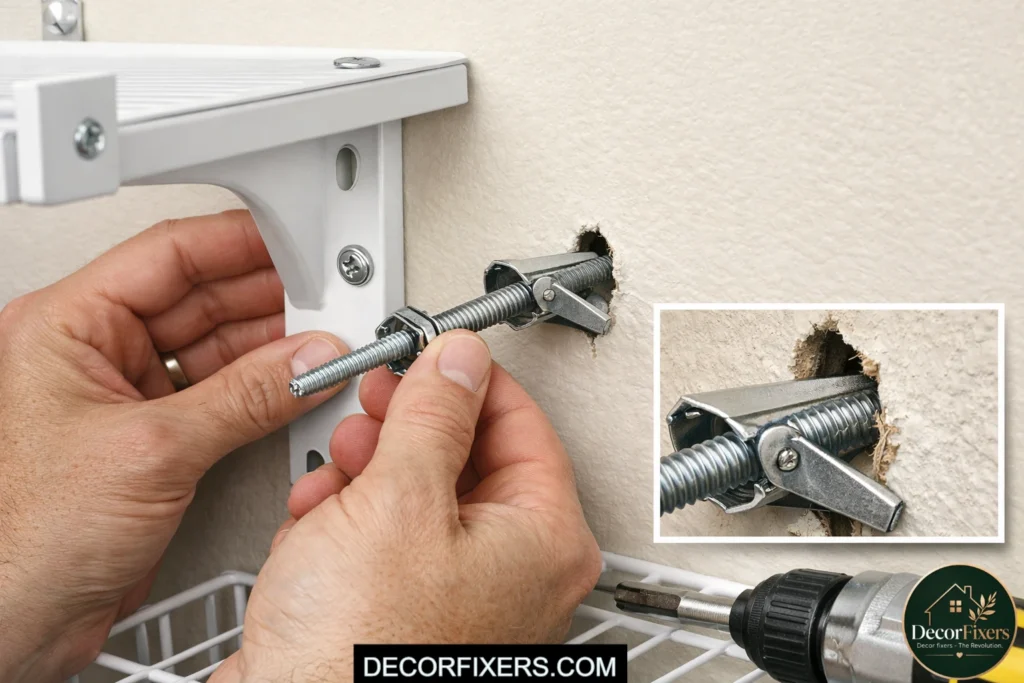
What most guides skip entirely: what to do when your closet wall has no studs where you actually need them. It happens constantly in older homes and in closets built with non-standard framing.
The answer is heavy-duty hollow-wall anchors, specifically toggle bolts (molly bolts) rated for your shelf weight, not the plastic expansion anchors from the bottom bin at the hardware store. A 1/4-inch toggle bolt properly installed into 1/2-inch drywall holds 50+ lbs per fastener. Space them no more than 24 inches apart, and you’re solid. Always check your anchor’s rated load before trusting it.
18. Double Closet Rod with Center Support Bracket
A full-width closet rod without a center support will sag, guaranteed, once you load it with clothes. Any rod span over 48 inches needs a center support bracket mounted to the wall behind it or hanging from the shelf above.
The bracket type matters: a center support that hooks to the shelf above is stronger than one anchored only into drywall mid-span. If your closet is 6 feet wide, one center support at 3 feet is sufficient. An 8-foot closet should have two supports at roughly equal spacing. Most home centers sell these for $5–$8 each, cheap insurance against a rod crash at midnight.
How do I install a closet rod without hitting studs?
Installing a closet rod when studs aren’t where you need them is a common problem. The solution is rated toggle bolts, not plastic expansion anchors, installed into drywall at each rod bracket location. According to the Family Handyman, hollow-wall anchors properly matched to drywall thickness can support significant weight when bracket loads are distributed correctly. Space anchors no wider than 24 inches apart and verify each anchor’s rated capacity matches your expected load before installation.
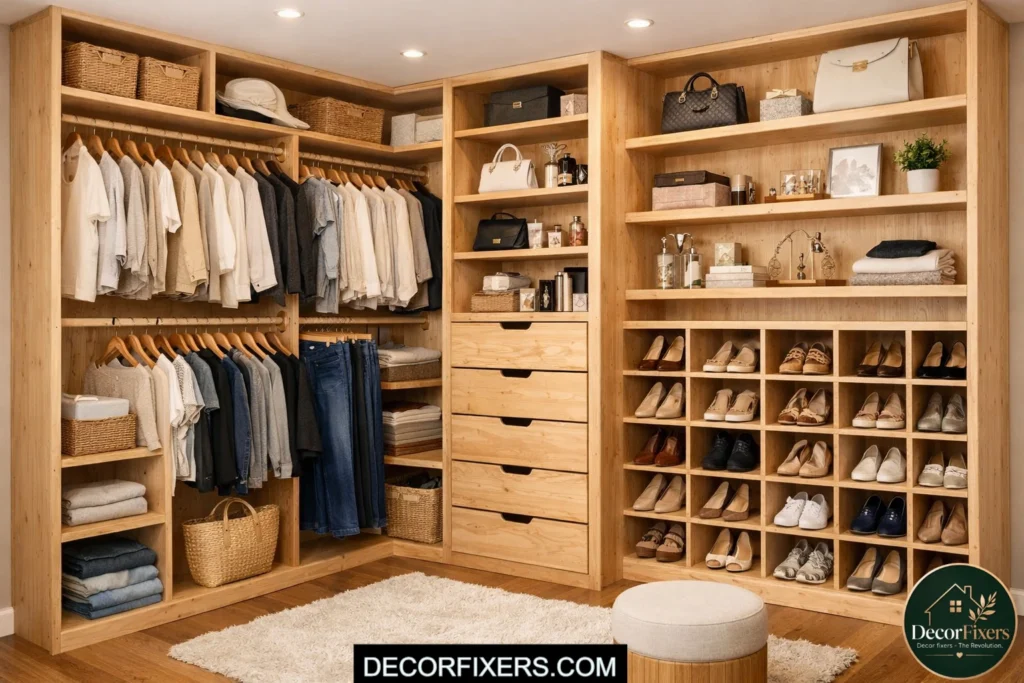
19. Open Cubby System for Shoes, Bags, and Folded Clothes
Cubbies, open square or rectangular boxes stacked or side-by-side, give every item a specific visual home. They’re the simplest way to stop the ‘pile everything on the shelf’ habit because the physical division forces you to organize by category.
Build a basic cubby grid from 3/4-inch plywood with dado slots or pocket-hole joinery at each intersection. Standard cubby size: 12 inches wide × 14 inches tall × 14 inches deep holds most shoe boxes, large folded sweaters, or medium bins. Line a wall with cubbies at floor level, and it replaces a shoe rack, a basket pile, and a bin shelf simultaneously.
20. Adjustable Shelf Standards and Bracket System
Shelf standards are metal tracks screwed into wall studs with brackets that clip in at different heights. They’re not the prettiest option, but they’re practically unbeatable for flexibility; you can raise, lower, or remove any shelf in 30 seconds without touching a screw.
Install tracks into studs 12–16 inches apart for standard shelving loads. Double up with heavy-duty tracks if you’re shelving heavy items like shoe boxes or storage bins. This system is ideal for a shared closet or a growing kid’s room where your storage needs change season to season. Total cost for a standard reach-in: $30–$60 in hardware.
21. Piggyback Shelf Above Existing Wire Shelving
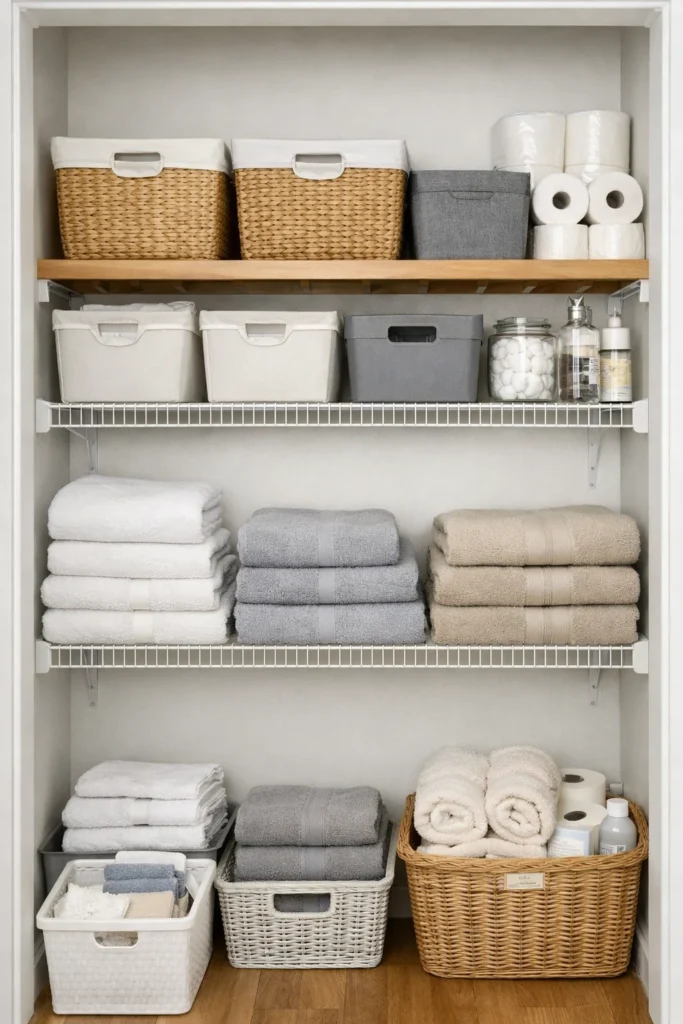
Already have wire shelving that you’d rather not tear out? Add a second shelf directly above it without removing anything. Buy closet shelving material cut to the same length as your existing shelf, attach new wall cleats 18 inches above the current shelf, and drop the board in.
This works especially well in linen closets and pantry closets where vertical space above a single shelf goes completely unused. Two shelves instead of one double your flat storage in an afternoon with no demolition required. It’s one of the fastest ROI upgrades in the closet world.
What is the standard height for a closet rod?
For a single closet rod, the standard height is 60 inches from the floor to the top of the rod, which accommodates dress shirts, jackets, and folded pants on hangers comfortably. For a double-rod setup, the lower rod sits at 40–42 inches and the upper at 80–82 inches. These measurements work for most adults, though lowering the single rod to 54 inches works better for shorter individuals.
22. IKEA PAX-Inspired DIY Build (The Budget Custom Look)
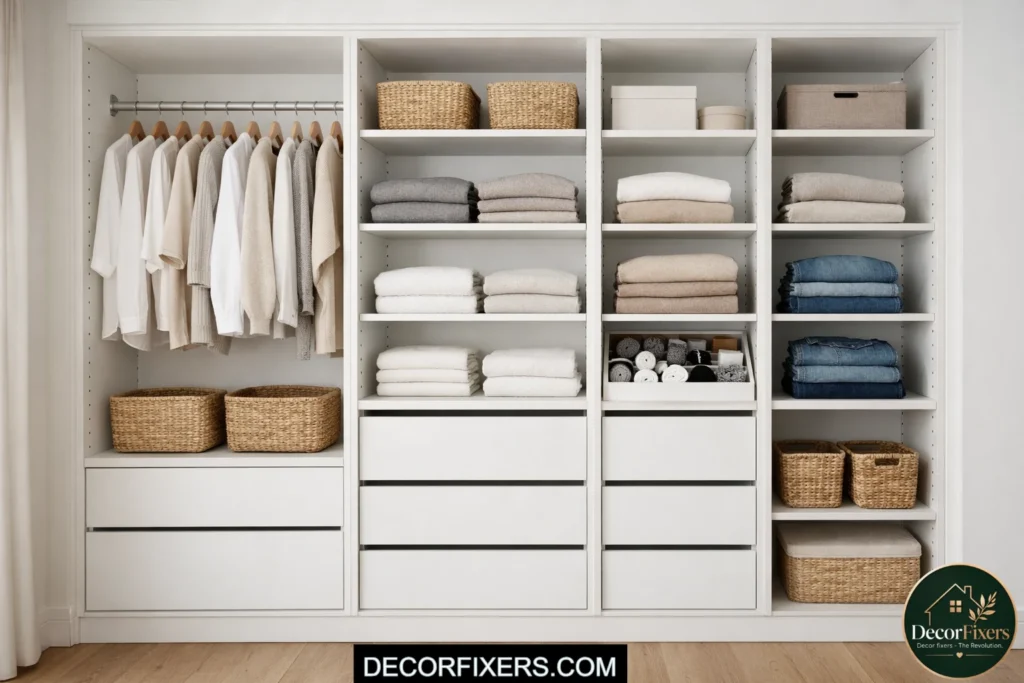
The IKEA PAX wardrobe system is a useful benchmark: a standard 19.75″ × 93″ PAX unit runs $200–$400 depending on shelving and doors. You can build a similar modular system from scratch, two plywood side panels, adjustable shelf holes drilled at 32mm intervals, and a top panel, for $80–$120 in materials.
Look, if you’re in a situation where you want the IKEA look but your closet is a non-standard width or depth, here’s what actually works: build your own panels to fit, drill a row of shelf pin holes at 1-inch intervals down each side, and use simple metal shelf pins. The result is fully adjustable, built-to-fit, and costs less than a single IKEA frame.
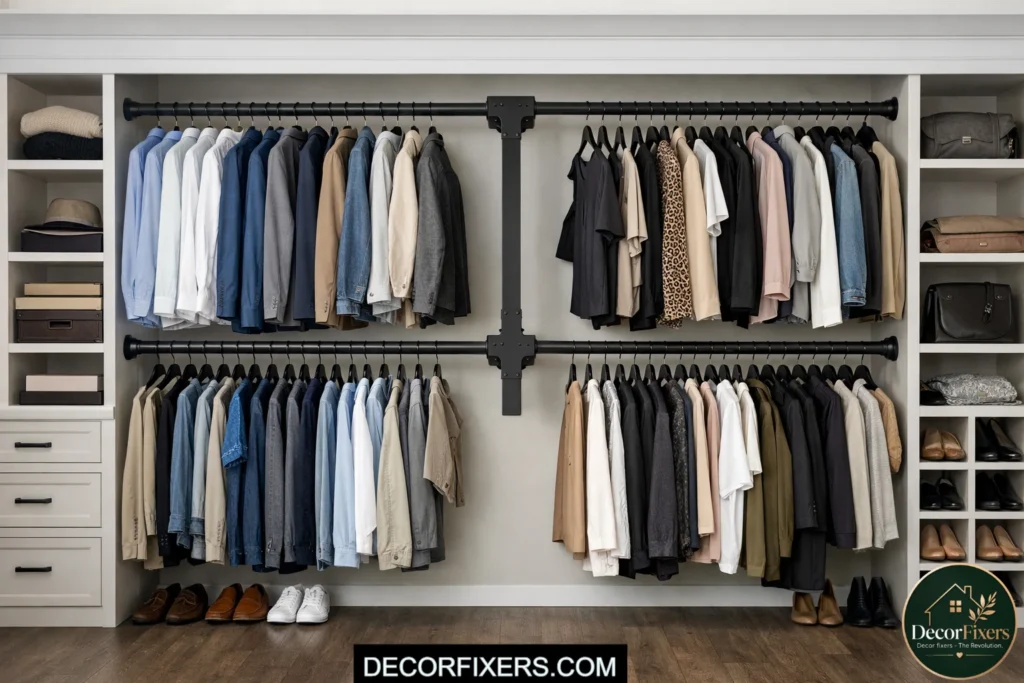
23. DIY Closet Organizer with Hanging Rods on Both Sides
Walk-in closets with walls on both sides beg for a symmetrical layout: hanging rods running the full length of each long wall, with a short-hang zone on one side and long-hang on the other. A center island or floor-level cubby system fills the middle.
Install each wall’s rod at 60 inches for single-hang or 40/80 for double-hang, depending on what you’re storing. For couples sharing a walk-in, divide the space clearly by assigning each wall, which eliminates the ‘whose stuff is where’ problem permanently. The key is measuring the walking clearance between rods on opposite walls: you need at least 36 inches to move comfortably.
24. Nursery or Kids’ Closet with Low Rod and Adjustable Shelves
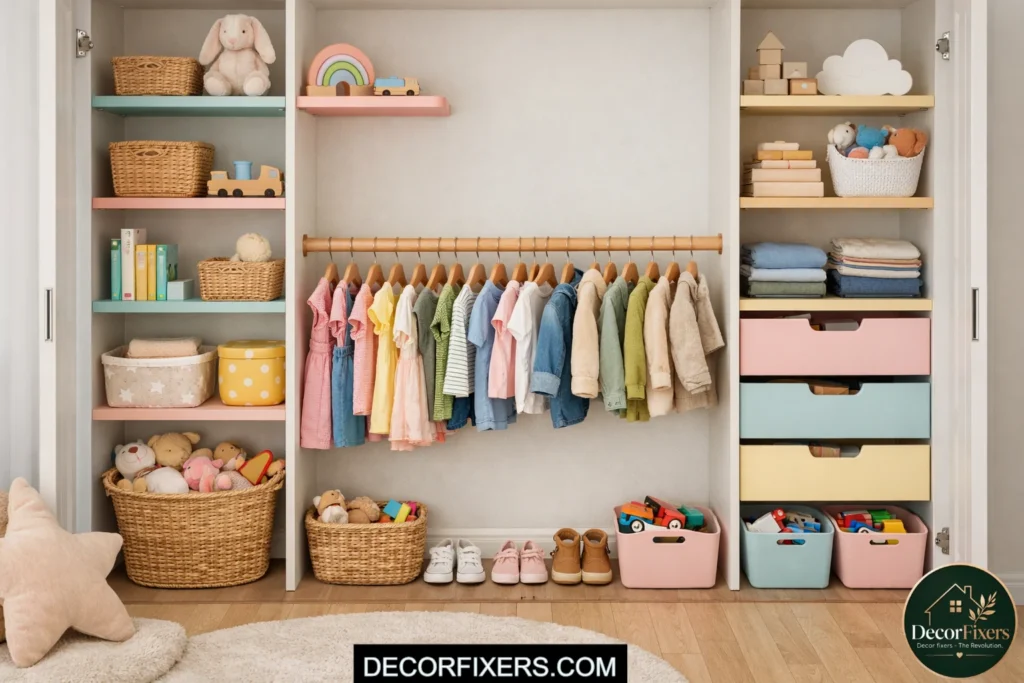
A kid’s closet needs a different approach from an adult’s. Lower the main rod to 36–42 inches so children can hang and grab their own clothes; this is the height that builds the independence habit. Add adjustable shelves above at 6-inch increments so you can raise everything as they grow.
Build the shelf tower from 3/4-inch plywood with routed shelf pin holes, paint it a fun color, and you’ve got a kids’ organizer that adapts for 10+ years. Lower the rod today, raise it at 8, raise it again at 13. One build, zero waste. This approach cost one DIYer roughly $200 for a full nursery closet transformation that would have been $800 from a custom closet company.
25. Complete Custom DIY Closet System Under $200, Full Build
This is the goal: a full closet organizer system with a double-hang zone, a floor-to-ceiling shelf tower, upper floating shelves, and a shoe cubby at the base, all built from 1.5 sheets of 3/4-inch plywood and standard pine trim.
Cut your plywood into two vertical side panels (full floor-to-ceiling height), horizontal shelf boards at your planned depths, and short cleats for wall support. The Kreg Jig handles joinery at the corners. Paint everything before assembly; it’s far easier than painting inside a closet. Then install the assembled sections one at a time, anchor to studs, and add your rods last.
Conclusion
I went back to that blank-walled closet and built a double-hang zone on the left, a floor-to-ceiling shelf tower on the right, and floating shelves above both. Total cost: $163. Time: one full Saturday and two hours Sunday morning. It’s not perfect, one cleat was slightly off-level, and I had to shim it, but it works every single day.
What I want you to take from these 25 DIY closet shelves and rods ideas is this: the difference between a functional closet and a chaotic one isn’t the budget. It’s whether you planned your zones before you drilled the first hole. Decide what you’re hanging, what you’re folding, and what needs to be at eye level, then build around that. Everything else is just wood and screws.
Start small. Even idea #1, a single shelf and rod done right, beats that saggy wire shelf that came with your apartment. Build that first, live with it for a week, then decide if you want to go further.
This guide covers standard reach-in and walk-in closet builds. It does not address custom cabinetry with integrated drawers, closet lighting systems, or retrofitting historic homes with plaster walls, all of which have their own additional considerations.
FAQs:
Q: What’s the best material for DIY closet shelves?
A: 3/4-inch birch or maple plywood is the best all-around choice. It resists sagging, holds screws well, and handles humidity better than MDF. For a painted finish, melamine offers a ready-finished surface that’s scratch and moisture-resistant.
Q: How do I install a closet rod with a shelf above it?
A: Mount your shelf first using cleats or brackets screwed into studs. Then install rod brackets 10–12 inches from the back wall and 1–2 inches below the shelf. Cut your rod to length and drop it into the brackets; no fasteners are needed on most standard rod bracket designs.
Q: Should I use wire or wood shelves in a closet?
A: Wood shelves (plywood or melamine) are better for most closets. Wire shelves are cheaper and renter-friendly, but can dent softer clothing and limit what you can store on them. For a permanent closet build, 3/4-inch plywood with a painted finish outperforms wire in both durability and aesthetics.
Q: Why does my closet rod sag in the middle?
A: A sagging rod means the span between brackets is too long. Any rod over 48 inches wide needs a center support bracket, either wall-mounted or hanging from the shelf above. Install one at the midpoint, and the sag stops immediately.
Q: When should I use a double-hang rod setup?
A: Use double-hang rods when most of your wardrobe consists of shorter garments, dress shirts, blazers, folded pants, kids’ clothing, or anything under 45 inches long. It literally doubles hanging capacity in the same footprint. Skip it only if you regularly hang full-length dresses or long coats that need the single full height.

Creator of DecorFixers, sharing practical home and interior ideas focused on real-life usability, simple design improvements, and budget-friendly solutions.
1 thought on “25 Genius DIY Closet Shelves and Rods Ideas: for Every Budget”