


The first thing I noticed when I walked into my friend’s newly renovated kitchen wasn’t the marble counters or the matte black cabinet pulls. It was the light. The room felt warm, alive, almost restaurant-quality, and she hadn’t done anything dramatic. No chandelier. No exposed Edison bulbs. Just three different types of light, placed intentionally.
I stood there for a full minute trying to figure out what was different. That’s when she said it: “I just did what my designer told me. Stop relying on one light source.”
If your kitchen still runs on a single overhead fixture, you already know the problem. Prep dinner, and half the counter is in shadow. Dim it down for the mood, and suddenly you can’t read the recipe. It’s not the fixture’s fault; it’s the approach.
This guide covers exactly how to fix that. No rewiring required for most of these ideas, no interior design degree, and no budget that would make your accountant cry.
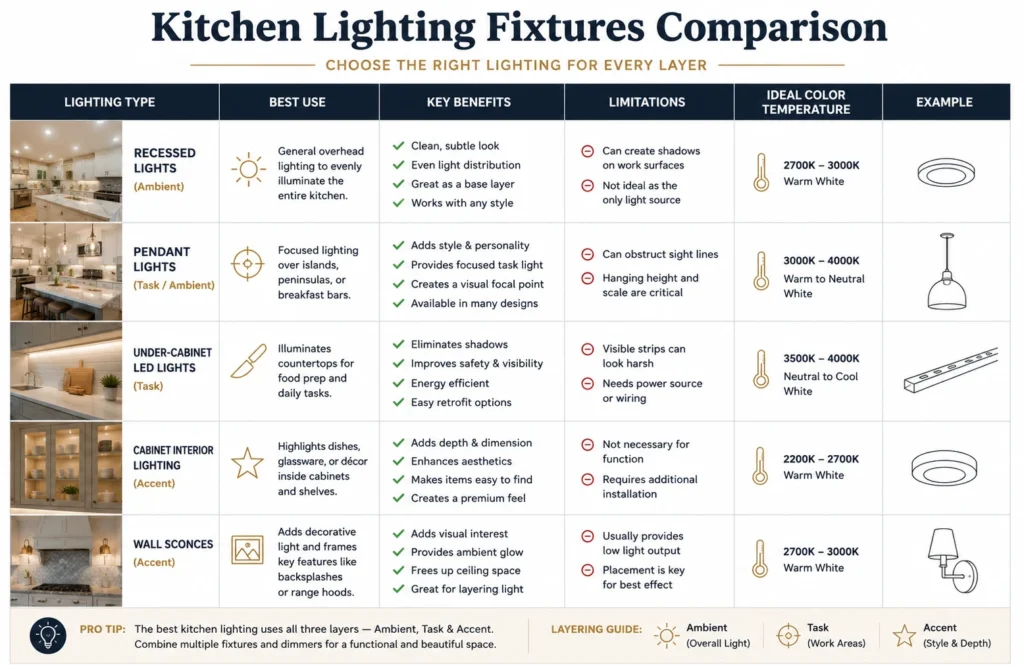
| What is Layered Kitchen Lighting? Layered kitchen lighting is the practice of combining three distinct light types, ambient (general), task (focused), and accent (decorative), at different heights and intensities to create a kitchen that’s both functional and atmospheric. A properly layered kitchen can shift from bright and practical during meal prep to warm and inviting at dinner with nothing more than a dimmer. |
1. Start with Recessed Lighting as Your Ambient Foundation
Recessed lights, also called can lights or downlights, are the skeleton of any good kitchen lighting scheme. They disappear into the ceiling, keep the visual lines clean, and give you an even base layer of light to build on.
Spacing matters more than quantity. Designers typically place them 4 feet apart in a grid, keeping fixtures 2 feet away from any wall. For color temperature, stay in the 2700K–3000K range for a warm, livable glow; anything above 3500K starts feeling like a hospital corridor.
2. Install Under-Cabinet LED Strips for Zero-Shadow Task Lighting
Under-cabinet lighting is the single highest-impact upgrade most kitchens are missing. It puts light exactly where you’re working, the counter, without any glare in your eyes.
For a budget-friendly retrofit, IKEA’s OMLOPP LED strips are a favourite for a reason: they’re plug-in (no electrician needed), dimmable, and sit nearly flush under the cabinet door. For a cleaner wired look, LED channel strips with a diffuser eliminate harsh hot spots. Aim for 4000K here, slightly cooler than your ambient layer, which keeps the contrast purposeful rather than jarring.
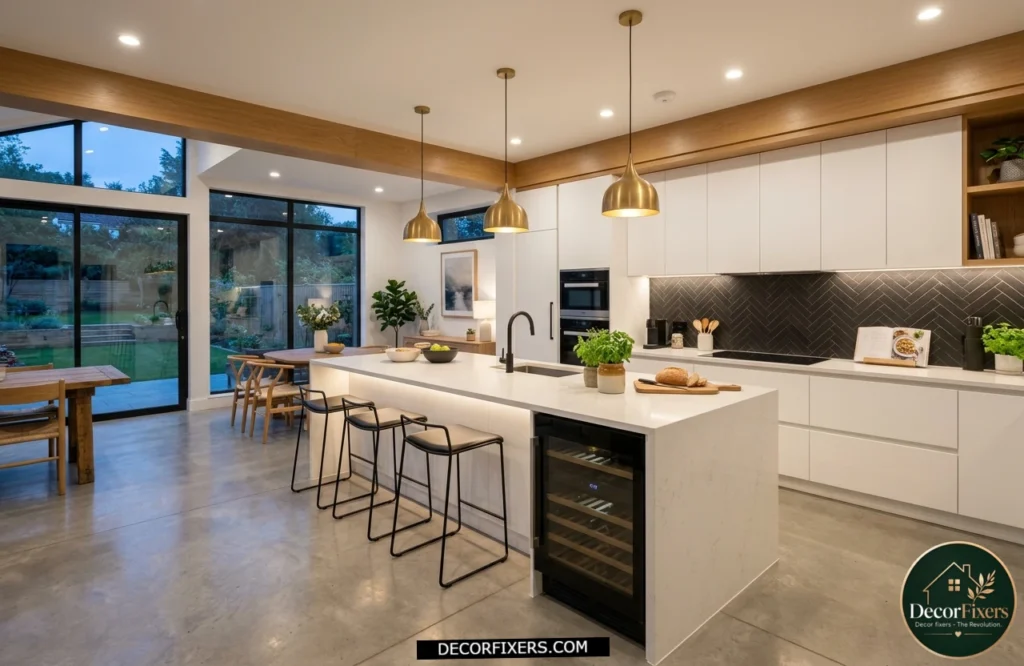
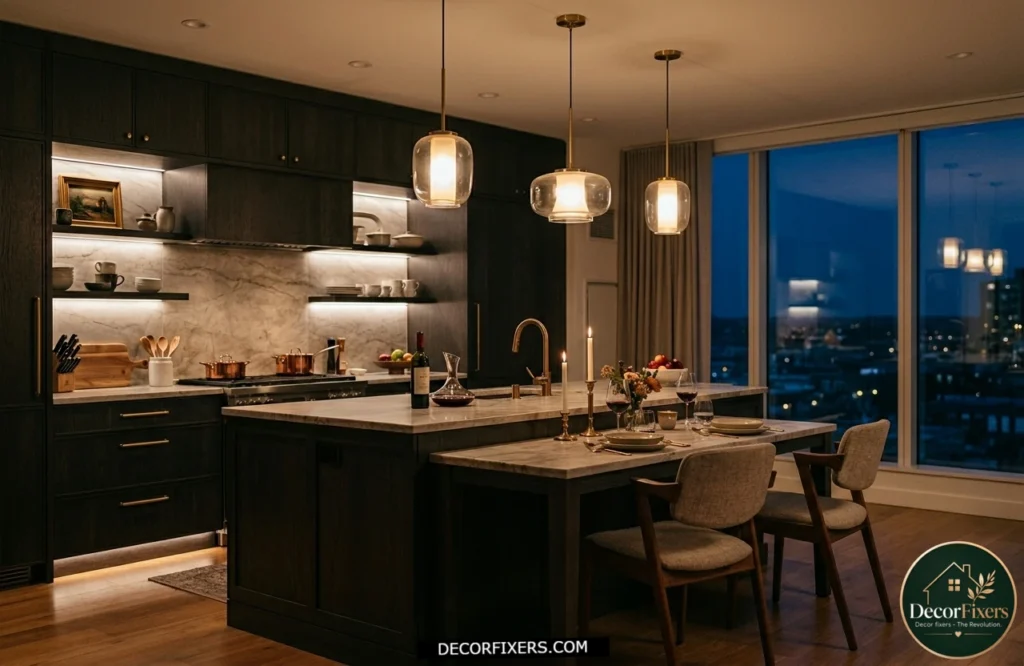
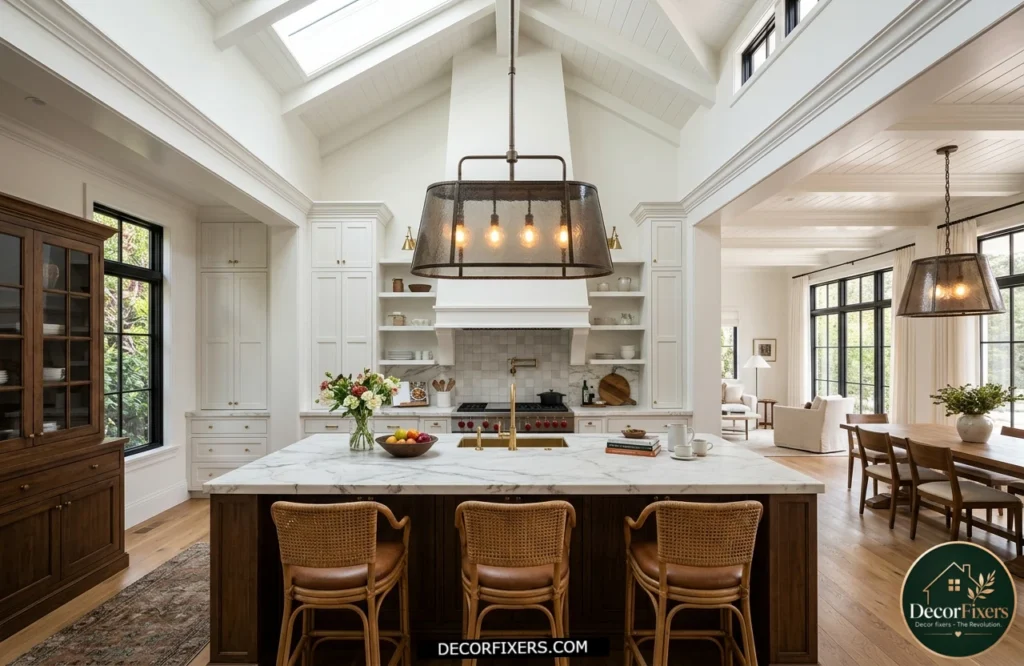
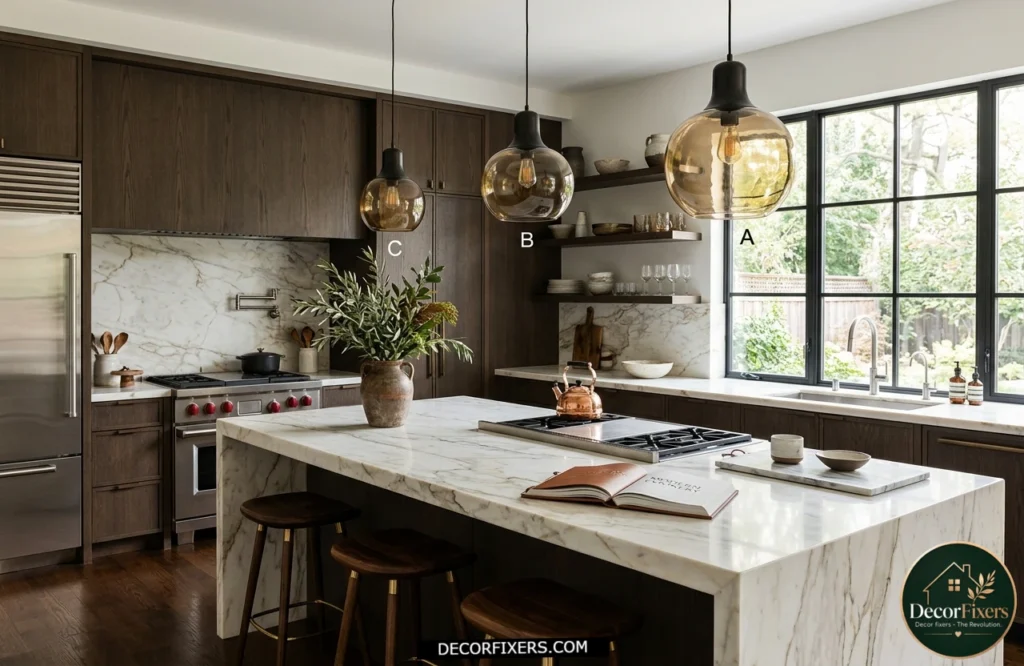
3. Hang Pendant Lights Over the Island, But Get the Scale Right
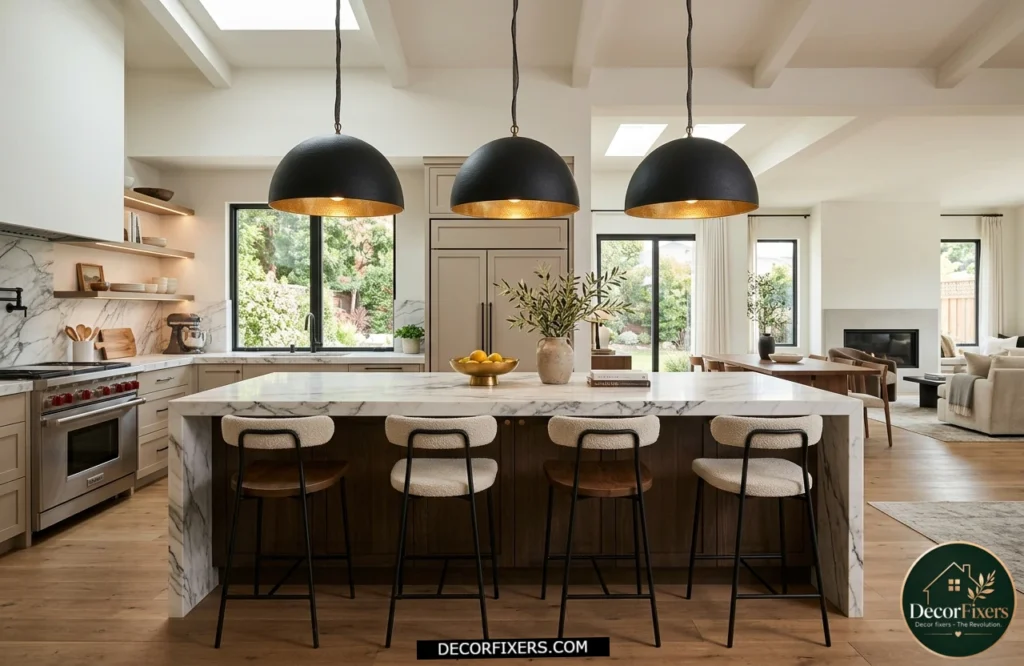
Pendants over a kitchen island are the most visually prominent fixture in the room. Done right, they’re jewellery. Done wrong, they’re the first thing every guest quietly notices.
The designer rule: the bottom of your pendant should hang 30–36 inches above the countertop. For islands longer than 48 inches, two or three pendants spaced evenly always look more intentional than one large one. Interior designer Layton Campbell puts it plainly: “Good design is like a symphony, all the instruments must blend.” Scale is the instrument most people play wrong.
Pendant lighting often becomes the visual centrepiece of the room, especially in homes inspired by Modern Luxury Kitchen Ideas, where lighting is treated as both a functional feature and a design statement.
| Kitchen lighting works best when it combines three layers: ambient light (2700K–3000K, recessed or flush-mount ceiling fixtures) sets the overall brightness, task lighting (3500K–4000K, under-cabinet LEDs and pendant lights) illuminates work surfaces, and accent lighting (adjustable spotlights or LED strips) highlights architectural features. |
4. Add Dimmers to Every Circuit, Not Just One
This is the upgrade most people skip, and it’s the one that makes everything else work. A single overhead light on a dimmer barely changes your kitchen. Every layer on its own dimmer circuit transforms it.
Dimmers let you run your task lights at full power during prep, pull the ambient layer down for dinner, and leave just a low accent glow when the kitchen’s empty. Lutron Caséta smart dimmers work without a neutral wire, making them compatible with older homes that weren’t wired for smart switches. The 2024 Houzz data found dimmer adoption up 4 points year over year. The trend is real, and the reason is simple: people who install them don’t go back.
5. Use Cabinet Interior Lighting to Add Depth and Display
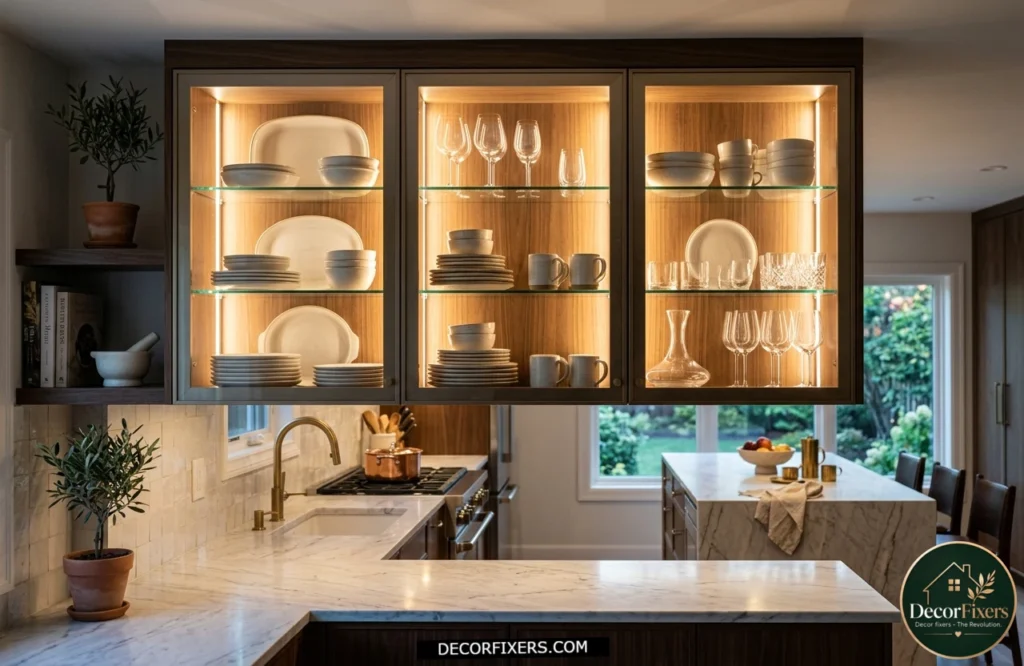
Open shelving and glass-front cabinets beg for interior lighting. A small LED puck or strip inside a cabinet does two things: it highlights whatever you’re storing there, and it adds an unexpected layer of glow that makes the whole kitchen feel larger.
This is an accent layer move. Don’t confuse it with task lighting; you’re not illuminating a work zone, you’re creating a focal point. Warm whites around 2200K–2700K work best for showing off ceramic dishes or glassware without washing everything out.
6. Mount Wall Sconces to Frame Your Backsplash or Range
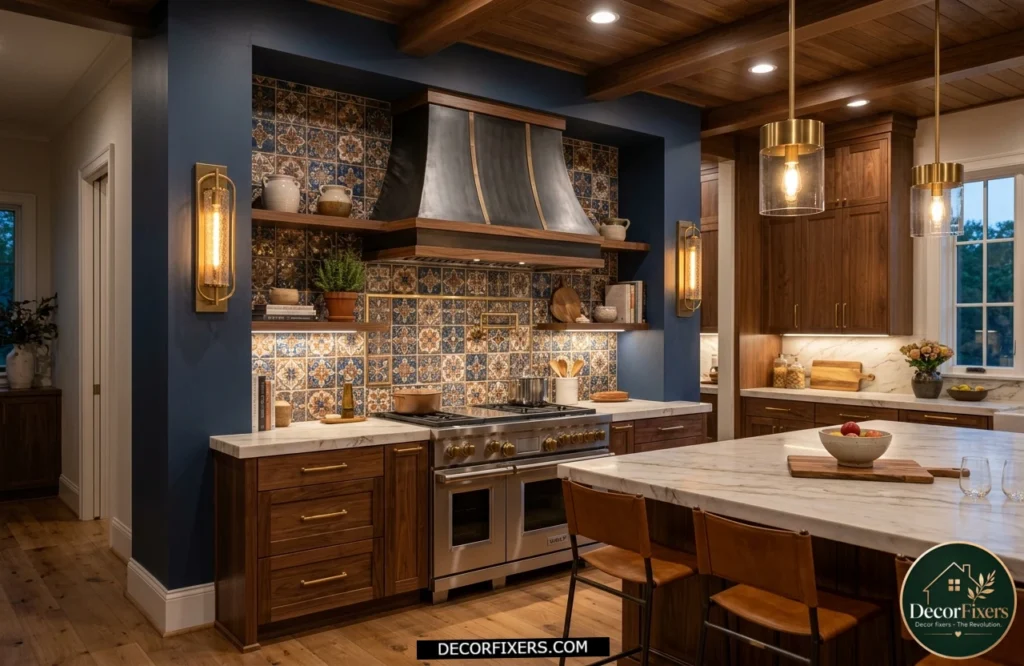
Most kitchens skip sconces entirely. That’s exactly why yours shouldn’t. A pair of small wall sconces flanking a range hood or a decorative tile backsplash creates a framing effect that reads as intentional design, not just illumination.
This layer doesn’t need to be powerful. Its job is to add horizontal light at eye level, which breaks up the top-heavy look that comes from ceiling-only lighting. Plug-in sconces avoid hardwiring and can be repositioned without patching walls.
7. Layer Color Temperatures Intentionally, Don’t Match Everything
Here’s the counter-intuitive insight that most lighting guides skip entirely: mixing color temperatures in the same kitchen is not a mistake, it’s a strategy.
Designers run ambient recessed lights at 2700K–3000K (warm, social), task under-cabinet strips at 3500K–4000K (crisp, functional), and accent cabinet lights at 2200K (warmest, intimate). The slight shift between zones tells the eye what each area is for. It’s the same principle as layering fabrics: you want variation, not uniformity.
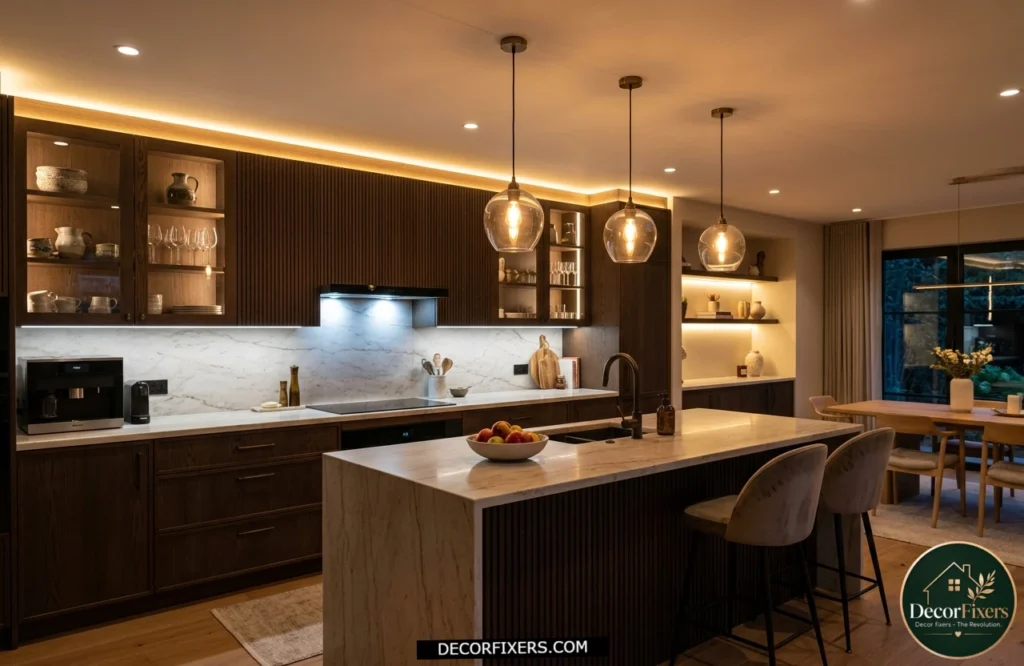
8. Install LED Strip Lighting Above Cabinets for Indirect Uplighting
Above-cabinet LED strips are one of the most underused ideas in residential kitchens. The strip sits on top of the upper cabinets, facing the ceiling, and bounces soft light upward, giving the room a crown of glow that adds height and warmth.
This is an indirect accent layer, and it works especially well in kitchens with high or vaulted ceilings. It costs almost nothing to install (plug-in strips work fine), and the visual effect looks like it cost far more than it did. Use 2200K–2700K to keep the ceiling glow warm rather than clinical.
9. Put a Statement Pendant or Semi-Flush Over the Sink
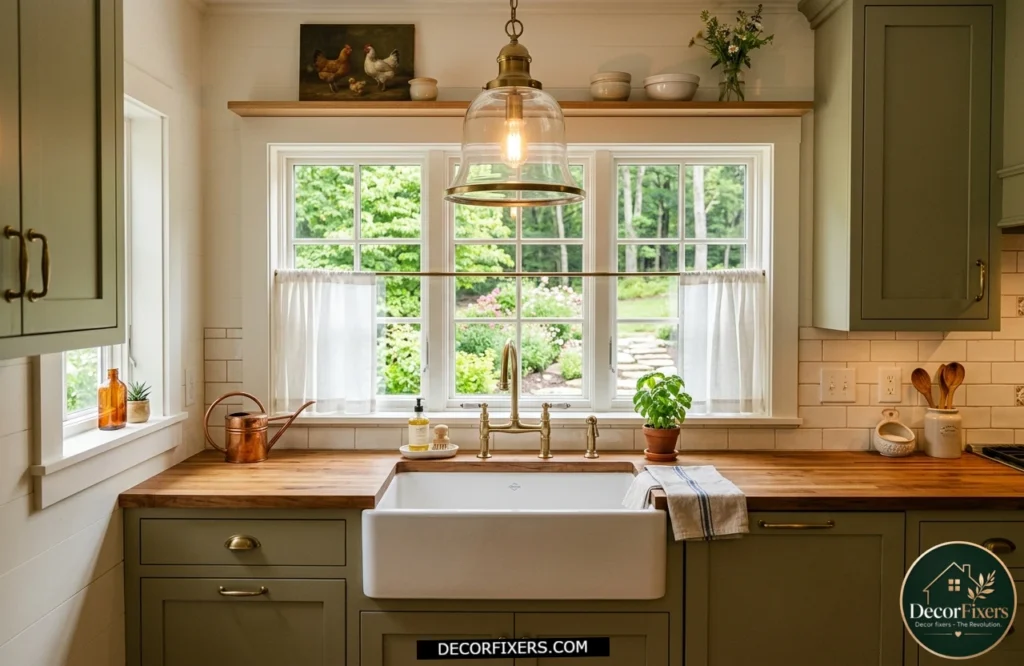
The kitchen sink is a task zone that almost nobody lights properly. A window helps during the day. But at night, or in a windowless kitchen, washing dishes in the shadow of an overhead ambient light is a small daily frustration that’s easy to solve.
A single-statement pendant or a small semi-flush fixture directly over the sink pulls double duty: it adds focused task light where you actually need it and creates a secondary focal point that keeps the eye moving around the room rather than landing only at the island. One of the strongest Modern Kitchen Design Trends is creating multiple focal points throughout the space rather than concentrating all visual interest in a single area.
10. Use Smart Lighting Scenes to Pre-Program Your Layers
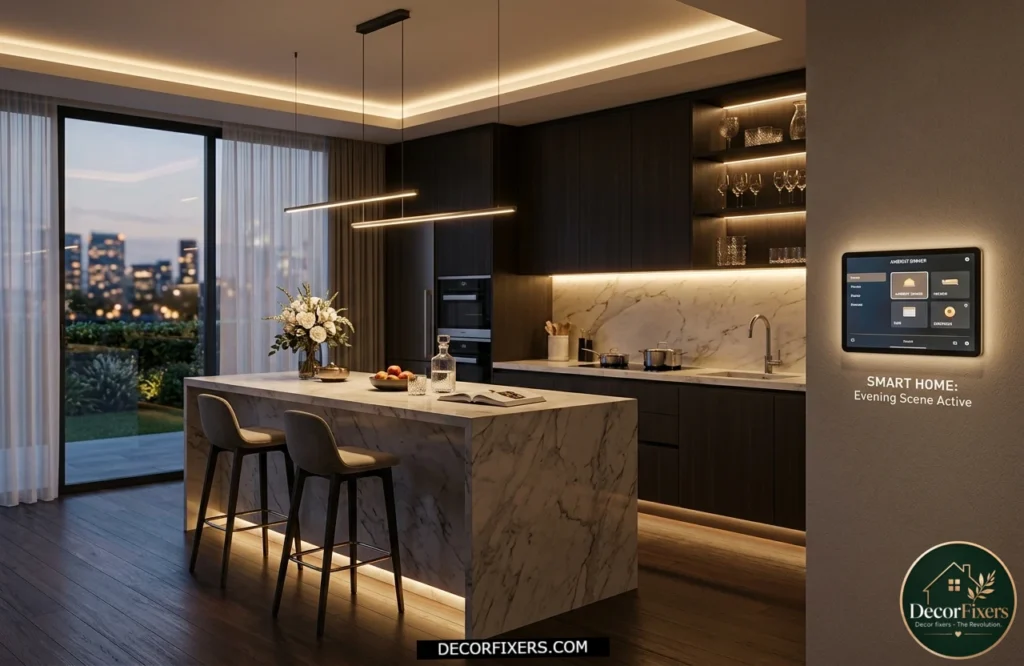
Smart lighting is often marketed as a novelty. Treat it as a precision tool instead. Philips Hue integrates with most recessed, under-cabinet, and strip light setups, letting you save scenes, a bright ‘Cooking’ mode, a dimmed ‘Dinner’ mode, a nearly-off ‘Night’ mode, and switch between them with one tap or a voice command.
Look, if you’re the person who stands in the kitchen adjusting three different switches every evening, here’s what actually works: set up two scenes, give them obvious names, and you’ll use them every single day. The technology isn’t the point. Convenience is.
11. Add a Toe-Kick LED Strip for Night-Light Navigation
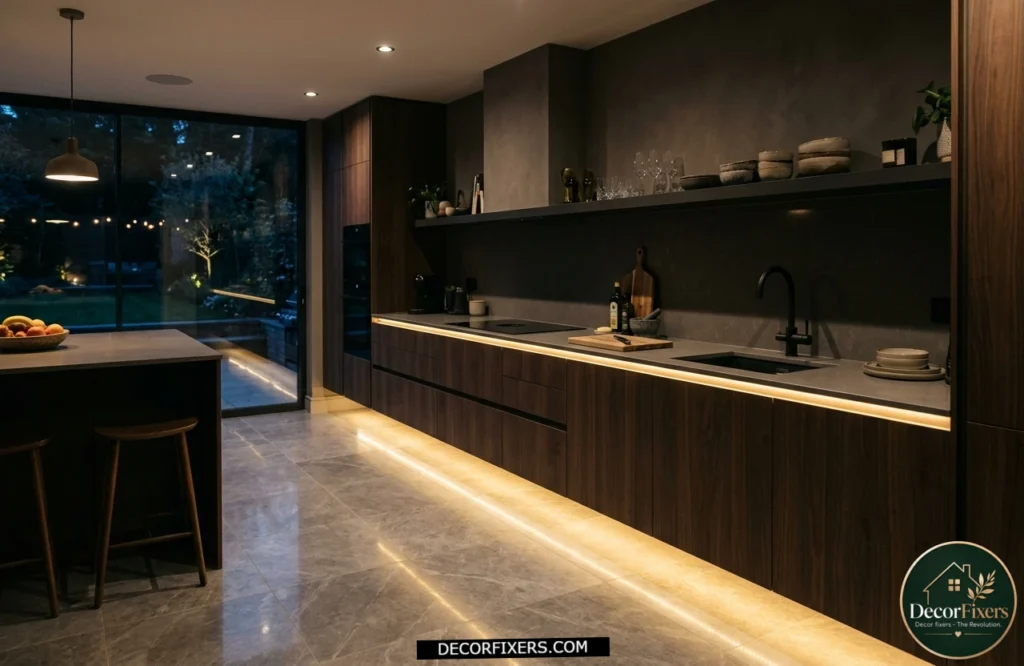
Toe-kick lighting runs along the base of lower cabinets, usually as a low-profile LED strip tucked inside the toe-kick recess. It’s the quietest accent layer in the kitchen, barely visible during the day, deeply useful at 2 a.m.
Beyond practicality, a warm toe-kick strip gives the cabinets a floating effect that looks genuinely high-end. It’s visible in a lot of kitchen design photography for exactly that reason. Motion-sensor strips make this genuinely hands-free; the light comes on as you enter and fades when you leave.
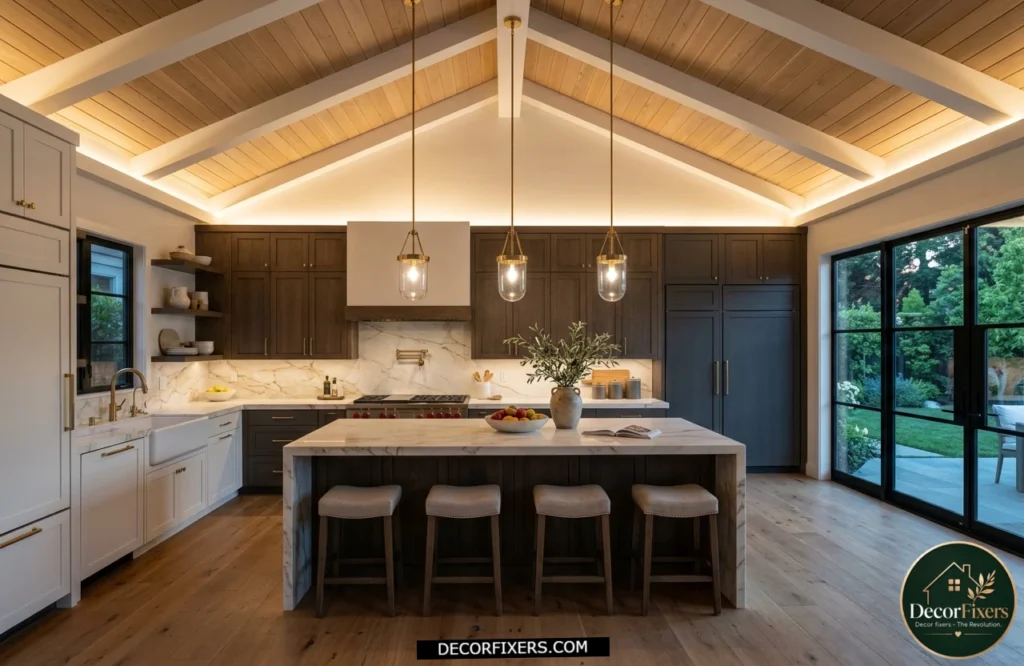
12. Choose the Right Fixture Scale for Your Ceiling Height
A fixture that’s wrong for its ceiling height throws off the entire room. Low ceilings (under 8 feet) need flush-mount or very short-pendant options; anything that drops more than 12–18 inches will make the kitchen feel cramped.
For ceilings above 9 feet, longer pendant drops look more proportional and give you room to make a design statement. The rule of thumb: ceiling height in feet × 2.5 = maximum pendant length in inches. It’s not perfect for every case, but it’ll stop you from the most common mistake, hanging a pendant that’s either too low or looks like it’s floating off the ceiling.
13. Frame Your Kitchen Island with Two Different Fixture Heights
Most island lighting guides recommend matching pendants. That’s safe, clean, and widely done. But designers who work on higher-end projects often mix pendant heights intentionally, one slightly lower for a visual anchor, one slightly higher to frame the space without crowding it.
This creates asymmetry that reads as curated rather than careless. The key is keeping the fixtures within the same visual family (matching metal finish or glass type) so the height difference feels intentional rather than mismatched. Use it as a signal: this is someone who thought about this.
14. Retrofit Without Rewiring: Battery and Plug-In Options for Renters
Here’s what nearly every kitchen lighting article misses: not everyone can rewire. Renters, condo owners, and homeowners in older properties often can’t install hardwired recessed lights or run new circuits for under-cabinet strips.
The retrofit path works. Rechargeable battery-powered puck lights (Mr. Beams or AMIR brands) can be stuck inside cabinets with 3M strips and charged by USB. Plug-in under-cabinet LEDs loop through cabinet interiors to a single outlet. Plug-in pendants with cord covers add a task layer over islands without touching the electrical panel. None of this is a perfect substitute for hardwired systems, but it gets you three-quarters of the way there and costs under $150 total.
15. Don’t Ignore Natural Light, Plan Around It, Not Against It
I’ve seen conflicting approaches here; some designers say to maximize natural light and let it replace your ambient layer during the day; others say to plan your artificial scheme as if the windows don’t exist. My read is that the truth sits between those two positions.
Natural light shifts throughout the day and with the seasons. North-facing kitchens lose it almost entirely in winter. The smart move is to plan your artificial layers as a complete, standalone scheme, one that works perfectly at midnight, and then let natural light supplement it during the day without replacing it. This means avoiding warm-only bulbs on south-facing kitchens (they look washed-out at noon) and being willing to add slightly more ambient fixtures in a north-facing space than you’d otherwise think you need.
This balanced approach works particularly well in Minimalist Kitchen Design Ideas, where thoughtful lighting replaces excessive decoration, helping maintain a clean, uncluttered aesthetic.
Quick Comparison:
Before diving into all 15 ideas, here’s how the main fixture types stack up:
| Fixture Type | Best For | Key Benefit | Limitation |
| Recessed / Can Lights | Ambient base layer | Even a clutter-free ceiling light | Creates flat light alone; shadows on counters |
| Pendant Lights | Island task + focal point | Adds height dimension and style | The wrong scale ruins the whole room |
| Under-Cabinet LED | Counter task lighting | Eliminates chopping shadows at zero glare | Needs an outlet or hardwiring to look clean |
| Cabinet Interior Lighting | Accent/display | Shows off dishes, adds depth | Purely decorative; minimal task value |
| Wall Sconces / Picture Lights | Accent + mood | Frames, backsplash, or art beautifully | Requires wall outlet or conduit planning |
| How to Layer Kitchen Lighting: Step-by-Step 1. Map your ceiling, mark positions for recessed ambient lights in a 4-foot grid, 2 feet from walls. 2. Identify task zones, counter, island, sink, and stovetop. Each needs its own dedicated fixture. 3. Install dimmers, one circuit per layer minimum. 4. Add under-cabinet LED strips at 3500K–4000K for shadow-free counter work. 5. Choose pendant fixtures for the island; hang them 30–36 inches above counter level. 6. Layer accent lighting last, above cabinets, inside glass cabinets, or at toe-kicks. |
What Most Guides Get Wrong (And What Designers Actually Do Differently)
Some experts argue that a single, oversized statement pendant over the island is all a kitchen really needs, that simplicity is always more elegant than a layered scheme. That’s valid for a very specific scenario: an open-plan kitchen in a well-lit apartment where natural light does most of the heavy lifting and cooking is minimal.
But if you’re dealing with a contained kitchen where you actually cook, that one-fixture approach leaves you fighting shadows every single evening.
What most guides skip: the practical spec level. They’ll tell you to ‘add task lighting’ without telling you that under-counter strips need at least 250–400 lumens per linear foot to actually eliminate counter shadows, or that a pendant that’s the right visual size may not deliver enough lumens for a 48-inch island without supplementary recessed lighting above it.
| The best kitchen lighting setup combines recessed ambient lights (spaced 4 feet apart, 2700K–3000K), under-cabinet LED task lighting (3500K–4000K, 250–400 lumens per linear foot), and accent layers like above-cabinet LED strips or cabinet interior lights (2200K–2700K). Each layer should be on a separate dimmer circuit. |
CONCLUSION:
A few months after that visit to my friend’s kitchen, I finally updated my own. I didn’t knock down walls. I spent about four evenings and a reasonable amount of money.
I added under-cabinet strips first. The difference on the first night was embarrassingly obvious. I’d been prepping food in my own shadow for years and didn’t realize it. Then a dimmer on the ceiling circuit. Then two pendants over the island that I’d been putting off because I couldn’t decide on a style.
The finished kitchen isn’t dramatic. It doesn’t look like a design magazine spread. But at 7 p.m., when dinner’s going, the ambient layer is low, the task lights are doing their job, and the room genuinely feels good to be in.
That’s the goal. Not impressive. Just right.
Start with one layer. Pick whichever one will immediately fix your biggest frustration. The rest will follow naturally once you’ve seen what a real lighting change actually does to a room.
For further reading on the data behind kitchen renovation trends, see the 2024 U.S. Houzz Kitchen Trends Study, the most comprehensive annual survey of U.S. homeowners on kitchen design choices.
FAQs:
Q: What’s the best lighting for a kitchen island?
A: Two or three pendant lights hung 30–36 inches above the countertop, spaced evenly. Match the metal finish to your hardware. Add recessed lights directly above the island for a backup task light.
Q: How do I add under-cabinet lighting without an electrician?
A: Use plug-in LED strip lights like IKEA OMLOPP or rechargeable puck lights. Feed the cord inside the cabinet to a rear outlet. No hardwiring, no permits, and it looks clean.
Q: Should kitchen lights be warm or cool white?
A: Use warm white (2700K–3000K) for ambient and accent layers, and slightly cooler (3500K–4000K) for task zones like counters. The difference helps your eye distinguish work areas from living areas.
Q: Why does my kitchen still feel dark after adding new lights?
A: You’re likely adding more ambient light when the real problem is a missing task light. Counters need direct, close-range illumination; overhead fixtures, regardless of wattage, always create shadows on work surfaces.
Q: When should I hire a designer for kitchen lighting?
A: If you’re doing a full renovation, installing more than four new circuits, or working with an unusual layout (vaulted ceilings, no window, open-plan), a lighting designer pays for themselves in avoided mistakes.

Creator of DecorFixers, sharing practical home and interior ideas focused on real-life usability, simple design improvements, and budget-friendly solutions.